Advertisement
Quick Links
Advertisement

Related Manuals for WTC DEP 300s


Summary of Contents for WTC DEP 300s
- Page 1 USER MANUAL DEP 300s - Q06905 Weld Control Communications...
- Page 2 TABLE OF CONTENTS Regarding this Documentation..........2 Revision History ..............2 Languages Available..............2 Symbols Used in this Documentation........3 Common Techniques Used in this Manual ......4 WTC Support - Industrial Technical services [ITS]....4 Working with Static-Sensitive Devices.........5 Chapter 1: Overview............9 DEP 300s................9 Physical Connections ............11 Keypad layout..............12...
- Page 3 Level 1. 2: Review Stepper Menu ........63 level 1. 3 Review Setups Menu ...........69 level 2.1 Review HIC Menu ..........70 level 2.2 EIP Options Menu ..........70 level 2.3 Welder ID Menu ..........78 Level 2.4 Reload Options Menu.........79 Breaker Type ...............83 Level 3.
- Page 4 M035030_V2.1-Q06905-12/2016 1 of 8...
- Page 5 M035030_V2.1-Q06905-12/2016 REGARDING THIS DOCUMENTATION This documentation is written to support the DEP 300s hand-held data entry panel with software Q06905-23 It has been designed for planning, programming, start-up personnel, operators, service technicians, plant operators, line builders and maintenance personnel to assist with procedures related to installing the weld control.
- Page 6 This symbol draws attention to specific instructions or product features. This symbol indicates that only WTC service personnel or WTC repair partners should service or open this device. Breaking a warranty seal will void the warranty of this device.
- Page 7 Italic type is used for emphasis. WTC SUPPORT - INDUSTRIAL TECHNICAL SERVICES [ITS] WTC tests all of our products to ensure that they are fully operational when shipped from the manufacturing facility. If you are experiencing installation or startup problems, please review the troubleshooting information contained in this publication.
- Page 8 A static-safe workstation must include a grounded ESD mat, wrist strap and cord. The measured static voltage at a workstation MUST NOT exceed 50 volts. For detailed information about ESD contact: WTC Industrial Technical Services Phone: +1 248-477-3900 | Fax: +1 248-477-8897 Email: service@weldtechcorp.com Website: www.weldtechcorp.com...
- Page 9 M035030_V2.1-Q06905-12/2016 For technical support, contact WTC's Industrial Technical Services department. Please have the following information available: Your Contact Information: • Company Name • Phone Number • Fax Number • Email Address Weld Control Part Number and Serial Number • Located on the serial tag on the outside of the cabinet...
- Page 10 M035030_V2.1-Q06905-12/2016 NOTES: 7 of 8...
- Page 11 M035030_V2.1-Q06905-12/2016 8 of 8...
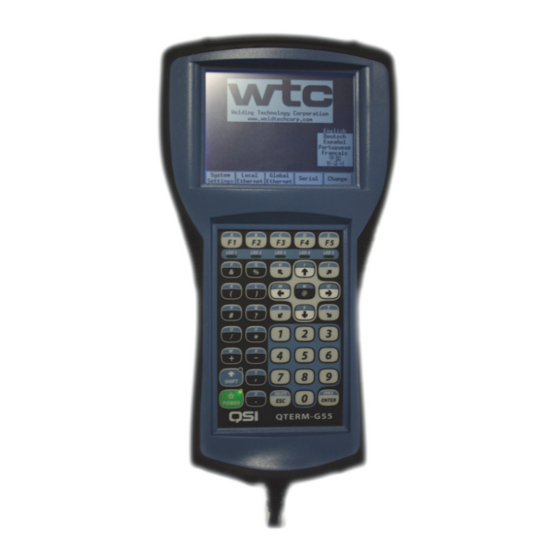
- Page 12 Chapter 1: OVERVIEW DEP 300 The WTC DEP-300s Data Entry Panel is a portable, hand-held, programming device, used to communicate with WTC weld timers through an EtherNet IP network. It can communicate with up to 30 WTC weld controls through the network.
- Page 13 I/O Mapping and Status Each weld control functions independently. The data displayed by the DEP 300s for each device varies, based on the software and features. NOTE: Example LCD display images are used in this manual to provide instruction in the use of the DEP-300s. Actual features and...
- Page 14 M035030-V2.0-Q06905/07-2017 PHYSICAL CONNECTIONS ON THE WELD TIMER Serial Port EtherNet Port DEP PORT ON THE CONTROL DOOR 11 of 18...
- Page 15 M035030-V2.0-Q06905/07-2017 KEYPAD LAYOUT THE FOLLOWING DESCRIBES THE KEY FUNCTIONS OF THE DEP- 300S: POWER KEY This key turns the LCD display either ON or OFF. It does not reboot or recycle power to the DEP. The green LED is illuminated when the LCD display is on.
- Page 16 M035030-V2.0-Q06905/07-2017 EXAMPLE 1: In the Home Menu above, there are five functions displayed at the bottom of the menu. The user can select any of these five functions by pressing the corresponding function key located on the top row of the keypad.
- Page 17 M035030-V2.0-Q06905/07-2017 CURSOR MOVEMENT KEYS The directional arrows keys are used to both move the cursor and scroll through displays UP, DOWN, LEFT, RIGHT: These keys move the cursor within data fields on the display. UP-RIGHT, DOWN-RIGHT: These keys scroll up or down through pages on the display.
- Page 18 M035030-V2.0-Q06905/07-2017 ENTER KEY This key places a new parameter into the DEP300s memory. The parameter is not changed in the weld timer until it is downloaded. NOTE: Before pressing the enter key, ensure the key is OFF (indicated by the unlit green LED).
- Page 19 M035030-V2.0-Q06905/07-2017 NEGATIVE KEY This key is used when a negative number is required in a particular field. HOT KEYS The following Hot Keys allow the user one-touch, quick access to commonly viewed menus in the DEP-300s. Once the DEP is connected to a weld timer, the Hot Keys can be used from any menu: NOTE: Do not press the key prior to pressing the Hot Keys.
- Page 20 M035030-V2.0-Q06905/07-2017 LCD DISPLAY During normal keypad input activity, the back-light to the LCD display is ON. During extended periods of inactivity, the display will go into one of the following three inactivity modes: MODE DISPLAY BACK-LIGHT DIM After 10 minutes of inactivity, the back-light will dim. SCREEN SAVER After 20 minutes of inactivity, the display will “blank”...
- Page 21 M035030-V2.0-Q06905/07-2017 18 of 18...
- Page 22 M035030-V2.0-Q06905/07-2017 Chapter 2: HOME MENU View and edit Select the network Connect to Change the DEP language the DEP method through the weld system which the DEP will control via preferences settings connect to a weld the serial control network Upon power-up of the DEP-300s, the Home Menu is displayed.
- Page 23 M035030-V2.0-Q06905/07-2017 1. SYSTEM SETTINGS When the System Settings key is pressed in the Home Menu, the following screen is displayed: SYSTEM SETTINGS DEP FIRMWARE & REV. DATE (Fixed and cannot be changed) FUNCTIONS MENU SYSTEM SETTINGS: This screen allows the user to view and edit the following: MAC ADDRESS: This address is a fixed value and cannot be changed. IP ADDRESS: This line shows the unique IP address of the DEP. SUBNET ADDRESS: This line displays the Subnet information the DEP is connected over. GATEWAY ADDRESS: Field for the Gateway Address. DHCP: Set to OFF by default. If DHCP is ON, and you plan to program an address, change the value to OFF. NOTE: To change the settings of the IP Address, Subnet Address and Gateway Address refer to the procedures on page 22. Connect to the weld control via the serial network 20 of 40...
- Page 24 M035030-V2.0-Q06905/07-2017 FUNCTIONS MENU: Home: returns the user back to the Home Menu. Download/Reboot: After editing the System Settings, this key allows the user to save the changes to DEP memory and then reboot the DEP for the changes to take effect. Flash DEP: allows the user to flash the DEP. This is typically only used during special maintenance operations. (See procedure on page 131) Backup/Restore: allows the user to back‐up weld timer schedules, stepper settings, setup settings and other information to DEP flash memory. For more information, see “Backup / Restore” on page 23. 21 of 40 Connect to the weld control via the serial network...
- Page 25 M035030-V2.0-Q06905/07-2017 2. NETWORK CONNECTIONS CHANGING THE IP ADDRESS, SUBNET ADDRESS OR GATEWAY ADDRESS: Press to navigate to line that will be edited. Press numeric keys 0‐9 to enter the new value. Press to save the change or the key to cancel the change. Repeat the process for any additional fields to be edited. NOTE: After a new numeric value has been entered, the cursor can not be moved off the field until either Enter or ESC has been pressed. After the changes have been made, press the DOWNLOAD/ REBOOT key to flash the changes to the DEP and for the altered address to take effect. The changes will not be saved unless the DEP is re-booted by pressing the DOWNLOAD/REBOOT [F2] key.
- Page 26 M035030-V2.0-Q06905/07-2017 BACKUP / RESTORE The Backup / Restore feature allows the user to transfer data files between weld timers. The DEP-300s is capable of uploading and storing three weld timer programs in flash memory and then restoring (downloading) them into other weld timers. NOTE: In order to transfer data from one weld timer to another, both weld timers must have the same firmware program and revision numbers.
- Page 27 M035030-V2.0-Q06905/07-2017 CREATING A BACKUP: To backup data from a weld timer, follow the procedure below. Connect the DEP-300s into the weld timer's RS-485 serial communications port. For instructions on how to connect the DEP- 300s to a weld timer for Serial network communications, see “Physical Connections”...
- Page 28 M035030-V2.0-Q06905/07-2017 In the Backup / Restore Menu, press to display the drop- down menu and then using the arrow keys, select the desired Memory location (1-3) then press NOTE: If a memory location is selected, which already has a data file stored in it, the old data file will be permanently deleted when the backup process begins.
- Page 29 M035030-V2.0-Q06905/07-2017 PAGE 1 - STANDARD: By default all 4 standard parameters are selected. To deselect a field, using the movement keys navigate to the parameter not required for backup and press to uncheck the field. Press to initiate the Backup. ...
- Page 30 M035030-V2.0-Q06905/07-2017 PAGE 2 - FIELDBUS: The FieldBus I/O and configuration parameters can be individually selected for back up. Using the movement keys navigate to desired field and press to select. Press initiate the Backup. If the DEP successfully connects to the weld timer, the backup sequence will begin automatically.
- Page 31 Notice that the Memory field will now display “Empty” to indicate that the previous data has been erased. NOTE: The DEP 300s does NOT Backup/Restore RAFT™ data. Connect to the weld control via the serial network 28 of 40...
- Page 32 M035030-V2.0-Q06905/07-2017 NETWORK COMMUNICATIONS The DEP-300s can connect to a weld timer via three separate networks: Local EtherNet, Global EtherNet and Serial Network. LOCAL ETHERNET (F2) In the Local EtherNet mode, the DEP is programmed to communicate directly with the “local” weld timer that it is physically connected to. In this mode, the DEP will only communicate to a local timer with an IP Address of 89.89.200.250.
- Page 33 M035030-V2.0-Q06905/07-2017 Upon completion of the upload, the Mode Selection Menu will appear, indicating that a connection to the weld timer has been established. When the HOME [F1] key is pressed from the Mode Selection Menu, the following message will appear: “Returning to Home Menu will close communications to the timer Please Confirm”.
- Page 34 M035030-V2.0-Q06905/07-2017 When CONFIRM [F1] is pressed, the communication between the DEP and the weld timer is closed, the DEP changes its Local IP Address back to the previous setting and the DEP returns to the Home Menu. GLOBAL ETHERNET (F3) In the Global EtherNet mode, the DEP-300s is capable of communicating with multiple weld timers on an EtherNet IP network.
- Page 35 M035030-V2.0-Q06905/07-2017 METHOD 1: The DEP 300s sends out a special command to all the devices within the Subnet Mask, which effectively is a request for all WTC weld timers to report to the DEP and confirm they are active and identify their IP Address.
- Page 36 M035030-V2.0-Q06905/07-2017 When the scan is complete, a list of all the active weld timers will appear, identified by their IP Address and Welder ID. Press keys to navigate the cursor to the desired weld control and press The DEP-300s will attempt to connect to the selected weld timer and “Upload in Progress”...
- Page 37 M035030-V2.0-Q06905/07-2017 METHOD 2: The weld timer IP Address is manually added by the user. The DEP will then send a communication message to that IP Address on the network. If the gateway and routers on the network allow the DEP to communicate with that IP Address, then communication will be established.
- Page 38 M035030-V2.0-Q06905/07-2017 Using the numeric keys enter the IP address of the weld control you want to connect. Press after entering the values in each field and press the key to move the cursor to the next field. When the complete IP Address has been added, press the Add key.
- Page 39 Using the keys, move the cursor over the new IP Address and press If the DEP 300s is able to connect successfully to the weld control, the status will be displayed. NOTE: Pressing Save after the weld controls are added to the...
- Page 40 M035030-V2.0-Q06905/07-2017 3. SERIAL NETWORK The DEP-300s is capable of communicating with multiple weld timers on an RS-485 serial network. To connect to a weld timer on the serial network, perform the following steps: NOTE 1: For instructions on how to physically connect the DEP-300s to a weld timer for Serial network communications, see “Physical Connections”...
- Page 41 M035030-V2.0-Q06905/07-2017 NOTE: If multiple weld timers appear in the Timer Status Menu, proceed to step 4 below. Upon completion of the upload, the Mode Selection Menu will appear, indicating that a connection to the weld timer has been established. Multiple timers on a serial connection are only found if the specific weld control and firmware installed supports Cascade Mode.
- Page 42 Japanese • Turkish English is the default language of the DEP 300s. NOTE: Language options other than English are application specific and may not be available in your weld timer. Furthermore, data uploaded from a weld control to the DEP is dependent on the language preference settings for that weld control.
- Page 43 Press [F1 – F4] to continue. NOTE: WTC is continuously increasing the number of languages its weld controls support. Your DEP-300s and weld control may support additional languages, which are not listed above. If your DEP-300s and weld timer do not support your present language requirements contact your WTC Sales Representative.
- Page 44 M035030-V2.0-Q06905/07-2017 Chapter 3: MODE SELECTION Once the DEP has successfully connected to a weld timer, the Mode Selection Menu is displayed. This menu allows the user to access three options: Program Mode, Status Mode and Display Mode. In addition, by selecting the Change Timer option, the user can change which timer the DEP is connected to on the network.
- Page 45 M035030-V2.0-Q06905/07-2017 HOME [F1] When the HOME key is pressed from the Mode Selection Menu, the following message will appear: “Returning to Home Menu will close communications to the timer Please Confirm”. When CONFIRM [F1] is pressed, the communication between the DEP and the weld timer is closed and the DEP will return to the Home Menu.
- Page 46 M035030-V2.0-Q06905/07-2017 Chapter 4: PROGRAM MODE Program Mode is used to review and edit weld schedules, current steppers and setup parameters for a weld control. It is also used to review and edit other parameters, including EtherNet/IP, Welder ID, Reload Timer Defaults, Local EtherNet, FieldBus Mapping and Network Address.
- Page 47 M035030-V2.0-Q06905/07-2017 PROGRAM MODE- NAVIGATION TREE LEVEL 1: • 1.1 Review Schedule • 1.2 Review Stepper • 1.3 Review Setups • More LEVEL 2: • 2.1 Review HIC • 2.2 EIP Options • 2.3 Welder ID • 2.4 Reload Options • More LEVEL 3: •...
- Page 48 M035030-V2.0-Q06905/07-2017 LEVEL 1: The following options are available within the Program Mode Menu - Level 1 by pressing the corresponding keys: Returns the user back to the Mode Selection Menu. Allows the user to edit, insert or delete functions within the weld schedule.
- Page 49 M035030-V2.0-Q06905/07-2017 LEVEL 2: The MORE [F5] key displays additional Program Mode options: Allows the user to view the Review HIC Menu. This option is customer application specific and may be inaccessible. For more information, see Review HIC Menu. Allows the user to view and configure the Global EtherNet/IP (EIP) Network settings and the EIP I/O bit map settings.
- Page 50 M035030-V2.0-Q06905/07-2017 LEVEL 3: Allows the user to view and configure the Local Eth- erNet settings (IP Address, SubNet Mask and Gate- way) of the weld timer. For more information, see Local Ethernet Menu. Allows the user to view and configure the FieldBus I/O bit map to support an optional DeviceNet or ProfiBus daughter board on the weld control.
- Page 51 M035030-V2.0-Q06905/07-2017 LEVEL 4: The following options are available within this Menu by pressing the corresponding keys: Customer application specific. Only available with certain software. Allows the user to make Spot and Schedule assign- ments. For more information see Spots Menu. Returns the user back to the top of the Program Mode Menu.
- Page 52 M035030-V2.0-Q06905/07-2017 LEVEL 1.1: REVIEW SCHEDULE MENU The Review Schedule menu allows the user to add or delete functions in a weld schedule or edit the parameters assigned to a function. In addition, it allows the user to change the weld scheduled to be viewed. When the REVIEW SCHEDULE key is pressed, the DEP will display schedule #1 by default (see below).
- Page 53 M035030-V2.0-Q06905/07-2017 Notice the weld functions will turn gray or “ghost out”. Using the number keys, enter desired Schedule Number. Press ENTER. The new weld schedule is now displayed. NOTE: Schedule changes can only be made to the weld timer that the DEP-300s is presently connected to on the network.
- Page 54 M035030-V2.0-Q06905/07-2017 PROGRAMMING A SCHEDULE When a schedule is displayed, the user can insert or delete a function into the schedule, or change the programmable values of a function. INSERT A FUNCTION IN A WELD SCHEDULE From the Review Schedule screen, press MORE. Confirm to make sure that the correct schedule # is displayed.
- Page 55 M035030-V2.0-Q06905/07-2017 Press INSERT BY FN. # [Insert by Function Number.] Using the number pad, enter the desired Function Number. Press ENTER If the function requires the parameters to be entered/ edited, proceed to step 8. If not, proceed to step 17. TIP 1: To find the desired weld function quicker, press the WELD [F2] key to scroll the function list down to the beginning of the weld functions, which typically starts at #20.
- Page 56 M035030-V2.0-Q06905/07-2017 Enter parameter Press ENTER For functions with two or more parameters, press the RIGHT arrow key to move the cursor to the next parameter box, then repeat steps 8 & 9. When complete, proceed to step 11. 53 of 104...
- Page 57 M035030-V2.0-Q06905/07-2017 Press APPLY (F2). [Saves changes to the DEP-300s only. Press DOWNLOAD. [Downloads the changes to the weld processor]. When complete, a “Download Complete” message will appear. 54 of 104...
- Page 58 M035030-V2.0-Q06905/07-2017 DELETE A FUNCTION FROM A WELD SCHEDULE Perform the following steps on the DEP-300s to delete a function from a weld schedule: Press Program Mode Press Review Schedule 55 of 104...
- Page 59 M035030-V2.0-Q06905/07-2017 Press Sch# Enter Schedule Number Press ENTER 56 of 104...
- Page 60 M035030-V2.0-Q06905/07-2017 Press MORE Press the arrow keys to move the cursor o the function line to be deleted 57 of 104...
- Page 61 M035030-V2.0-Q06905/07-2017 Press DELETE. [The function is immediately deleted from the DEP-300s.] Press DOWNLOAD [Downloads the changes to the weld processor. When complete, a “Download Complete” message will appear] 58 of 104...
- Page 62 M035030-V2.0-Q06905/07-2017 COPYING A WELD SCHEDULE Perform the following steps on the DEP-300s to copy an entire weld schedule from one location and paste it into another: Press Program Mode Press Review Schedule 59 of 104...
- Page 63 M035030-V2.0-Q06905/07-2017 Press Sch# Enter Schedule Number Press ENTER 60 of 104...
- Page 64 M035030-V2.0-Q06905/07-2017 Press MORE Press COPY 61 of 104...
- Page 65 M035030-V2.0-Q06905/07-2017 FROM SCHEDULE # (Current Schedule will be displayed) TO [Blank Field] enter the paste to Schedule Number Press ENTER The copy is immediately downloaded to the weld processor. When complete, a “Download Complete” message will appear. NOTE: When copying a weld schedule from one location to another, any existing data in the paste location will be completely overwritten and permanently lost.
- Page 66 M035030-V2.0-Q06905/07-2017 LEVEL 1. 2: REVIEW STEPPER MENU WTC weld control software is designed with stepper programs that keep track of the weld count and gradually increase heat after a programmed number of welds. The number of steppers available varies with different programs. (Refer to your software specific manual for more details on the stepper program).
- Page 67 M035030-V2.0-Q06905/07-2017 CHANGING THE STEPPER NUMBER: To view and edit a Stepper profile, other than the one displayed, press You will notice that the rest of the screen will gray out and the Stepper # field opens up an edit box. Using the numeric keys enter the number for the desired Stepper Press EDITING A STEPPER PROFILE...
- Page 68 M035030-V2.0-Q06905/07-2017 The stepper settings determine when current is added and the amount of current to add. When you select REVIEW STEPPER, you’ll see a menu to program the stepper settings. Press Review Stepper Example of a stepper profile as accessed from the Review Stepper key from the previous screen.
- Page 69 TO CHANGE THE STEPPER #: Press Stepper # Enter Stepper Number Press ENTER EDITING A PARAMETER ON THE REVIEW STEPPER MENU ON THE DEP 300s: Press the arrow keys to move the cursor onto the parameter line to be edited. 66 of 104...
- Page 70 M035030-V2.0-Q06905/07-2017 Press ENTER Enter parameter Press ENTER For parameters with two or more data fields, press arrow key to move the cursor to the next data field box, then repeat steps 3 & 4. When complete, proceed to step 6. 67 of 104...
- Page 71 M035030-V2.0-Q06905/07-2017 Press APPLY [Saves changes to the DEP-300s only.] To edit more parameter lines, repeat steps 1 through 6. When complete, proceed to step 8. Press DOWNLOAD [Downloads the changes to the weld processor. When complete, a “Download Complete” message will appear] 68 of 104...
- Page 72 M035030-V2.0-Q06905/07-2017 LEVEL 1. 3 REVIEW SETUPS MENU WTC weld controls use a number of programmable settings, called set-up parameters, to enable you to customize a weld control to meet your application requirements. The set-up parameters tell the control about its operating environment: how to react to certain conditions (as FAULT or ALERT conditions) and how to react when certain inputs become active.
- Page 73 M035030-V2.0-Q06905/07-2017 LEVEL 2.1 REVIEW HIC MENU The Review HIC Menu is customer application specific. Consult the weld timer firmware manual for more information. LEVEL 2.2 EIP OPTIONS MENU The EIP Options Menu allows the user to configure the Global EtherNet IP Network settings, such as IP Address, SubNet Mask, Gateway, DHCP, etc.
- Page 74 M035030-V2.0-Q06905/07-2017 Press Input Mapping. Press the key to move the cursor to the “Input 4" field. 71 of 104...
- Page 75 M035030-V2.0-Q06905/07-2017 Press and a drop-down box will appear containing all the available input bits. Press key until the cursor is on the PRESSURE SWITCH bit. 72 of 104...
- Page 76 M035030-V2.0-Q06905/07-2017 Press key. NONE will be replaced with PRESSURE SWITCH in the Input 4 field. Press EXECUTE This begins the process to download the change to the weld timer. Press ey. NONE will be replaced with PRESSURE SWITCH in the Input 4 field. Press EXECUTE .
- Page 77 M035030-V2.0-Q06905/07-2017 The message “Download complete power cycle required” will appear. Cycle power on the weld control to complete the process. EIP OUTPUT MAPPING The following procedure explains how to reconfigure the EIP Output Map. In this example, Output 18 will be re-mapped from the NONE bit to the PRESSURE SELECT 1 bit: Press Output Mapping.
- Page 78 M035030-V2.0-Q06905/07-2017 Press the key. A drop-down box will appear. Using key move the cursor to “Outputs 17-24” and press Press the Outputs 17-24 will now be displayed. key to move the to the “Output 18" field. 75 of 104...
- Page 79 M035030-V2.0-Q06905/07-2017 Press the key. A drop-down box will appear containing all the available output bits. Using the key move the cursor to “PRESSURE SELECT 1” and press NOTE: The display accommodates only 8 input/output lines per view. If the desired input/output is not visible in the first view, press which will open up the extended list in a drop down menu.
- Page 80 M035030-V2.0-Q06905/07-2017 Note: Once a schedule is edited the change is carried over to all spots with the same schedule. The message “Do you want to change EIP information” will appear. Press CONFIRM The message “Download complete power cycle required” will appear. Cycle power on the weld control to complete the process.
- Page 81 M035030-V2.0-Q06905/07-2017 LEVEL 2.3 WELDER ID MENU The Welder ID Menu allows the user to program an alpha-numeric name to the weld timer. Returns the user Allows the user back to the to download the previous Program changes to the Mode menu. weld timer.
- Page 82 Below is an example of a typical Reload Options Menu: 2. 4. 1 2. 4. 2 2. 4. 3 Set a preference - Non- user WTC HIDE or SHOW, for Diagnostic tools the non-configurable setup parameters. Customize web page settings 2.
- Page 83 M035030-V2.0-Q06905/07-2017 The message, “Do you want to RELOAD CONTROL information?” will appear. Press CONFIRM . This begins the download process to the weld timer. When the download process is complete, the message, “Download Complete Power Cycle Required” will appear. Cycle power on the weld control to complete the process.
- Page 84 M035030-V2.0-Q06905/07-2017 The Language Menu allows the user to select weld control language. English is the default language of the weld control. To reload application in any of the available languages, follow the procedure below. Using the arrow key, move to the “Language” field on the screen and Press .
- Page 85 M035030-V2.0-Q06905/07-2017 The message, “Do you want to RELOAD CONTROL Information?” is displayed. Press to Confirm. Cycle power to the control to complete the language change procedure. 82 of 104...
- Page 86 M035030-V2.0-Q06905/07-2017 BREAKER TYPE Using the arrow key, move to the “Breaker Type” field on the screen and Press . The drop down box will display the available breakers. Using the arrow key, move to the desired breaker type and press to select.
- Page 87 M035030-V2.0-Q06905/07-2017 When the download process is complete, the message, “Download Complete Power Cycle Required” will appear. Cycle power on the weld control cabinet to complete the process. 84 of 104...
- Page 88 M035030-V2.0-Q06905/07-2017 2. 4. 3 SPOT TO SCH ASSIGNMENT The SPOT TO SCH ASSIGNMENT menu allows setting up welding schedules that are associated with spot numbers. Another feature of this option is to initiate the weld control based on spot numbers instead of schedule numbers.
- Page 89 M035030-V2.0-Q06905/07-2017 The message, “Do you want to RELOAD CONTROL information?” will appear. Press CONFIRM . This begins the download process to the weld timer. When the download process is complete, the message, “Download Complete Power Cycle Required” will appear. Cycle power on the weld control to complete the process.
- Page 90 M035030-V2.0-Q06905/07-2017 SPOT TO SCH IN MANY TO ONE METHOD: Press the arrow key twice to bring the cursor to SPOT TO SCH ASSIGNMENT. Press This opens up a drop down box displaying the available modes. Press the arrow key to select MANY TO ONE.
- Page 91 M035030-V2.0-Q06905/07-2017 Do you want to RELOAD CONTROL information will be displayed. Press to confirm. Press to Execute and cycle power to the weld control to confirm the change. NOTE: When this mode is selected, more than one spots can be assigned to a single schedule.
- Page 92 M035030-V2.0-Q06905/07-2017 LEVEL 3. 1 LOCAL ETHERNET MENU The Local EtherNet Menu allows the user to view and edit the Local EtherNet configuration settings. CHANGING THE LOCAL ETHERNET IP ADDRESS, SUBNET MASK OR GATEWAY ADDRESS Perform the following steps to change the Local EtherNet IP Address, SubNet Mask or Gateway Address: Press the key to move the cursor to the...
- Page 93 M035030-V2.0-Q06905/07-2017 Press the keys to move the cursor over the appropriate field to be edited. Press the keys to enter a numeric value. Press the key to save the change or the key to cancel the change. Repeat steps 1 though 4 if changes are required for any additional fields.
- Page 94 M035030-V2.0-Q06905/07-2017 When the download to the weld timer is complete, the message “Download Complete Power Cycle Required” will appear. Cycle power on the weld control for the changes to take effect. CHANGING THE LOCAL ETHERNET IP ADDRESS VIA THE SERIAL NETWORK If the DEP does not establish a Local EtherNet connection with the weld control, the IP Address of the weld control may not be set to...
- Page 95 M035030-V2.0-Q06905/07-2017 When a serial connection is established between the DEP and the weld timer, press the PROGRAM MODE key. From the Program Mode Menu, press the MORE twice. 92 of 104...
- Page 96 M035030-V2.0-Q06905/07-2017 Press the LOCAL ETHERNET [F1] key. Verify the IP Address is set to 89.89.200.250. If it is incorrect, continue to step 7. Press the and keys to move the cursor over the appropriate field to be edited. Press the keys to enter a numeric value.
- Page 97 M035030-V2.0-Q06905/07-2017 Press the DOWNLOAD [F2] key to save changes to the weld timer. When the download to the weld timer is complete, the message “Download Complete Power Cycle Required” will appear. Cycle power on the weld control cabinet for the changes to take effect. 94 of 104...
- Page 98 M035030-V2.0-Q06905/07-2017 LEVEL 3.2 FIELDBUS MAPPING MENU The steps to configure the FieldBus I/O Mapping are identical to the steps to configure the EIP I/O Mapping. While in the FieldBus Mapping Menu, follow the steps explained above in either EIP Input Mapping or EIP Output Mapping (whichever is applicable), to configure the FieldBus I/O map.
- Page 99 M035030-V2.0-Q06905/07-2017 LEVEL 3.3 I/O MAPPING The I/O Mapping Menu is customer application specific. Consult the weld control firmware manual for more information. LEVEL 3.4 NETWORK ADDRESS MENU The Network Address Menu allows the user to set the Serial Network Node Address for the weld timer. 96 of 104...
- Page 100 M035030-V2.0-Q06905/07-2017 The default address is 0. TO CHANGE THE SERIAL NETWORK NODE ADDRESS, PERFORM THE FOLLOWING STEPS: Press the keys to enter the desired node address. Press the key to save the changes to DEP memory. Press the DOWNLOAD key to save changes to the weld timer.
- Page 101 M035030-V2.0-Q06905/07-2017 LEVEL 4.2 SPOTS The Spots menu allows the user to make the Spot to Schedule assignments. Before moving ahead with this function, confirm the parameters previously determined (One to one or Many to One) in the RELOAD OPTIONS menu -“2. 4. 3 SPOT TO SCH ASSIGNMENT” on page 85. SPOT ID SETUP ONE TO ONE MANY TO ONE...
- Page 102 M035030-V2.0-Q06905/07-2017 ASSIGNING SPOTS IN ONE TO ONE MODE Press to open the Spot menu. If no spots have been previously assigned, the screen displays “No Spots”. Then proceed to step 3. If existing Spots numbers are found, the screen will default to the schedule view with associated spot number as depicted below.
- Page 103 M035030-V2.0-Q06905/07-2017 By default 256 is displayed the Spot # field since that is the minimum spot number that can be assigned. Numbers 1-255 are reserved as there are 255 welding schedules and a number within that range may cause a conflict when firing. To edit the Spot number, press to insert the cursor within the Spot # field and using the...
- Page 104 M035030-V2.0-Q06905/07-2017 TIP: To increase the numbers in increments of 1, press the and press key to decrease the number by decrements of 1. Press New to complete the assignment. wait until the message “Download Complete” is displayed, indicating the Spot to Schedule assignments have been made.
- Page 105 M035030-V2.0-Q06905/07-2017 Pressing Back takes the user to the screen above. will open up the screen to add a new spot as shown in step 5. TO REMOVE A SPOT: enables the Removal of a spot. By default the lowest spot number is visible in the Spot # field. To view all available Spots, press , which opens a list of additional Spot numbers.
- Page 106 M035030-V2.0-Q06905/07-2017 Wait for the message - “Download Complete” to indicate removal of the spot. Pressing the button lets the user Switch between spots. Press to display the screen above. Press to view the list of spots. Then using the keys or the to scroll down by page and to scroll up the page, move the cursor to the...
- Page 107 M035030-V2.0-Q06905/07-2017 The schedule assigned to the selected spot will be displayed. TO EDIT A SCHEDULE: Press to edit the schedule. Press to Insert a function in the weld schedule. For detailed instructions on inserting a function follow the procedure - Insert a Function in a Weld Schedule on Page 49.
- Page 108 M035030-V2.0-Q06905/07-2017 Chapter 5: STATUS MODE The Status Mode displays information on the overall welding status of various processes within the weld control. These include: • Faults • Steppers • RAFT Functions • I/O Status • Weld Data • Errors 105 of 120...
- Page 109 M035030-V2.0-Q06905/07-2017 When the key is pressed, the following menu is displayed: The Status Mode display tells you the options you can select when you press the corresponding keys FAULT Press to see the fault information logged at the weld control, set fault filtering and reset the weld control. (See page 106) STEPPER Press...
- Page 110 M035030-V2.0-Q06905/07-2017 Press to view the HIC Menu. This option is weld control firmware specific and may be inacces- sible. (page 115). I/O STATUS Press to see the current state of the I/O for a selected device. WELD DATA Press to view the status of certain key weld parameters.
- Page 111 M035030-V2.0-Q06905/07-2017 FAULT MENU The Fault Menu allows the user to view, reset and filter both faults and alerts. When a fault or alert occurs, it is displayed on the Fault Menu. This display is used to determine which fault condition was detected by the weld control.
- Page 112 M035030-V2.0-Q06905/07-2017 FAULT FILTERING Press the OPTIONS button to categorize and filter what is viewed on the Fault Status Menu. Options include ALL, FAULTS, ALERTS or HISTORY. NOTE: Fault filtering options are customer application specific and may vary depending on the firmware loaded in the weld control. Consult the weld control manual for more information.
- Page 113 M035030-V2.0-Q06905/07-2017 STEPPER STATUS MENU The Stepper Status Menu allows the user to view the status of any stepper program within the weld control. Stepper programs can also be advanced and reset form this menu. The Stepper Status display cannot be used to program the stepper profile or to set the stepper parameters.
- Page 114 M035030-V2.0-Q06905/07-2017 STEPPER # Press to change the stepper program number being viewed on the Stepper Status Menu. RESET GRP Press to Reset the Stepper Programs assigned to a Group (1or 2). RESET ALL Press to globally reset all stepper programs. The following chart describes the parameters, which appear on the Stepper Status Menu: The parameters displayed in this menu may vary depending upon the...
- Page 115 M035030-V2.0-Q06905/07-2017 GROUP The stepper group that the stepper program is currently in. NUMBER STEPPER # The stepper program number currently displayed. Pressing the Stepper # key, allows the user to change the stepper pro- gram that is displayed. STEPPER RESET An END OF STEPPER FAULT indicates the stepper program has ended.
- Page 116 M035030-V2.0-Q06905/07-2017 The message “Do you want to RESET ALL STEPPERS” will appear. Press CONFIRM RAFT MENU The RAFT Menu allows the user to view RAFT data and perform certain RAFT functions. This feature is customer application specific and may be inaccessible. For more information, see RAFT (Resistive Adaptive Feedback Technology) in the weld control firmware manual.
- Page 117 M035030-V2.0-Q06905/07-2017 BACK Press to return back to the previous Status Menu screen. REF COPY Press to copy the RAFT Reference Weld data from one schedule to another. R MEASURE Press to turn the R Measure Mode ON or OFF. REF OFF Press to turn the Reference Mode ON or...
- Page 118 M035030-V2.0-Q06905/07-2017 Total energy Nugget Integrity Tool Factor: The C-Factor of the last 3/4 of the weld time, minus the blanking period Tooling Integrity Average Resistance Resistance Drop End Resistance HIC MENU The HIC Menu is customer application specific. Consult the weld control firmware manual for more information.
- Page 119 M035030-V2.0-Q06905/07-2017 Displays additional I/O status menus (if applicable) by pressing PAGE 2, PAGE 3, etc. If there are no Returns the additional I/O user back to the status menus, the previous Status key will be ghosted Menu screen. out. Each I/O bit is represented by an I/O tag. Each tag will have either a “1” or “0”...
- Page 120 M035030-V2.0-Q06905/07-2017 WELD DATA MENU The Weld Data Menu allows the user to view various Weld and RAFT data values. Constant Current and Percent of Available Volt-Seconds RAFT weld data weld data. Spot ID Number BACK Press to return back to the previous Status Menu screen.
- Page 121 M035030-V2.0-Q06905/07-2017 THE FOLLOWING DESCRIBES THE DATA TAGS DISPLAYED IN THE MENU: WELD DATA DATA TAG DESCRIPTION bus V DC bus voltage (MAX, AVG, MIN) Sec I Secondary current (MAX, AVG, MIN) Pri I Primary current (MAX, AVG, MIN) High frequency cycles (inverter output) On-time of the inverter in microseconds Percent of available volt-seconds mea- surement...
- Page 122 M035030-V2.0-Q06905/07-2017 RAFT™ DATA DATA TAG DESCRIPTION Mode AdaptQ Mode ON/OFF (0=OFF, 1=ON) ref h Total heat of the Reference Weld Total heat The number of cycles since the beginning exp cy of the weld at which expulsion was detected The running adaptive current, as learned by ...
- Page 123 The Pressure Control Menu is customer application specific. Consult the weld control firmware manual for more information. ERRORS MENU The Errors Menu is a diagnostics tool, which logs network communication and DEP errors. This is for WTC use only. 120 of 120...
- Page 124 M035030-V2.0-Q06905/07-2017 Chapter 6: DISPLAY MODE The Display Status menu provides the user with information regarding hardware status the weld control the DEP is connected to. The Display Mode enables you to perform the following tasks to change: • To quickly access weld schedules •...
- Page 125 M035030-V2.0-Q06905/07-2017 Press scroll the page up and scroll down The following is the information typically displayed within the Display Status Menu. The actual information displayed may vary depending on the firmware version loaded into the weld control and the customer's application requirements: INFORMATION DISPLAYED •...
- Page 126 M035030-V2.0-Q06905/07-2017 HEAT DISPLAY MENU change the amount of The Heat Display Menu allows the user to weld energy provided by a schedule without using Program Mode and edit RAFT function parameters within a weld schedule without going into the Program Mode Menu. BACK Press to return back to the Mode Selection Menu SCH# Press...
- Page 127 M035030-V2.0-Q06905/07-2017 CHANGING THE SCHEDULE NUMBER FOR HEAT DISPLAY To view a different schedule perform the following steps: Press the SCH # key. A window will appear around the schedule number at the bottom of the screen. Using the keys, enter the desired schedule number and press .
- Page 128 M035030-V2.0-Q06905/07-2017 EDITING A PARAMETER To change a function parameter, perform the following steps: Using the keys move the cursor over the function to be edited and press A window will appear around the function parameters at the bottom of the screen. Press the keys to move the cursor over the parameter to be edited.
- Page 129 M035030-V2.0-Q06905/07-2017 126 of 126...
- Page 130 M035030-V2.0-Q06905/07-2017 Chapter 7: CHANGE TIMER The Change Timer menu allows the user to connect the DEP-300s to different weld timers on the network. This feature is accessible only when the DEP-300s is connected to either the Global EtherNet or Serial Network, see “Network Communications”...
- Page 131 M035030-V2.0-Q06905/07-2017 SCAN Press to initiate a scan of the network for active weld timers. A list with the results is displayed. EDIT Press to manually edit or delete a weld timer IP Address. For more information, see Manually Search for a Weld Timer. Note: This feature is accessible only when the DEP-300s is connected to the network via the Global EtherNet.
- Page 132 M035030-V2.0-Q06905/07-2017 TO CONNECT TO A DIFFERENT WELD TIMER/ CONTROL, PERFORM THE FOLLOWING STEPS: From the Mode Selection Menu, press to CHANGE TIMER. The Timer/Control Selection Menu will appear with a list of multiple weld timers, identified by their IP Address and Welder ID.
- Page 133 M035030-V2.0-Q06905/07-2017 Using the keys, move the cursor to highlight the desired weld timer/control IP Address and Welder ID. Press the key. The DEP-300s will now attempt to connect to the desired weld timer. Upon completion, the Mode Selection Menu will appear, indicating that it is now connected to the new timer.
- Page 134 M035030-V2.0-Q06905/07-2017 HOW DO I UPGRADE DEP300 (EDEP) SOFTWARE? Find the DEP’s IP ADDRESS. When the DEP is powered up, it should be in the Home Menu. Press F1(System Settings) and write down the IP Address. Change your PC’s IP Address to be one off from the EDEP’s IP Address so they can talk. For example, if the EDEP's IP address is 89.89.200.249, change the PC's IP address to 89.89.200.250. 131 of 134...
- Page 135 M035030-V2.0-Q06905/07-2017 Connect the EDEP's 15 pin D‐sub cable into the DEP door port. On the back of the door port is an RJ45 EtherNet connector mounted on a PC board. Plug a standard EtherNet cable into the RJ45 connector and plug the other end into the PC's EtherNet port. On the EDEP while in the “System Settings” screen, press F3(Flash DEP). The EDEP will post a message indicating it is waiting for the software. Now run the qularitydownloader.exe file. If you see a pop‐up window stating “Couldn't open serial port”, click OK. Select the “Ethernet” tab. Type in the IP Address of the EDEP (written down in step #1). Click the “Browse” button and find the update file, q06905‐23_08_28_2015_release.bff. Select it with your mouse and then click “Open”. Click the “Download Application” button. You should briefly see a download status bar. When the download is complete, the EDEP should display a message that it is receiving the data. When complete, it will reboot. After the EDEP reboots, it should be in the Home Menu. Press F1 (System Settings). The EDEP software should read “Q06905‐00‐23 (date)”. 132 of 134...
- Page 136 M035030-V2.0-Q06905/07-2017 Notes: 133 of 134...
- Page 137 24775 CRESTVIEW COURT | FARMINGTON HILLS, MI USA 48335 | PHONE: +1 248‐477‐3900 134 of 134...
Need help?
Do you have a question about the DEP 300s and is the answer not in the manual?
Questions and answers