Advertisement
Quick Links
INTERFACE FEATURES
• Provides accessory power (12-volt 10-amp)
• Maintains the retained accessory power (R.A.P.) feature
• Provides NAV outputs (parking brake, reverse, speed sense)
• Pre-wired ASWC-1 harness (ASWC-1 sold separately)
† Excluding digital-(Fender) amplified models
APPLICATIONS
VOLKSWAGEN
Beetle
2012-2015
CC
2009-2017
EOS
2007-2016
Golf (with double DIN factory radio)
Golf
2003-2006
AxxessInterfaces.com
Volkswagen Data Interface
INTRODUCTION
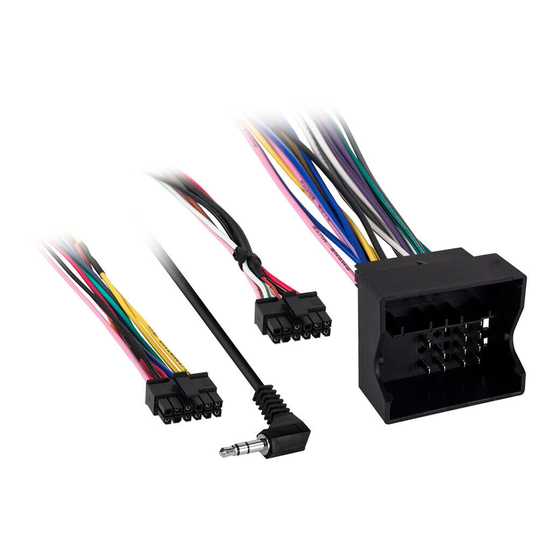
The AX-ADVW01 harness is designed for, and must be used with, the
AX-ADBOX1 or AX-ADBOX2 interface (sold separately). Please refer to the
AX-ADBOX1 or AX-ADBOX2 for the 16-pin connector with stripped leads.
• Can be used in non-amplified, or analog/digital-(Fender) amplified models
• Retains balance and fade†
• Micro "B" USB updatable
Golf, Golf R
GTI
Jetta (with double DIN factory radio)
2002
Jetta
Jetta GLI
© COPYRIGHT 2018 METRA ELECTRONICS CORPORATION
2002-2017
2010-2014
Jetta Sportwagen
2002-2014
Passat
2002
R32
2003-2015
Rabbit
2006-2015
Tiguan
AX-ADVW01
I N S TA L L AT I O N I N S T R U C T I O N S
TABLE OF CONTENTS
Connections to be made .......................................2
Installing & programming the AX-ADVW01
AX-ADBOX1 ...........................................................3
AX-ADBOX2 ..........................................................4
Adjusting the AX-ADVW01 .....................................5
INTERFACE COMPONENTS
• AX-ADVW01 harness
TOOLS REQUIRED
• Crimping tool and connectors, or solder gun, solder,
and heat shrink • Small flat-blade screwdriver
• Tape • Wire cutter • Zip ties
2010-2014
CAUTION!
All accessories, switches, climate
2002-2015
controls panels, and especially air bag indicator
lights must be connected before cycling the
2007-2008
ignition. Also, do not remove the factory radio
2007-2009
with the key in the on position, or while the
vehicle is running.
2009-2015
REV. 6/21/18 INSTAX-ADVW01
Advertisement

Related Manuals for Axxess AX-ADVW01


Summary of Contents for Axxess AX-ADVW01
- Page 1 INTRODUCTION AX-ADBOX1 ............3 AX-ADBOX2 ............4 The AX-ADVW01 harness is designed for, and must be used with, the AX-ADBOX1 or AX-ADBOX2 interface (sold separately). Please refer to the Adjusting the AX-ADVW01 ........5 AX-ADBOX1 or AX-ADBOX2 for the 16-pin connector with stripped leads.
- Page 2 CONNECTIONS TO BE MADE From the 16-pin harness with stripped leads to the aftermarket radio (harness included with interface): From the AX-ADVW01 harness to the aftermarket radio: • Connect the Red wire to the accessory wire. • Connect the Black wire to the ground wire.
- Page 3 • Connect the AX-ADVW01 harness to the wiring harness in the vehicle. Continue to Adjusting the AX-ADVW01 • If an ASWC-1 (sold separately) will be used, do not connect it until the AX-ADVW01 is programmed and fully functional. REV. 6/21/2018 INSTAX-ADVW01...
- Page 4 1. The Blue reset button is located inside the interface, between the two connectors. The button is accessible outside the interface, no need to open the interface. • If an ASWC-1 (sold separately) will be used, do not connect it until the AX-ADVW01 is programmed and fully functional.
- Page 5 ADJUSTING THE AX-ADVW01 Audio level adjustment (Fender amplified models only): • With the vehicle and radio turned on, turn the volume up 3/4 of the way. • With a small flat-blade screwdriver, adjust the potentiometer clockwise to raise the audio level;...
- Page 7 REV. 6/21/2018 INSTAX-ADVW01...
- Page 8 AX-ADVW01 I N S TA L L AT I O N I N S T R U C T I O N S IMPORTANT If you are having difficulties with the installation of this product, please call our Tech Support line at 1-800-253-TECH. Before doing so, look over the instructions a second time, and make sure the installation was performed exactly as the instructions are stated.
Need help?
Do you have a question about the AX-ADVW01 and is the answer not in the manual?
Questions and answers