
Related Manuals for Sea & Sea Leak Sentinel V5 XB


Summary of Contents for Sea & Sea Leak Sentinel V5 XB
- Page 1 Leak Sentinel V5 XB Pre–dive and dive leak detection system for underwater camera housings with TEMPERATURE COMPENSATION LOW BATTERY INDICATION OVERNIGHT FUNCTION RESET FUNCTION USER MANUAL www.vividhousings.com info@vividhousings.com...
- Page 2 Thank you for choosing Leak Sentinel V5 XB, the premier pre-dive vacuum leak detection system for underwater camera housings. Please read this manual carefully before installing and using the Leak Sentinel V5 XB 1. Safety precautions Never dive or immerse the housing in any water without the protective cap. The rubber valve is not watertight and serves only to hold the vacuum during the evacuating process.
- Page 3 The vacuum causes additional pressure on the o-rings which will help prevent rinse tank floods. Always perform any test procedures in a dry place. The rubber valve that is pressed to switch the Leak Sentinel on and off, as well as release the vacuum is not watertight. Any water inside the unit could damage the circuit.
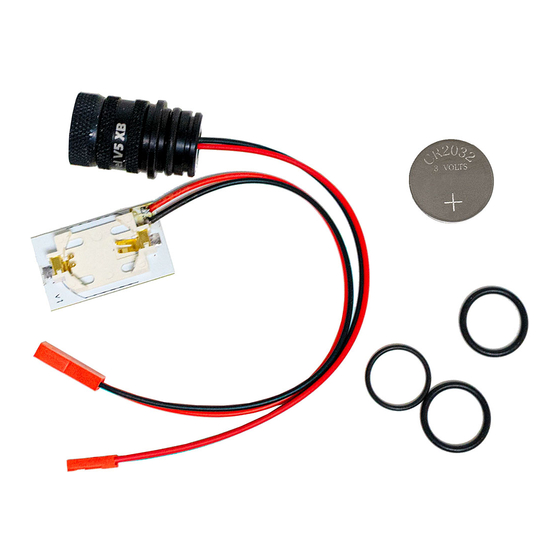
- Page 4 3. Installation Before installation and operation of your Leak Sentinel, please familiarize yourself with the parts by referencing the figure above! Do not disassemble the valve body and the adapter – there are no user serviceable parts inside the valve body and opening the compartment may result in the damage to the circuit.
- Page 5 a. Depending on your housing type, remove the lid from the accessory port (Nauticam, Aquatica, Isotta, Hugyfot, Seacam, Nexus, Subal etc.), the bulkhead cap (Sea&Sea), the control gland (Ikelite) or the bulkhead itself (Sea&Sea etc.).
- Page 6 b. Push the cable attached to the device through the accessory port from the outside.
- Page 7 c. In case of installing into a threaded port, screw the adapter into the accessory port and tighten snugly by hand, using more force than you would to screw the protective cap, but not so much as to break anything. In case of non – threaded ports, consult your housing's manual for details about installing and removing port attachments.
- Page 8 d. Find the appropriate place for battery board installation. If possible, choose a spot on the same side as the accessory port so that the cables don't get in the way of camera and/or other equipment. Also try to avoid installing the holder directly at the bottom of the housing if not absolutely necessary, to keep the battery dry in case of spillage etc.
- Page 9 1. Push the black wire into the hole on the plastic lid on the (-) terminal. Keep pushing until the wire hits the back wall (about 3mm). 2. Put the board on the flat hard surface and press the lid downwards until it almost touches the board, to obtain good electrical and mechanical contact.
- Page 10 4. Pre-Dive Procedures and Operation 1. Remove the protective cap by unscrewing the cap in a counter-clockwise motion, being sure to hold the Leak Sentinel body to avoid loosening the Leak Sentinel from the camera housing. 2. Gently press the translucent button on the rubber valve in a downward motion, until the switch clicks, which can be felt by the finger.
- Page 11 During the dive, be sure to occasionally observe the LED. If the green LED stops blinking and an alternate red/green or red LED starts blinking, this indicates the rise of internal housing pressure and a possible leak. If there is a possible leak, it is advisable to immediately ascend to minimize the risk of flooding.
- Page 12 6. Special functions Temperature compensation The Leak Sentinel V5 has temperature compensation. Temperature compensation means that the circuit constantly monitors temperature changes and compensates for the pressure changes accordingly. This feature eliminates the possibility of false alarms in situations where the housing is set up in a cold environment and used in a warmer environment.
- Page 13 FUNCTION USER ACTION/DESCRIPTION LED INDICATION Start/Power on Short press on the rubber valve button 1 second red flash>steady red flashing Low battery After turning the unit on 1 second red flash>fast red flashing Pressure change Pumping/Leak alarm Alternate red/green flashing Vacuum hold Monitoring Steady green flashing...
- Page 14 Clean the manual or electric pump with dry or damp cloth. Do not rinse or submerge the pump in water. Check the cap o-ring after every dive, clean it and only apply a thin film of silicone grease. There is no need to over-lubricate the o-ring. All the o-rings in the device are made of Nitrile rubber (NBR).
- Page 15 The device won't turn on when the button is pressed Make sure the power cables are connected and the wire colors match. If not, correct the error and try switching the device on again. Disconnect and reconnect the cables even if the wire colors match.
- Page 16 If the problem persists, contact your seller for service. Package includes: 1X Leak Sentinel V5 XB with adapter (valve body with adapter and cable + battery holder with cable) 1X Spare o-ring for protective cap, metric 15X2, NBR 70SH black...
Need help?
Do you have a question about the Leak Sentinel V5 XB and is the answer not in the manual?
Questions and answers