Table of Contents
Advertisement
Quick Links
Advertisement
Table of Contents

Related Manuals for LG CordZero R9


Summary of Contents for LG CordZero R9
- Page 1 • Charge the battery fully before first use. • Read the Safety Instructions before using the product. • After reading this manual, keep it in an easily accessible location. www.lg.com MFL69826107 Copyright © 2020 LG Electronics Inc. All Rights Reserved...
-
Page 3: Table Of Contents
14 Using the Robot Cleaner 15 Control Panel 16 Choosing a Cleaning Mode 18 Choosing an Auxiliary Function 19 SMART FUNCTIONS 19 Using LG ThinQ Application 23 Using Smart Diagnosis 25 MAINTENANCE 25 Regular Cleaning 30 TROUBLESHOOTING 30 Before Calling for Service... -
Page 4: Important Safety Instructions
Children should be supervised to ensure that they do not play with the appliance. • If the power supply cord is damaged, it must be replaced by an LG Electronics Customer Information Center or dealer in order to avoid a potential hazard. - Page 5 • For your safety, do not remove the battery from the appliance. If you need to replace the battery of the appliance, take it to an authorized LG Electronics Customer Information Center or dealer for assistance. • Use only as described in this manual. Use only manufacturer’s recommended attachments.
- Page 6 • Make sure the power cord of the home station is not crushed under a heavy object or damaged by contact with sharp objects. If the power cord is broken, do not plug it in. Take it to an authorized LG Electronics Customer Information Center or dealer for assistance.
-
Page 7: Caution Statements
• Do not put water, detergent, or other liquids into or onto the appliance. • Ensure that liquids do not seep into the appliance. If liquid gets inside of the appliance, turn off the power supply and take the appliance to an authorized LG Electronics Customer Information Center or dealer for assistance. -
Page 8: Before Using The Robot Cleaner
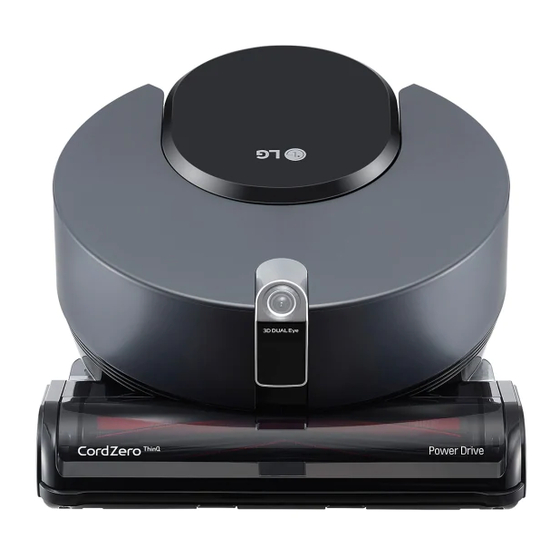
BEFORE USING THE ROBOT CLEANER BEFORE USING THE ROBOT CLEANER Parts and Specifications Front View 3D DUAL Eye Nozzle Control Panel Bottom View Brush Cliff Detection Sensors Charging Terminals Top Cover Release Button Brush Release Button Exhaust Port... - Page 9 Dust Bin HEPA Filter Pre-Filter Main Power Switch Pre-Filter Case NOTE • The filters will eventually need to be replaced. To purchase replacement filters, call an LG Electronics Customer Information Center or visit www.lg.com Home Station Charging Terminals Cord Keeper...
- Page 10 • This product is a Class I laser device of which conformity assessment is conducted in accordance with the IEC 60825-1. • Battery run time is the result of using a fully charged battery according to the LG Electronics test standard. Results may be different depending on actual use environment and period of use.
-
Page 11: Charging
BEFORE USING THE ROBOT CLEANER Charging Inserting Batteries into the Remote Control Before Charging the Battery Release the tab at the back of the remote • Charging takes place even if the main power control to open the battery cover. switch of the robot cleaner is turned off. - Page 12 12 BEFORE USING THE ROBOT CLEANER Insert the power plug into an outlet. NOTE • If power is not supplied to the home station, the • When the home station is turned on, the LED robot cleaner will not charge. will light up.
- Page 13 • If the cleaning mode has been changed while charging, the robot cleaner will not resume cleaning. • If the robot cleaner is connected to the LG ThinQ application and finishes charging between 9 PM and 6 AM, it will not resume...
-
Page 14: Operation
14 OPERATION OPERATION Preparing Cleaning Area • Check the following items before use: Using the Robot Cleaner − Remove cables or long strings from the floor. − Roll up or remove thin mats or thick area rugs. Before Starting Thin mats can get stuck in the nozzle, and the robot cleaner will stop operating. -
Page 15: Control Panel
NOTE Home Button • The Wi-Fi connection indicator lights up when the robot cleaner is connected to the LG ThinQ • Press the Home button to return the robot application or a wireless network. cleaner to the home station to charge. -
Page 16: Choosing A Cleaning Mode
16 OPERATION Choosing a Cleaning Mode Remote Control Getting Started Select a cleaning mode on the control panel or on the remote control. Insert the power plug of the home station into a power outlet. Press the Mode g button to select the desired mode as follows. - Page 17 OPERATION Edge Mode • The Spiral Spot mode cannot be activated while the robot cleaner is charging. Manual Mode You can move the robot cleaner manually by pressing the directional buttons on the remote control. • Press the Directional buttons on the remote The robot cleaner moves in zigzag movements control to operate the robot cleaner.
-
Page 18: Choosing An Auxiliary Function
18 OPERATION Choosing an Auxiliary NOTE • The Turbo function uses more battery power. Function • The robot cleaner will be louder when running the Turbo function. Repeat Function The robot cleaner repeats the selected cleaning Smart Turbo Function mode. The robot cleaner automatically detects carpets, •... -
Page 19: Smart Functions
Internet service provider or refer to your wireless router manual. Check the distance between the appliance and • LG ThinQ is not responsible for any network the wireless router (WLAN network). connection problems or any faults, malfunctions, • If the distance between the appliance and the or errors caused by network connection. - Page 20 With the My Zone feature and the LG ThinQ application, a designated area of the home can be • Pictures taken by the R9 are saved in the LG selected for specific cleaning attention. ThinQ Server and only the registered user can view the pictures.
- Page 21 SMART FUNCTIONS Using the My Zone Function Set the location from which the HomeGuard function will monitor and tap Save in the application. Tap Draw a New Map to create a map of the cleaning area and designate cleaning zones. •...
- Page 22 • Consult the dealer or an experienced radio/TV LG Electronics will also provide open source code technician for help. to you on CD-ROM for a charge covering the cost of performing such distribution (such as the cost of...
-
Page 23: Using Smart Diagnosis
SMART FUNCTIONS Using Smart Diagnosis The robot cleaner announces the result through a voice message. • To repeat the voice message, press the Using the Robot Cleaner to Home button. Diagnose Issues You can diagnose the current status of the robot cleaner automatically using the Smart Diagnosis function. - Page 24 • If there is a problem with the sensor or the motor or the problem cannot be solved through Smart Diagnosis, contact an authorized LG Electronics Customer Information Center. • Extremely shiny surfaces may cause the sensors to react and result in an operational...
-
Page 25: Maintenance
• The filters will eventually need to be replaced. To purchase replacement filters, call an LG Electronics Customer Information Center or visit www.lg.com CAUTION •... - Page 26 26 MAINTENANCE Clean the cyclonic mesh filter thoroughly with Clean the pre-filter using a vacuum cleaner or a vacuum cleaner or rinse it under running rinse it under running water. water. • To avoid odor, allow the pre-filter to dry •...
- Page 27 MAINTENANCE Cleaning the HEPA Filter Cleaning the Brush Separate the dust bin from the robot cleaner Place a soft cloth on the floor and place the body and pull out the HEPA filter case a. robot cleaner upside down on top of the cloth. Push the brush release button a to separate the brush case b from the nozzle.
- Page 28 28 MAINTENANCE Insert the brush into the brush case, starting • Dust may build up at the brush inlet at the with the right side. bottom of the brush. Periodically remove the buildup using another vacuum cleaner or a soft brush.
- Page 29 Failure to do so may cause an electric shock or injury. CAUTION • If the sensors or the charging terminals are damaged, discontinue use and contact an LG Electronics Customer Information Center. • Do not wipe the product with a volatile solvent or an organic solvent (thinner, solvent, acetone, etc.) Doing so will cause...
-
Page 30: Troubleshooting
30 TROUBLESHOOTING TROUBLESHOOTING Before Calling for Service Troubleshooting Guide Save time and money by checking the following before calling for service. Symptom Cause and Solution Power cannot be Main power switch of the robot cleaner is turned off. turned on. •... - Page 31 TROUBLESHOOTING Symptom Cause and Solution The product is noisier Brush is clogged with foreign substances. than usual. • Remove foreign substances from the brush. Brush case is not installed properly. • Install the brush case properly. The robot cleaner is cleaning against the grain of the flooring. •...
-
Page 32: Limited Warranty
Should your LG Vaccum Cleaner (“Product”) fail due to a defect in materials or workmanship under normal and proper use, during the warranty period set forth below, LG will, at its option, repair or replace the Product. This limited warranty is valid only to the original retail purchaser of the Product and applies only when purchased and used within the United States including U.S. - Page 33 Notice of Dispute. In the event you intend to commence an arbitration proceeding, you must first notify LG in writing at least 30 days in advance of initiating the arbitration by sending a letter to LG at LG Electronics U.S.A., Inc. Attn: Legal Department- Arbitration 111 Sylvan Ave, Englewood Cliffs 07632. You and LG agree to engage in good faith discussions in an attempt to amicably resolve your claim.
- Page 34 AAA in the manner described in the AAA Rules. You must also send a copy of your written demand to LG at LG Electronics, USA, Inc.
Need help?
Do you have a question about the CordZero R9 and is the answer not in the manual?
Questions and answers