
Related Manuals for Adafruit Feather 32u4 FONA


Summary of Contents for Adafruit Feather 32u4 FONA
- Page 1 Adafruit Feather 32u4 FONA Created by lady ada Last updated on 2016-04-27 02:03:47 PM EDT...
- Page 2 Turning on the FONA Feather Sending an SMS Enabling GPRS TCPIP connection Sending an MQTT packet (about 200 bytes) Disabling GPRS Arduino IDE Setup Using with Arduino IDE Install Drivers (Windows Only) © Adafruit Industries https://learn.adafruit.com/adafruit-feather-32u4-fona Page 2 of 59...
- Page 3 Setting Headset or External audio Playing Toolkit Tones Phone Calls Make Phone Calls Send and Read SMS FM Radio (FONA800) FM Radio (FONA 800 only) Feather FONA FAQ HELP! Downloads Schematic Fabrication Print Datasheets: © Adafruit Industries https://learn.adafruit.com/adafruit-feather-32u4-fona Page 3 of 59...
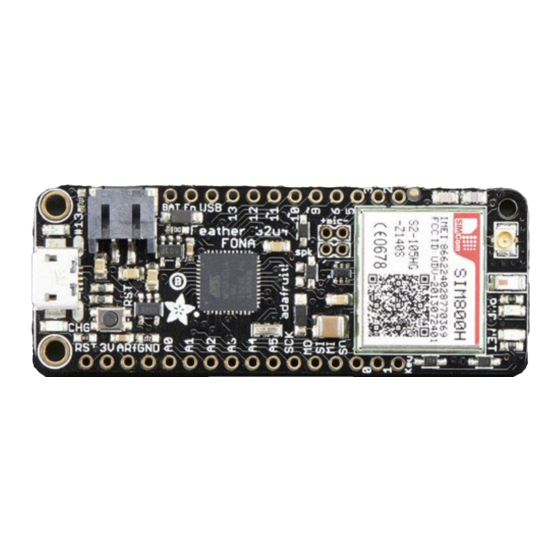
- Page 4 Overview Feather is the new development board from Adafruit, and like its namesake it is thin, light, and lets you fly! We designed Feather to be a new standard for portable microcontroller cores. This is the Adafruit Feather 32u4 FONA - our take on an 'all-in-one' Arduino-compatible + audio/sms/data capable cellular with built in USB and battery charging.
- Page 5 A 500mAh+ Lipoly battery is required for use, it keeps the cellular module happy during the high current spikes. Plug the Feather into microUSB to charge at 500mA. © Adafruit Industries https://learn.adafruit.com/adafruit-feather-32u4-fona Page 5 of 59...
- Page 6 10 x analog inputs Built in 500mA lipoly charger with charging status indicator LED Pin #13 red LED for general purpose blinking Power/enable pin for the 3.3V regulator 4 mounting holes Reset button © Adafruit Industries https://learn.adafruit.com/adafruit-feather-32u4-fona Page 6 of 59...
- Page 7 Scan and receive FM radio broadcasts (yeah, we don't exactly know why this was included but it works really well) AT command interface with "auto baud" detection Pair-able Bluetooth client interface with SPP (for controlling the module) as well as audio. © Adafruit Industries https://learn.adafruit.com/adafruit-feather-32u4-fona Page 7 of 59...
- Page 8 (http://adafru.it/851) so you can connect to your SMA antenna External Mic & Speaker - If you want to make phone calls, you'll also need this electret (http://adafru.it/dDa) mini 8 ohm speaker (http://adafru.it/dDb) © Adafruit Industries https://learn.adafruit.com/adafruit-feather-32u4-fona Page 8 of 59...
- Page 9 © Adafruit Industries https://learn.adafruit.com/adafruit-feather-32u4-fona Page 9 of 59...
-
Page 10: Power Pins
Pinouts The Feather 32u4 FONA is chock-full of microcontroller goodness. There's also a lot of pins and ports. We'll take you a tour of them now! Power Pins © Adafruit Industries https://learn.adafruit.com/adafruit-feather-32u4-fona Page 10 of 59... - Page 11 #13 - GPIO #13, can do PWM output and is connected to the red LED next to the USB jack A0 thru A5 - These are each analog input as well as digital I/O pins. © Adafruit Industries https://learn.adafruit.com/adafruit-feather-32u4-fona Page 11 of 59...
-
Page 12: Cellular Module
#6 - This pin is available on the breakout and is connected to FONA RTS in case you want to use flow control, which is not enabled by default Other Pins! © Adafruit Industries https://learn.adafruit.com/adafruit-feather-32u4-fona Page 12 of 59... - Page 13 Mic+ and Mic- connections for attaching an electret microphone for audio applications (external audio interface) Spk+ and Spk- connections for attaching a 8 ohm 1W speaker for audio applications (external audio interface) FONA connections & LEDs © Adafruit Industries https://learn.adafruit.com/adafruit-feather-32u4-fona Page 13 of 59...
- Page 14 At the very bottom is the jumper for the KEY pad - cut this to let you control the module's on/off key manually. By default KEY is tied to ground so the module is always powered and on. © Adafruit Industries https://learn.adafruit.com/adafruit-feather-32u4-fona...
- Page 15 Feather into a solderless breadboard Another option is to go with socket female headers. This won't let you plug the Feather into a breadboard but it will let you attach featherwings very easily © Adafruit Industries https://learn.adafruit.com/adafruit-feather-32u4-fona Page 15 of 59...
- Page 16 Soldering in Plain Headers Prepare the header strip: Cut the strip to length if necessary. It will be easier to solder if you insert it into a breadboard - long pins down © Adafruit Industries https://learn.adafruit.com/adafruit-feather-32u4-fona Page 16 of 59...
- Page 17 And Solder! Be sure to solder all pins for reliable electrical contact. (For tips on soldering, be sure to check out our Guide to Excellent Soldering (http://adafru.it/aTk)). © Adafruit Industries https://learn.adafruit.com/adafruit-feather-32u4-fona Page 17 of 59...
- Page 18 Solder the other strip as well. You're done! Check your solder joints visually and continue onto the next steps © Adafruit Industries https://learn.adafruit.com/adafruit-feather-32u4-fona Page 18 of 59...
- Page 19 For sockets you'll want to tape them in place so when you flip over the board they don't fall out Flip & Tack Solder After flipping over, solder one or two points on each strip, to 'tack' the header in place © Adafruit Industries https://learn.adafruit.com/adafruit-feather-32u4-fona Page 19 of 59...
- Page 20 And Solder! Be sure to solder all pins for reliable electrical contact. (For tips on soldering, be sure to check out our Guide to Excellent Soldering (http://adafru.it/aTk)). © Adafruit Industries https://learn.adafruit.com/adafruit-feather-32u4-fona Page 20 of 59...
- Page 21 You're done! Check your solder joints visually and continue onto the next steps © Adafruit Industries https://learn.adafruit.com/adafruit-feather-32u4-fona Page 21 of 59...
-
Page 22: Power Management
FONA module direct from the lipoly battery. If this isn't plugged in, the battery charger ends up trying to source an amp, which it cant, and the board will reset © Adafruit Industries https://learn.adafruit.com/adafruit-feather-32u4-fona Page 22 of 59... -
Page 23: Power Supplies
So, yeah. Use a battery! It will keep topped up when using USB, and allow the cellular module to draw current spikes without issue The JST connector polarity is matched to Adafruit LiPoly batteries. Using wrong polarity batteries can destroy your Feather The above shows the Micro USB jack (left), Lipoly JST jack (top left), as well as the 3.3V regulator and... -
Page 24: Enable Pin
If you think WiFi is power hungry, you will be surprised at how much power draw you'll need to manage with a cellular module. Here's some power traces for common events with a cellular module: Turning on the FONA Feather © Adafruit Industries https://learn.adafruit.com/adafruit-feather-32u4-fona Page 24 of 59... - Page 25 Booting cell module + connecting to network Sending an SMS send SMS: 6.5s, 150uAh, 300mW, 52mA recv sms: 6.5s, 140uAh, 330mW, 78mA Enabling GPRS enabling GPRS: about 8 seconds, 850uAh, 300mW, 70mA avg © Adafruit Industries https://learn.adafruit.com/adafruit-feather-32u4-fona Page 25 of 59...
- Page 26 TCPIP connection grab mini webpage: 4.5 sec, 203uAh, 650mW, 150mA avg Sending an MQTT packet (about 200 bytes) © Adafruit Industries https://learn.adafruit.com/adafruit-feather-32u4-fona Page 26 of 59...
- Page 27 Disabling GPRS disabling GPRS: about 4 seconds, 120uAh, 480mW, 113 mA avg © Adafruit Industries https://learn.adafruit.com/adafruit-feather-32u4-fona Page 27 of 59...
- Page 28 You can put the FONA into sleep mode (with the AT+CSCLK command) which will drop the current draw but keep the cellular connection open so you can still receive an SMS and/or wakeup quickly. © Adafruit Industries https://learn.adafruit.com/adafruit-feather-32u4-fona Page 28 of 59...
- Page 29 Note that the quiescent current drops from 40mA to 20mA and of that 20mA, about ~12mA is the ATmega32u4. Like we said, the best way to really reduce power for long-term usage is to completely turn off the module with KEY © Adafruit Industries https://learn.adafruit.com/adafruit-feather-32u4-fona Page 29 of 59...
- Page 30 Preferences menu. You can access it from the File menu in Windows or Linux, or the Arduino menu on OS X. A dialog will pop up just like the one shown below. © Adafruit Industries https://learn.adafruit.com/adafruit-feather-32u4-fona Page 30 of 59...
- Page 31 We will be adding a URL to the new Additional Boards Manager URLs option. The list of URLs is comma separated, and you will only have to add each URL once. New Adafruit boards and updates to existing boards will automatically be picked up by the Board Manager each time it is opened. The URLs point to index files that the Board Manager uses to build the list of available &...
- Page 32 Make sure you remove the apt.adafruit.com proxy setting from the Arduino preferences if you have previously added it. Here's a short description of each of the Adafruit supplied packages that will be available in the Board Manager when you add the URL: Adafruit AVR Boards - Includes support for Flora, Gemma, Feather 32u4, Trinket, &...
- Page 33 Contributed. You will then be able to select and install the boards supplied by the URLs added to the prefrences. In the example below, we are installing support for Adafruit AVR Boards, but the same applies to all boards installed with the Board Manager.
- Page 34 Install Drivers (Windows Only) When you plug in the Feather, you'll need to possibly install a driver Click below to download our Driver Installer Download Adafruit Drivers Installer http://adafru.it/mai Download and run the installer © Adafruit Industries https://learn.adafruit.com/adafruit-feather-32u4-fona Page 34 of 59...
- Page 35 Run the installer! Since we bundle the SiLabs and FTDI drivers as well, you'll need to click through the license Select which drivers you want to install: © Adafruit Industries https://learn.adafruit.com/adafruit-feather-32u4-fona Page 35 of 59...
- Page 36 Plug in the Feather 32u4 and wait for it to be recognized by the OS (just takes a few seconds). It will create a serial/COM port, you can now select it from the dropdown, it'll even be 'indicated' as Feather 32u4! © Adafruit Industries https://learn.adafruit.com/adafruit-feather-32u4-fona Page 36 of 59...
- Page 37 LED will pulse, so you know that its in bootloader mode. Do the reset button press right as the Arduino IDE says its attempting to upload the sketch, when you see the Yellow Arrow lit and the Uploading... text in the status bar. © Adafruit Industries https://learn.adafruit.com/adafruit-feather-32u4-fona Page 37 of 59...
- Page 38 (http://adafru.it/fP6) The fix for this issue is to make sure Adafruit's custom udev rules are applied to your system. One of these rules is made to configure modem manager not to touch the Bluefruit Micro board and will fix the programming difficulty issue.
- Page 39 You may need to create the libraries subfolder if its your first library. Restart the IDE. We also have a great tutorial on Arduino library installation at: http://learn.adafruit.com/adafruit-all-about-arduino-libraries-install-use (http://adafru.it/aYM) Wire up and Power! Insert a micro SIM, attach a GSM antenna, then connect battery and micro USB © Adafruit Industries https://learn.adafruit.com/adafruit-feather-32u4-fona Page 39 of 59...
- Page 40 Load Demo Open up File->Examples->Adafruit_FONA->FONAtest © Adafruit Industries https://learn.adafruit.com/adafruit-feather-32u4-fona Page 40 of 59...
- Page 41 FONA_RST and change them to: #define FONA_RX #define FONA_TX #define FONA_RST #define FONA_RI Once uploaded to your Arduino, open up the serial console at 115200 baud speed to begin the tester sketch © Adafruit Industries https://learn.adafruit.com/adafruit-feather-32u4-fona Page 41 of 59...
- Page 42 The test sketch has a menu interface so you can test out just about everything the FONA can do. The menu may change slightly as we add more functionality and update code! Continue onto the next few sections to see what functionality you can test with the sketch © Adafruit Industries https://learn.adafruit.com/adafruit-feather-32u4-fona Page 42 of 59...
- Page 43 You'll see a print-out of the battery voltage in mV, so in this case its 3.726V Check SIM CCID You can verify that the SIM is inserted and correct by reading the CCID, which is the unique identifier printed on it with C © Adafruit Industries https://learn.adafruit.com/adafruit-feather-32u4-fona Page 43 of 59...
- Page 44 © Adafruit Industries https://learn.adafruit.com/adafruit-feather-32u4-fona Page 44 of 59...
-
Page 45: Network Test
If the FONA has good signal it will immediately try to locate a cell tower and register to it. You can check the status of the network with n Once it's Home Registered, give it like 5-10 more seconds before trying to access/send SMS's or phone calls. © Adafruit Industries https://learn.adafruit.com/adafruit-feather-32u4-fona Page 45 of 59... - Page 46 © Adafruit Industries https://learn.adafruit.com/adafruit-feather-32u4-fona Page 46 of 59...
- Page 47 To set the audio to external, use the command e Note the FONA 808 only has Headset audio, so setting External audio wont do anything. The Feather FONA does not have headphone brought out, so use external only! © Adafruit Industries https://learn.adafruit.com/adafruit-feather-32u4-fona Page 47 of 59...
- Page 48 We'll use tone #20 which is the American dial tone. You can switch to headset mode, play a tone, then try it on the external audio mode. This is a very easy way to try out both speakers for debugging © Adafruit Industries https://learn.adafruit.com/adafruit-feather-32u4-fona Page 48 of 59...
- Page 49 (external or headset!) before you go forward Make a call with c - the call happens in the 'background'. When you're done then you can hang up with h © Adafruit Industries https://learn.adafruit.com/adafruit-feather-32u4-fona Page 49 of 59...
- Page 50 You can then ask the SIM how many SMS's it has with N and read all of them with R Note that SMS's are referred to by slots but the number does not include empty slots. We'll show this in detail in a bit © Adafruit Industries https://learn.adafruit.com/adafruit-feather-32u4-fona Page 50 of 59...
- Page 51 You can read individual SMS's with r © Adafruit Industries https://learn.adafruit.com/adafruit-feather-32u4-fona Page 51 of 59...
- Page 52 And delete SMS's by slot # with d Note that before I deleted SMS #2, so if I read them again, that SMS # will be an empty slot. SMS number #3 doesn't "move slots"! © Adafruit Industries https://learn.adafruit.com/adafruit-feather-32u4-fona Page 52 of 59...
- Page 53 © Adafruit Industries https://learn.adafruit.com/adafruit-feather-32u4-fona Page 53 of 59...
- Page 54 You can open and tune to an FM frequency in units of 100KHz. So if you want to tune to 88.1MHz, type in 881. For 102.3, type in 1023. Use the f command to open and tune, and F to close it © Adafruit Industries https://learn.adafruit.com/adafruit-feather-32u4-fona Page 54 of 59...
- Page 55 Feather and definitely as far as possible from the processor chip! 3. The above incoming call reset issue, which is unclear why its happening - but easy to fix © Adafruit Industries https://learn.adafruit.com/adafruit-feather-32u4-fona Page 55 of 59...
- Page 56 9. The IDE should see the bootloader COM/Serial port and upload properly For Feather M0, same as above, but *double click* the reset button, you'll see the red pulsing LED that tells you its bootloading © Adafruit Industries https://learn.adafruit.com/adafruit-feather-32u4-fona Page 56 of 59...
- Page 57 © Adafruit Industries https://learn.adafruit.com/adafruit-feather-32u4-fona Page 57 of 59...
-
Page 58: Fabrication Print
Downloads Adafruit FONA Arduino Library (http://adafru.it/ncj) Adafruit Feather 32u4 PCB files (http://adafru.it/nck) Schematic Click to enlarge Fabrication Print Dimensions in Inches © Adafruit Industries https://learn.adafruit.com/adafruit-feather-32u4-fona Page 58 of 59... -
Page 59: Data Sheets
SIM800HL Schematic and PCB Reference Design (http://adafru.it/kEe) SIM800H GCF I13GC9551_RSE-E Report (http://adafru.it/kEf) SIM800H CE Certificate (http://adafru.it/kEg) SIM800H CTTL + GCF Test Report (http://adafru.it/kEh) I14Z46950-GPM01 Test Report (http://adafru.it/kEi) © Adafruit Industries Last Updated: 2016-04-27 02:03:50 PM EDT Page 59 of 59... - Page 60 SIM800H PTCRB Test Report (http://adafru.it/kEj) SIM800H RoHS Test Report (http://adafru.it/kEk) SIM800H REACH Test Report (http://adafru.it/kEl) SIM800H GCF I13GC9551 Test Report (http://adafru.it/kEm) SIM800H FCC PCB Grant Final (http://adafru.it/kEn) SIM800H FCC DSS Grant Final (http://adafru.it/kEo) SIM800H CE EMC Test Report (http://adafru.it/kEp) SIM800H CE RF-BT Test Report (http://adafru.it/kEq) SIM800H CE RF-GSM Test Report (http://adafru.it/kEr)
Need help?
Do you have a question about the Feather 32u4 FONA and is the answer not in the manual?
Questions and answers