
Related Manuals for ravioli J Series

Summary of Contents for ravioli J Series
- Page 1 UNITA’ DI COMANDO TRANSMITTER UNITS JPB06 JPB09 JPB13 Radiocomando industriale Industrial radio remote control Manuale d’uso User manual...
- Page 2 BENVENUTI Congratulazioni per aver scelto un radiocomando industriale RAVIOLI, progettato e realizzato secondo le più evolute tecnologie di settore e i più innovativi criteri ergonomici. Il presente manuale fornisce tutte le indicazioni per poter installare ed utilizzare al meglio il Vostro Radiocomando.
- Page 3 —————————— ————————————————— UNITA’ DI COMANDO JPB INDICE DEGLI ARGOMENTI Informazioni generali Unità disponibili Sicurezza del sistema Unità di comando JPB06 Unità di comando JPB09 Unità di comando JPB13 Dati tecnici generali Opzioni Funzionamento Configurazione delle opzioni Funzionamento ‘Data feedback’ Personalizzazione scritta display Sostituzione batterie Manutenzione Rottamazione...
- Page 4 (rif. A,B) – rivolgersi all’ Assistenza Ravioli per ulteriori chiarimenti e supporto tecnico. In caso di semplici contatti ‘on/off’ sono disponibili degli opportuni ingressi sul ricevitore –vedi rif. A,B...
- Page 5 —————————— ————————————————— UNITA’ DI COMANDO JPB RAVIOLI non potrà in nessun caso essere ritenuta responsabile per inosservanza a quanto sopra definito Unità disponibili UNITA’ DI COMANDO RICEVITORI COMPATIBILI J P B xx yy J R B xx yy LINEA DI PRODOTTO...
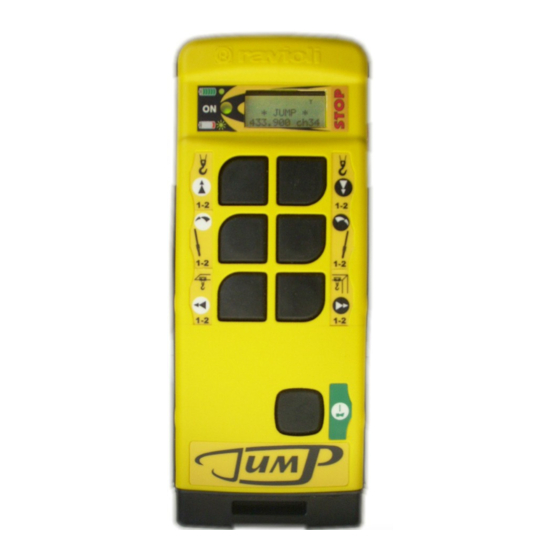
- Page 6 —————————— ————————————————— UNITA’ DI COMANDO JPB Unità di comando JPB06 P14_2 P1_2 P2_2 P3_2 P4_2 P5_2 P6_2 DATI TECNICI JPB06 Comandi disponibili 6 pulsanti con comandi a doppio scatto + pulsante di start Comandi opzionali ** ( P14 – P14_2 ) Vedere paragrafo OPZIONI Dimensioni 225 x 85 x 55 mm...
- Page 7 —————————— ————————————————— UNITA’ DI COMANDO JPB Unità di comando JPB09 P14_2 P1_2 P2_2 P3_2 P4_2 P5_2 P6_2 P7_2 P8_2 P9_2 DATI TECNICI JPB09 Comandi disponibili 9 pulsanti con comandi a doppio scatto + pulsante di start Comandi opzionali ** ( P14 – P14_2 ) Vedere paragrafo OPZIONI Dimensioni 225 x 85 x 55 mm...
- Page 8 —————————— ————————————————— UNITA’ DI COMANDO JPB Unità di comando JPB13 P14_2 P1_2 P2_2 P3_2 P4_2 P5_2 P6_2 P7_2 P8_2 P9_2 P10_2 P11_2 P12_2 P13_2 DATI TECNICI JPB13 Comandi disponibili 13 pulsanti con comandi a doppio scatto + pulsante di start Comandi opzionali ** ( P14 –...
- Page 9 —————————— ————————————————— UNITA’ DI COMANDO JPB Dati tecnici generali Frequenza di lavoro 433,100 ÷ 434,700 MHz Numero canali radio (canale di comando) Numero canali radio (canale ‘data feedback’) 2 Distanza di Hamming >= 6 Possibilità di manovra errata 4,7x10 Codici di indirizzo Tempo di risposta comandi 65 ms Tempo di ‘refresh’...
- Page 10 A questo punto il LED si accende di verde e sul display appare per qualche secondo la scritta “JUMP – Ravioli SpA”, dopodiché –se il canale di ‘data feedback’ è attivato (predisposizione di serie) e la ricevente è attivata- viene visualizzato un messaggio di default della ricevente - ‘FEEDBACK OK’- oppure i dati personalizzati dell’utente (quali allarmi, misure etc.) –...
- Page 11 —————————— ————————————————— UNITA’ DI COMANDO JPB OPERAZIONI CON CODICE DI ACCESSO La protezione con CODICE DI ACCESSO (‘pincode’) impedisce l'utilizzo non autorizzato del dispositivo. La funzione non è pre-attivata di serie; si raccomanda comunque il suo impiego allo scopo di impedire utilizzi non autorizzati od accidentali del radiocomando. Nel seguito viene descritto come attivare (e deattivare) la funzione ed il suo utilizzo.
- Page 12 —————————— ————————————————— UNITA’ DI COMANDO JPB CONTROLLO DELLA BATTERIA Quando la batteria è quasi scarica, il LED situato sulla parte superiore dell’unità di comando passa da verde fisso a verde lampeggiante. Inoltre nel display lampeggia il simbolo di batteria. In questa condizione, è possibile continuare a lavorare per circa 10 minuti prima che il radiocomando si spenga definitivamente.
- Page 13 —————————— ————————————————— UNITA’ DI COMANDO JPB • Premere il tasto 3 per attivare o disattivare l'autospegnimento. Il LED si accende in VERDE quando si attiva ed in ROSSO quando si disattiva, mentre sul display appare la scritta “TX apo ON” oppure “TX apo OFF” -dove ‘apo stà per ‘auto power off’- •...
- Page 14 PLC, computer o similari) al ricevitore del radiocomando tramite un cavo seriale conforme allo standard RS422, seguendo le procedure ed i protocolli illustrati in rif. A,B – rivolgersi all’ Assistenza Ravioli per ulteriori chiarimenti e supporto tecnico. In caso di semplici contatti ‘on/off’ sono disponibili degli opportuni ingressi sul ricevitore –vedi rif.
- Page 15 —————————— ————————————————— UNITA’ DI COMANDO JPB Personalizzazione scritta display Nota: questa funzionalità è utilizzabile pienamente solo con il canale di ‘data feedback’ disattivato (‘FEEDBACK OFF’ - vedi “Configurazione Opzioni/Predisposizioni ‘Data Feedback’), in quanto con il canale di ‘feedback’ attivo il display viene utilizzato in via prioritaria per i messaggi provenienti dalla macchina controllata (o, in assenza di questa, dal ricevitore).
- Page 16 RAVIOLI. Per la riparazione devono essere utilizzate esclusivamente parti di ricambio originali RAVIOLI, pena il decadimento immediato della garanzia o assistenza. E' obbligatorio sostituire prontamente tutte le parti che presentano difetti o alterazioni, anche al di fuori del programma di manutenzione, perché...
- Page 17 LED si accende in VERDE ma non appare il anomalia. simbolo “antenna” sul display in alto a destra Rivolgersi alla rete di Assistenza RAVIOLI Sul display non vengono visualizzati i dati di Verificare che la funzione ‘Data Feedback’ non ‘feedback’ provenienti dalla macchina sia disabilitata (‘FEEDBACK OFF’...
- Page 18 (tramite contatti on/off oppure interfaccia seriale) non è stata implementata correttamente oppure non funziona. Verificare le corrette procedure sui rif. A, B oppure rivolgersi all’Assistenza RAVIOLI. Il radiocomando non funziona ancora Effettuare la diagnostica dell'unità ricevente (rif. A/B).
- Page 19 WELCOME Congratulations for choosing RAVIOLI industrial radio remote control, which is designed according to the most advanced technologies and the most innovative ergonomic principles. This manual provides you for all information in order to install and use your radio remote control for the best.
-
Page 20: Table Of Contents
————————— ————————————————— JPB TRANSMITTER UNIT SUMMARY Conventions General information Available units Safety JPB06 transmitter unit JPB09 transmitter unit JPB13 transmitter unit General technical data Options Operating instructions Options setting ‘Data feedback’ operation Customized display message Battery replacement Maintenance Disposal Troubleshooting Conventions Symbols we use in the manual and their meaning: Instructions... -
Page 21: General Information
(ref. A,B). – address to Ravioli Technical Assistance for further details and tecnical support. In the case the required connections are simple ‘on/off’ contacts suitable inputs are available on receiver (refer to A,B). -
Page 22: Available Units
————————— ————————————————— JPB TRANSMITTER UNIT RAVIOLI shall not be considered responsible for non- compliance with the a.m. directions Available units TRANSMITTER UNITS AVAILABLE RECEIVERS J P B xx yy J R B xx yy PRODUCT LINE PRODUCT LINE J LINE... -
Page 23: Jpb06 Transmitter Unit
—————————— ————————————————— JPB TRANSMITTER UNIT JPB06 transmitter unit P14_2 P1_2 P2_2 P3_2 P4_2 P5_2 P6_2 TECHNICAL DATA JPB06 Available commands 6 two-step push-buttons + start push-button Optional commands ** ( P14 – P14_2 ) See paragraph OPTIONS Dimensions 225 x 85 x 55 mm Weight 470 g... -
Page 24: Jpb09 Transmitter Unit
————————— ————————————————— JPB TRANSMITTER UNIT JPB09 transmitter unit P14_2 P1_2 P2_2 P3_2 P4_2 P5_2 P6_2 P7_2 P8_2 P9_2 TECHNICAL DATA JPB09 Available commando 9 two-step push-buttons + start push-button Optional commands ** ( P14 – P14_2 ) See paragraph OPTIONS Dimensions 225 x 85 x 55 mm Weight... -
Page 25: Jpb13 Transmitter Unit
—————————— ————————————————— JPB TRANSMITTER UNIT JPB13 transmitter unit P14_2 P1_2 P2_2 P3_2 P4_2 P5_2 P6_2 P7_2 P8_2 P9_2 P10_2 P11_2 P12_2 P13_2 TECHNICAL DATA JPB13 Available commands 13 two-step push-buttons + start push-button Optional commands ** ( P14 – P14_2 ) See paragraph OPTIONS Dimensions 275 x 85 x 55 mm... -
Page 26: General Technical Data
————————— ————————————————— JPB TRANSMITTER UNIT General technical data Operating frequency 433,100 ÷ 434,700 MHz Number of radio channels Hamming distance >= 6 Error probability 4,7x10 Address codes Command response time 65 ms Data feedback refresh time about 1 sec. Active STOP response time 65 ms Automatic STOP response time 1,6 sec. -
Page 27: Operating Instructions
After access code insertion, the LED located in the upper part of the unit lights on in green while the message “JUMP – Ravioli SpA” appears for a few seconds on the display, then -if the ‘data feedback’ channel is set (standard configuration) and the receiver is active- either the default message of the receiver -‘FEEDBACK OK’- or the customized data of the user (such... - Page 28 ————————— ————————————————— JPB TRANSMITTER UNIT TWO-RELEASE BUTTON COMMANDS ACTIVATION Push the command actuators to start the movement you need according to their symbols Px_2 and to your application All actuators are two-release, as the image shows. Px + Px_2 COMMAND COMMAND COMMANDS STOP AND TURNING OFF...
-
Page 29: Options Setting
—————————— ————————————————— JPB TRANSMITTER UNIT Options setting In order to increase the flexibility of the radio remote control, the user can directly modify some operating parameters by means of simple settings on the transmitter unit. To enable the settings, operate as follows: •... - Page 30 ————————— ————————————————— JPB TRANSMITTER UNIT Thanks to this option you can change the AUTOMATIC STOP time on the receiver, from min. 0,3 to max. 1,8 sec. (pre-set value: 1,6 sec.) Push button 5 to increase this value of 0,1 sec. at each push, to max. 1,8 sec., or push button 6 for decreasing the time of 0,1 sec.
-
Page 31: Data Feedback' Operation
RS422 standard, following the instructions and the protocols described in the receiver manual (ref. A,B). – address to Ravioli Technical Assistance for further details and tecnical support. In the case the required connections are simple ‘on/off’ contacts suitable inputs are available on receiver –refer to A,B. -
Page 32: Customized Display Message
————————— ————————————————— JPB TRANSMITTER UNIT Customized display message Note: this option can be fully used only when the ‘data feedback’ channel is disabled (‘FEEDBACK OFF’ – refer to “Options setting/‘Data Feedback’ setting), because when the feedback channel is activated the display is used primarily for the messages from the controlled machine (or, in absence of this, from the receiver). -
Page 33: Maintenance
For all special interventions of maintenance, repairing and replacement of damaged parts, contact RAVIOLI Assistance Network. Only original RAVIOLI spare parts can be used for repairing, otherwise warranty and assistance will decay. It is compulsory to replace immediately all the parts showing any damage or change, although they are not included in the maintenance program, since they can modify the radio remote control safety. - Page 34 (refer to ‘Options setting/‘Data Feedback’ setting). If the feedback radio link does not work yet address to Ravioli Technical Assistance ‘Data Feedback’ option is enabled, feedback Verify that the controlled machine is radio link works properly, but data feedback is...
- Page 35 La RAVIOLI non potrà essere ritenuta in alcun modo responsabile per eventuali errori o omissioni nelle informazioni contenute nello stesso. Total or partial copy of this user manual in any form is forbidden unless RAVIOLI S.p.A’s preventive written authorization. The content of this manual can be modified without warning or communication.
- Page 36 RAVIOLI S.p.A.Via Passo Pordoi, 4 ● I -20139 Milano Tel +3902536301 (ric. aut.) ● fax +3902536305 E-mail: raviolispa@raviolispa.com Web: www.raviolispa.com...
Need help?
Do you have a question about the J Series and is the answer not in the manual?
Questions and answers