Best Cattura Downdraft D49M30SB Service Manual
Hide thumbs
Also See for Cattura Downdraft D49M30SB:
- Manual (64 pages) ,
- Installation instructions manual (44 pages) ,
- Instructions manual (36 pages)

Related Manuals for Best Cattura Downdraft D49M30SB


Summary of Contents for Best Cattura Downdraft D49M30SB
- Page 1 Cattura ™ Downdraft Service Manual D49M30SB, D49M36SB, D49M48SB Downdraft Ventilator Pub Number: 99045685C...
-
Page 2: Safe Servicing Practices
• All panels are properly and securely re-assembled NOTE This service manual is intended for use by persons having electrical and mechanical training and a level of knowledge of these subjects considered acceptable in the appliance repair trade. BEST ® cannot be responsible, or assume any liability, for injury or damage of any kind arising from the use of this manual. -
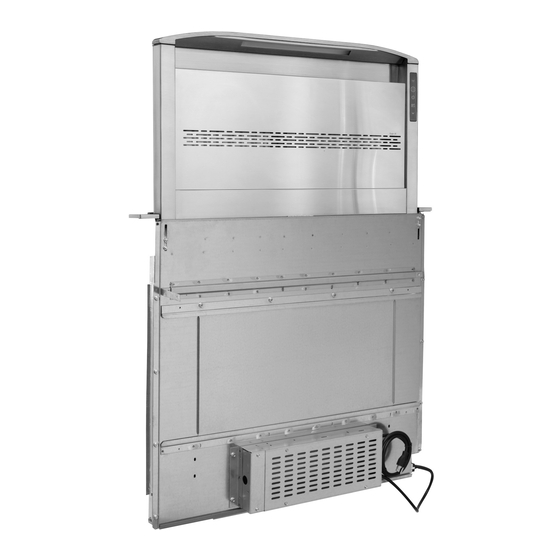
Page 3: Downdraft Components
Downdraft components Top Cap BACK LED Light Bar Baffles (left and Chimney right sides) Chimney Grille Lift Guide Cover User Interface Door Assembly Cover (Left) DOWN Button Heat Sentry Angle Brackets Angle Brackets (left and (left and Filters (left and right sides) right sides) right sides) -
Page 4: Table Of Contents
Table of contents ➠ Safe servicing practices BACK ➠ Grounding instructions ➠ Downdraft components ➠ Table of contents Section A – Troubleshooting sequences ..................... 6 ➠ Chimney will not rise – UP button will not light ➠ Chimney will not rise – UP button lights ➠... - Page 5 Section C – Correction steps ......................35 BACK ➠ Reseat Chimney Grille ➠ Realign or replace Door Assembly or Door Assembly Cover (Left) ➠ Repair or replace Door Assembly Cover (Right) with UP Button ➠ Replace User Interface ➠ Replace LED Light Bar ➠...
-
Page 6: Section A - Troubleshooting Sequences
Chimney will not rise – UP button will not light (page 1 of 2) TesT Response ➠ Chimney will not rise – UP Press UP button. Does it light? button lights (p.8) BACK External Check cord plug. Is it fully seated? Plug in cord. - Page 7 Chimney will not rise – UP button will not light (page 2 of 2) << Continued from previous page BACK TesT Response ➠ Main PCB Replace Main PCB (p.44) Test wires and connections at connector CN5 on Main PCB. †...
-
Page 8: Chimney Will Not Rise - Up Button Lights
Chimney will not rise – UP button lights (page 1 of 2) TesT Response ➠ Chimney will not rise – UP Press UP button. Does it light? button will not light (p.6) BACK Main PCB 1. Locate electrical box. If necessary, remove rangetop, oven or cooktop components, or blower assembly, to allow direct access to Electrical Box. - Page 9 Chimney will not rise – UP button lights (page 2 of 2) << Continued from previous page TesT Response BACK Actuator Check actuator circuit continuity. † Is actuator circuit continuity good? Circuit Continuity Test Actuator circuit continuity (p.32) Chimney Obstruction Detection Switches ➠...
-
Page 10: Chimney Will Not Lower - Down Button Will Not Light
Chimney will not lower – DOWN button will not light (page 1 of 2) TesT Response ➠ Chimney will not lower – DOWN Press DOWN button. Does it light? button lights (p.12) BACK External Check cord plug. Is it fully seated? Plug in cord. - Page 11 Chimney will not lower – DOWN button will not light (page 2 of 2) << Continued from previous page TesT Response BACK User Remove User Interface: Interface NOTICE: Unplug the main power cable for the downdraft and wait 1 full minute (60 seconds) before disconnecting any Molex connectors.
-
Page 12: Chimney Will Not Lower - Down Button Lights
Chimney will not lower – DOWN button lights (page 1 of 2) TesT Response ➠ Chimney will not lower – DOWN Press DOWN button. Does it light? button will not light (p.10) BACK Main PCB 1. Locate electrical box. If necessary, remove rangetop, oven or cooktop components, or blower assembly, to allow direct access to Electrical Box. - Page 13 Chimney will not lower – DOWN button lights (page 2 of 2) << Continued from previous page TesT Response BACK Actuator Check actuator circuit continuity. † Is actuator circuit continuity good? Circuit Continuity Test Actuator circuit continuity (p.32) Chimney Obstruction Detection Switches ➠...
-
Page 14: Unit Functioning, But Poor Cooking Plume Capture
Unit functioning, but poor cooking plume capture TesT Response Filters 1. Press UP button to raise Chimney. 2. Remove Chimney Grille. Dirty or BACK Damaged ➠ Clean or replace Filters (p.55) Inspect filters. † Is there excessive grease accumulation? External Access ductwork. -
Page 15: Chimney Is Raised, But Blower Does Not Turn On
Chimney is raised, but blower does not turn on TesT Response ➠ Press LED light button. Does LED Light Bar illuminate? Go to Chimney will not rise – UP button lights (p.8) LED light button only works when Chimney is fully raised. ... -
Page 16: Unit Makes Rattling Or Squeaking Noise When Chimney Rises Or Lowers
Unit makes rattling or squeaking noise when Chimney rises or lowers TesT Response Chimney Press UP button to raise Chimney. BACK Grille Not ➠ Inspect back of Chimney Grille. Reseat Chimney Grille (p.35) Properly † Are ears on either side of Lift Guide Cover seated Seated firmly in retaining tabs at back of Chimney Grille? ➠... -
Page 17: Unit Makes Rustling Or Whooshing Noise When Chimney Rises Or Lowers
Unit makes rustling or whooshing noise when Chimney rises or lowers TesT Response Packing 1. Press UP button to raise Chimney. BACK 2. Remove Chimney Grille. Material Left in Unit Inspect inside of Chimney: is any plastic or cardboard Remove material. -
Page 18: Chimney Is Raised, But Led Light Bar Will Not Turn On
Chimney is raised, but LED Light Bar will not turn on TesT Response ➠ Go to Chimney will not rise – Press fan speed button. Does fan speed change? BACK UP button lights (p.8) Fan speed button only works when Chimney is fully raised. LED Light Remove User Interface: NOTICE:... -
Page 19: Section B - Wiring Test Sequences
Test continuity between Door Assembly Cover and Frame BACK <1Ω acceptable Ω... -
Page 20: Test Main Pcb
Test Main PCB (page 1 of 2) NOTICE NOTICE BACK Follow these steps before disconnecting Terminal connections inside Molex or reconnecting ANY wiring in the connectors are easily bent or broken. Do downdraft. Failure to do so may damage not force probes when testing connectors. - Page 21 Test Main PCB (page 2 of 2) Recorded values ±10% are acceptable << Continued from previous page BACK 24.00 Pin 1 to Pin 2 5.000 Pin 2 to Pin 3 24.00...
-
Page 22: Test Continuity At Triac
Test continuity at Triac NOTICE NOTICE BACK Follow these steps before disconnecting Terminal connections inside Molex or reconnecting ANY wiring in the connectors are easily bent or broken. Do downdraft. Failure to do so may damage not force probes when testing connectors. the downdraft. -
Page 23: Test Line Filter
Test Line Filter NOTICE NOTICE BACK Follow these steps before disconnecting Terminal connections inside Molex or reconnecting ANY wiring in the connectors are easily bent or broken. Do downdraft. Failure to do so may damage not force probes when testing connectors. the downdraft. -
Page 24: Test 4-Pin Connector For Up Button Wiring
Test 4-pin connector for UP Button wiring NOTICE NOTICE BACK Follow these steps before disconnecting Terminal connections inside Molex or reconnecting ANY wiring in the connectors are easily bent or broken. Do downdraft. Failure to do so may damage not force probes when testing connectors. -
Page 25: Test Continuity At Connector Cn10 To Make-Up Air Damper
Test continuity at connector CN10 to make-up air damper NOTICE NOTICE BACK Follow these steps before disconnecting Terminal connections inside Molex or reconnecting ANY wiring in the connectors are easily bent or broken. Do downdraft. Failure to do so may damage not force probes when testing connectors. -
Page 26: Test Power Supply
Test Power Supply (page 1 of 2) NOTICE NOTICE BACK Follow these steps before disconnecting Terminal connections inside Molex or reconnecting ANY wiring in the connectors are easily bent or broken. Do downdraft. Failure to do so may damage not force probes when testing connectors. - Page 27 Test Power Supply (page 2 of 2) Recorded values ±10% are acceptable << Continued from previous page BACK -V to +V 24.00...
-
Page 28: Test Field Wiring To Blower
Test field wiring to blower (page 1 of 2) NOTICE NOTICE BACK Follow these steps before disconnecting Terminal connections inside Molex or reconnecting ANY wiring in the connectors are easily bent or broken. Do downdraft. Failure to do so may damage not force probes when testing connectors. - Page 29 Test field wiring to blower (page 2 of 2) Recorded values ±10% are acceptable << Continued from previous page BACK 120.0 Fan speed: medium low 120.0 Fan speed: low...
-
Page 30: Test 6-Pin Connector From Wire Harness To User Interface
Test 6-pin connector from Wire Harness to User Interface NOTICE NOTICE BACK Follow these steps before disconnecting Terminal connections inside Molex or reconnecting ANY wiring in the connectors are easily bent or broken. Do downdraft. Failure to do so may damage not force probes when testing connectors. -
Page 31: Test User Interface
Test User Interface NOTICE NOTICE BACK Follow these steps before disconnecting Terminal connections inside Molex or reconnecting ANY wiring in the connectors are easily bent or broken. Do downdraft. Failure to do so may damage not force probes when testing connectors. the downdraft. -
Page 32: Test Actuator Circuit Continuity
Test Actuator circuit continuity NOTICE BACK Follow these steps before disconnecting or reconnecting ANY wiring in the downdraft. Failure to do so may damage the downdraft. 1. Unplug main power cable from wall socket or external power supply. 2. Wait 1 full minute (60 seconds). -
Page 33: Test Actuator
Test Actuator NOTICE Swap leads to free battery terminals to reverse polarity and re-test. BACK Follow these steps before disconnecting or reconnecting ANY wiring in the downdraft. Failure to do so may damage the downdraft. 1. Unplug main power cable from wall socket or external power supply. -
Page 34: Test Continuity At Chimney Obstruction Detection Switches
Test continuity at Chimney Obstruction Detection Switches <1Ω acceptable BACK Ω Ω... -
Page 35: Reseat Chimney Grille
Reseat Chimney Grille BACK Press UP button to raise Chimney Lift Chimney Grille up, then away from frame Reinstall Chimney Grille Tabs behind ears in Lift Guide Cover Tabs behind frame... -
Page 36: Realign Or Replace Door Assembly Or Door Assembly Cover (Left)
Realign or replace Door Assembly or Door Assembly Cover (Left) Remove all adhesive (both sides) To Replace Door Assembly BACK Request Service Kit: 97019636 (D49M30SB) Peel off • 97019637 (D49M36SB) • 97019638 (D49M48SB) • Follow all steps To Replace Door Assembly Cover (Left) Request Service Kit: 97019640 (all models) •... -
Page 37: Repair Or Replace Door Assembly Cover (Right) With Up Button
Repair or replace Door Assembly Cover (Right) with UP Button Request Service Kit: 97020244 (all models) BACK • Peel off NOTICE Follow these steps before disconnecting or reconnecting ANY wiring in the downdraft. Failure to do so may damage the downdraft. -
Page 38: Replace User Interface
Replace User Interface (page 1 of 2) Request Service Kit: BACK 99271514 (all models) • Unplug Molex NOTICE connector Follow these steps before disconnecting or reconnecting ANY wiring in the downdraft. Failure to do so may damage the downdraft. 1. - Page 39 Replace User Interface (page 2 of 2) << Continued from previous page BACK Pull out User Interface NOTICE: Avoid contact with exposed post! Unplug two Molex connectors...
-
Page 40: Replace Led Light Bar
Replace LED Light Bar (page 1 of 2) Request Service Kit: BACK 99271515 (D49M30SB) • 99271516 (D49M36SB) • 99271517 (D49M48SB) • Unplug Molex connector NOTICE Follow these steps before disconnecting or reconnecting ANY wiring in the downdraft. Failure to do so may damage the downdraft. - Page 41 Replace LED Light Bar (page 2 of 2) << Continued from previous page BACK Pull out User Interface NOTICE: Avoid contact with exposed post! Remove (2) nuts and LED Light Bar Unplug...
-
Page 42: Replace Heat Sentry
Replace Heat Sentry Cut and strip Request Service Kit: wires. Remove (1) BACK 97019665 (all models) • retaining screw and Heat Sentry. NOTICE Follow these steps before disconnecting or reconnecting ANY wiring in the downdraft. Failure to do so may damage the downdraft. -
Page 43: Replace Fuse On Main Pcb
Replace fuse on Main PCB Request Service Kit: 97020368 (all models) BACK • 10-amp 5x20mm fast-acting fuse NOTICE Follow these steps before disconnecting or reconnecting ANY wiring in the downdraft. Failure to do so may damage the downdraft. 1. Unplug main power cable from wall socket or external power supply. -
Page 44: Replace Main Pcb
Replace Main PCB Unplug Molex connectors Request Service Kit: BACK 99271573 (all models) • CN10 NOTICE Follow these steps before disconnecting or reconnecting ANY wiring in the downdraft. Failure to do so may damage the downdraft. 1. Unplug main power cable from wall socket or external power supply. -
Page 45: Replace Power Supply
Replace Power Supply Request Service Kit: Loosen (5) 99271573 (all models) BACK • terminal screws NOTICE Follow these steps before disconnecting or reconnecting ANY wiring in the downdraft. Failure to do so may damage Remove wires the downdraft. 1. Unplug main power cable from wall socket or external power supply. -
Page 46: Replace Electrical Box
Replace Electrical Box Disconnect wires Request Service Kit: to blower BACK 97019584 (all models) • (1) screw Green NOTICE Orange-Orange White-White Follow these steps before disconnecting Blue-Blue or reconnecting ANY wiring in the Black-Black downdraft. Failure to do so may damage Red-Gray the downdraft. -
Page 47: Lubricate Airbox Front
Lubricate Airbox Front If necessary, press DOWN BACK button to lower Remove (5) Chimney retaining screws, then Airbox Front. If necessary, remove screws and retract Angle Brackets. Unplug NOTICE Follow these steps before disconnecting or reconnecting ANY wiring in the downdraft. -
Page 48: Replace Chimney Seal
Replace Chimney Seal Request Service Kit: BACK 97019874 (D49M30SB) • 97019875 (D49M36SB) • Remove 97019877 (D49M48SB) • (9) retaining nuts from Airbox Front If necessary, press DOWN button to lower Chimney Remove (5) retaining screws, then Airbox Front. NOTICE If necessary, remove screws and retract... -
Page 49: Realign Airbox Wedge Assemblies
Realign Airbox Wedge Assemblies If necessary, press DOWN BACK button to lower Chimney Press UP button to raise Chimney Remove obstructions to allow direct access to Airbox Front. If necessary, remove rangetop, oven or cooktop components, or blower assembly. Slide Airbox Wedge Assembly down until it is tightly seated... -
Page 50: Replace Lift Guide Pucks
Replace Lift Guide Pucks (page 1 of 2) Request Service Kit: BACK 97019676 (all models) • Remove (5) retaining screws, then Airbox Front. If necessary, remove screws Press UP button to and retract raise Chimney Angle Brackets. Unplug Remove (8) retaining screws NOTICE Follow these steps before disconnecting or reconnecting ANY wiring in the... - Page 51 Replace Lift Guide Pucks (page 2 of 2) << Continued from previous page BACK D49M48SB only: remove Lift Guide Pucks from side rails Install new Lift Install new Lift Guide Pucks Guide Pucks Puck tool (in kit)
-
Page 52: Replace Actuator
Replace Actuator (page 1 of 2) NOTICE Request Service Kit: BACK 99271524 (all models) • Follow these steps before disconnecting or reconnecting ANY wiring in the downdraft. Failure to do so may damage the downdraft. 1. Unplug main power cable from wall socket or Press UP button to external power supply. - Page 53 Replace Actuator (page 2 of 2) << Continued from previous page Manually lift Chimney NOTICE until it is clear of BACK Actuator Do not adjust the Chimney Obstruction Detection Switches or allow the switch assembly to come in contact with the Actuator during removal.
-
Page 54: Adjust Actuator Height
Adjust Actuator height NOTICE BACK Do not adjust the Chimney Press UP button to Obstruction Detection raise Chimney Switches or allow the switch assembly to come in contact with the Actuator during adjustment. Any change to the default configuration of the switches may cause the Chimney to malfunction and require replacement of... -
Page 55: Clean Or Replace Filters
Clean or replace Filters Replace Filters BACK Press UP button to raise Chimney Align Filters with mounting brackets Reinstall Chimney Grille Tabs behind ears in Lift Guide Cover Lift Chimney Grille up, then away from frame Tabs behind frame Lift Filters up, then away from frame To clean: wash Filters in mild detergent... -
Page 56: Replace Wire Harness
Replace Wire Harness (page 1 of 3) Request Service Kit: BACK 99271510 (all models) • Pull Top Cap back and away Press UP button to raise Chimney Unplug Molex NOTICE connector Follow these steps before disconnecting or reconnecting ANY wiring in the downdraft. - Page 57 Replace Wire Harness (page 2 of 3) << Continued from previous page Pull out User Interface BACK Disconnect (4) plugs to Chimney NOTICE: Avoid contact with Obstruction exposed post! Detection Switches Remove (1) screw and Heat Sentry Remove obstructions to allow direct access to Airbox Front.
- Page 58 Replace Wire Harness (page 3 of 3) << Continued from previous page Disconnect (1) screw BACK and ground wire Cut wire ties. Pull out Wire Harness. Disconnect Unplug (1) screw and Molex (2) ground wires connectors and remove Wire Harness Unplug Unplug...
-
Page 59: Replace Downdraft
Replace downdraft Disconnect wires Request new downdraft: to blower D49M30SB BACK • (1) screw D49M36SB Green • D49M48SB • Orange-Orange White-White If necessary, Blue-Blue press DOWN Black-Black button to lower Red-Gray Chimney Remove (8) screws to Remove obstructions to allow direct access Angle Brackets and Airbox to Electrical Box and Airbox Front. -
Page 60: Section D - Specifications
Exploded view BACK... -
Page 61: Service Parts
Service parts BACK KEY NO. 30N WIDTH 36N WIDTH 48N WIDTH DESCRIPTION 97019624 97019625 97019626 Top Cap 99271515 99271516 99271517 LED Light Bar 97020361 97020361 97020361 Angle Brackets (Right & Left) 97019636 97019637 97019638 Door Assembly (includes Door Assembly Hardware Kit) 97020366 97020366 97020366... -
Page 62: Molex And Terminal Connections
Molex and terminal connections Main PCB BACK To make-up To blower air damper Blue terminal screws Gray Yellow Black To Line Filter To line-in Black power White Black To Power Supply White Yellow To Wire Harness Gray Gray To Wire Harness Brown Orange Yellow... - Page 63 User Interface BACK Brown To UP Button Orange Yellow To LED Light Bar White Black Green Yellow Orange From Wire Harness Brown...
-
Page 64: Wiring Schematic
Wiring schematic BACK... - Page 65 BACK...
-
Page 66: Warranty
® PRODUCTS BACK Broan-NuTone LLC (Broan-NuTone) warrants to the original consumer purchaser of BEST products that such products will be free from ® defects in materials or workmanship for a period of one year from the date of original purchase. THERE ARE NO OTHER WARRANTIES,...
Need help?
Do you have a question about the Cattura Downdraft D49M30SB and is the answer not in the manual?
Questions and answers
The fan continuously cycles between the various speeds
The fan on the Best Cattura Downdraft D49M30SB may continuously cycle between various speeds if the operating temperature is too high. In this case, the fan automatically increases to the highest speed to protect sensitive components. The fan icon will flash and the fan cannot be turned off until the temperature returns to a safe level. Once the temperature is acceptable, the fan returns to the selected speed and the icon stops flashing.
This answer is automatically generated
where is the serial number
will the D49M30SB fit in a 24" deep drawer base?