Table of Contents
Advertisement
Quick Links
66
B
l
u
B
l
u
B
a
B
a
Web site:
Equipment Photo
e
S
t
r
e
a
e
S
t
r
e
a
P
o
r
t
a
b
l
e
P
o
r
t
a
b
l
n
d
S
a
w
n
d
S
a
w
Ellington Industrial Supply, Inc.
Ellington, Missouri 63638 USA
www.baker-online.com
Phone: (573) 663 – 7711 Fax: (573) 663 – 2787
T
M
T
M
k
M
o
k
M
o
o
r
S
t
a
t
e
o
r
S
t
a
t
m
i
l
l
U
s
e
m
i
l
l
U
s
e
P. O. Box 128
E-mail:
info@baker-online.com
d
e
l
3
6
4
d
e
l
3
6
4
i
o
n
a
r
y
i
o
n
a
r
y
r
M
a
n
u
a
r
M
a
n
u
a
0
E
0
E
l
l
Advertisement
Table of Contents

Related Manuals for Baker Blue Streak 3640E


Summary of Contents for Baker Blue Streak 3640E
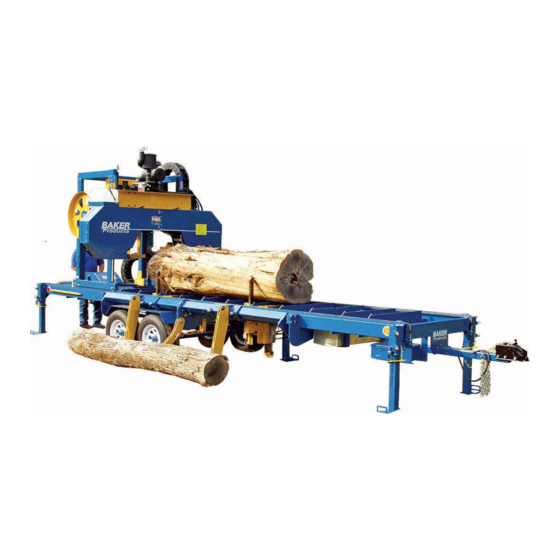
- Page 1 Equipment Photo Ellington Industrial Supply, Inc. P. O. Box 128 Ellington, Missouri 63638 USA Web site: www.baker-online.com E-mail: info@baker-online.com Phone: (573) 663 – 7711 Fax: (573) 663 – 2787...
-
Page 2: Table Of Contents
Recommended Spare Parts Machine Parts List 73-76 Service Contact Information Serial Number Location Electrical Diagram (see schematic in main electrical panel) SETWORKS MANUAL (optional, included if purchased with sawmill) Baker Blue Streak Portable or Stationary Band Sawmill - Rev 2, 03/07; WWW.BAKER-ONLINE.COM... -
Page 3: Introduction
When properly ran and maintained, it will provide you with many years of profitable operation. For safety reasons, and for your own best use of the Baker Blue Streak Portable or Stationary Band Sawmill, we insist that you read this manual fully, and constantly review and refer back to it as necessary. -
Page 4: Definition Of Terms
A mechanical apparatus with elongated cylinders used to perform rolling operation for material movement, can be both powered and/or manually operated Schematic A structural or procedural diagram, typically of an electrical or hydraulic system Baker Blue Streak Portable or Stationary Band Sawmill - Rev 2, 03/07; WWW.BAKER-ONLINE.COM... -
Page 5: Manual Contents Notice
28 in (71 cm) diameter; all-steel with crown request 36 in (91 cm) diameter; all-steel with crown Sawdust Removal: 6” (152mm) outlet; min. 1,300 CFM suction recommended at dust removal chute Baker Blue Streak Portable or Stationary Band Sawmill - Rev 2, 03/07; WWW.BAKER-ONLINE.COM... -
Page 6: Warranty
CEO or Sales Manager of Baker Products. Our one (1) year warranty period covers all items built at our manufacturing facilities including structural frame, cowlings, doors, shafting, dust chutes and guards. -
Page 7: Defective Parts
Ellington Industrial Supply, Inc. P. O. Box 128 Ellington, Missouri 63638 USA Web site: www.baker-online.com E-mail: info@baker-online.com Phone: (573) 663 – 7711 Fax: (573) 663 – 2787 Baker Blue Streak Portable or Stationary Band Sawmill - Rev 2, 03/07; WWW.BAKER-ONLINE.COM... -
Page 8: Rules For Safe Operation
No list of safety expectations can ever be complete as every work environment is as different as are the people operating the equipment. Always keep safety as your highest priority and always use this machine with caution and respect. Baker Blue Streak Portable or Stationary Band Sawmill - Rev 2, 03/07; WWW.BAKER-ONLINE.COM... -
Page 9: Control Of Hazardous Energy - (Lockout / Tagout)
2. Failure to disconnect from a power source 3. Failure to dissipate (bleed, neutralize) residual energy 4. Accidental re-starting of equipment 5. Failure to clear work areas before re- starting Baker Blue Streak Portable or Stationary Band Sawmill - Rev 2, 03/07; WWW.BAKER-ONLINE.COM... -
Page 10: Machine Safety Decals
Machine Safety Decals ** Adhere to ALL Safety Warnings! ** Baker Blue Streak Portable or Stationary Band Sawmill - Rev 2, 03/07; WWW.BAKER-ONLINE.COM... -
Page 11: Machine Features
MACHINE FEATURES We want to highlight the unique and special features of the Baker Blue Streak Portable or Stationary Band Sawmill. Heavy-duty steel construction Powerful and reliable power source Handles logs up to 36 inches in diameter ... -
Page 12: Set-Up
All five (5) of these listed items together make Guards up the safety system. Failure of any one of these factors will increase accident potential. Devices Instructions ’ ’ Baker Blue Streak Portable or Stationary Band Sawmill - Rev 2, 03/07; WWW.BAKER-ONLINE.COM... - Page 13 NOTE: Leg locking bolts must be tightened prior to moving the carriage head up and down the track moving the carriage head up and down the track Baker Blue Streak Portable or Stationary Band Sawmill - Rev 2, 03/07; WWW.BAKER-ONLINE.COM...
-
Page 14: Machine Positioning
Tighten turnbuckle outrigger to the ground; then until the outrigger remove turnbuckle pin and re- rests firmly on the assemble per the picture to ground the right Baker Blue Streak Portable or Stationary Band Sawmill - Rev 2, 03/07; WWW.BAKER-ONLINE.COM... -
Page 15: Leveling The Head Frame
Leg locking bolts and jam nut Leg locking bolts and jam nut Leg locking bolts and jam nuts Leg locking bolts and jam nut Figure 15 Baker Blue Streak Portable or Stationary Band Sawmill - Rev 2, 03/07; WWW.BAKER-ONLINE.COM... - Page 16 After all leveling legs have been adjusted, check all bolts for tightness and tighten the associated jamb nuts. Replace the leg-leveling jack handle and hairpin cotter pins. Leg-leveling jack handle Figure 16C Figure 16D Baker Blue Streak Portable or Stationary Band Sawmill - Rev 2, 03/07; WWW.BAKER-ONLINE.COM...
-
Page 17: Operator Control Station
Setting the Head forward speed too high can result in personal injury and/or equipment damage. Always verify the head speed control valve position during daily mill inspection. Baker Blue Streak Portable or Stationary Band Sawmill - Rev 2, 03/07; WWW.BAKER-ONLINE.COM... -
Page 18: Log Loader Arms
Min. of 12” Min. of 12” Ensure a minimum of 42” between loader arms past arm past arm Figure 18 Baker Blue Streak Portable or Stationary Band Sawmill - Rev 2, 03/07; WWW.BAKER-ONLINE.COM... -
Page 19: Operation
Engine RPM gauge Note: The pictures Note: The pictures referenced are for a 3667D referenced are for a 3667D Portable or Stationary Portable or Stationary Sawmill Figure 19 Baker Blue Streak Portable or Stationary Band Sawmill - Rev 2, 03/07; WWW.BAKER-ONLINE.COM... -
Page 20: Loading A Log
Raise fence arms so log arms so log can be squared can be squared Figure 20 Bring clamp in to square log against fence arms Figure 20A Baker Blue Streak Portable or Stationary Band Sawmill - Rev 2, 03/07; WWW.BAKER-ONLINE.COM... -
Page 21: Cutting A Log
Note: The blade will travel from 1 1/4" to 30" from the bunks. Always ensure that all obstructions are clear of the blade before making any cut. Baker Blue Streak Portable or Stationary Band Sawmill - Rev 2, 03/07; WWW.BAKER-ONLINE.COM... - Page 22 Cutting A Log (continued) Photos of a customer’s 3667D sawing logs into lumber Figure 22 Figure 22A Baker Blue Streak Portable or Stationary Band Sawmill - Rev 2, 03/07; WWW.BAKER-ONLINE.COM...
-
Page 23: Finished Product
Finished Product 7” x 9” x 8’6” Hardwood Railroad Ties Figure 23 4/4 Hardwood Lumber 1 1/16” x 6” x 8’6” Figure 23A Baker Blue Streak Portable or Stationary Band Sawmill - Rev 2, 03/07; WWW.BAKER-ONLINE.COM... -
Page 24: Securing The Mill For Transport
Verify that the electric brakes, brake lights and turn signals work properly prior to towing. NOTE: Baker Products will not be held responsible for any injury or damage resulting from failure to follow all safety precautions associated with vehicle towing. It is the customer’s responsibility to ensure that the mill meets all laws associated with towed equipment in their respective state or local. - Page 25 Securing the Mill for Transport (continued) Ensure log loader arms are folded over and centered on a log bunk Figure 25 Head Frame Transport Pin Locations Figure 25A Figure 25B Baker Blue Streak Portable or Stationary Band Sawmill - Rev 2, 03/07; WWW.BAKER-ONLINE.COM...
-
Page 26: Maintenance
Perform inspection and preventative maintenance per the schedule and tasks noted on Page 27. Baker Blue Streak Portable or Stationary Band Sawmill - Rev 2, 03/07; WWW.BAKER-ONLINE.COM... -
Page 27: Inspection And Preventative Maintenance Checklist
We recommend JT-6 grease (no more than 5 pumps). Have idler and pull wheel crowned. Every 2 years (2,000 - 3,000 hrs) Baker Blue Streak Portable or Stationary Band Sawmill - Rev 2, 03/07; WWW.BAKER-ONLINE.COM... - Page 28 Engine oil dipstick located here Check engine coolant here Figure 28 Figure 28A Check hydraulic fluid level here Check blade lubricant level here Figure 28C Figure 28B Baker Blue Streak Portable or Stationary Band Sawmill - Rev 2, 03/07; WWW.BAKER-ONLINE.COM...
- Page 29 Figure 29 Figure 29A Toe roller grease Toe roller grease fitting (backside) fitting (backside) Fence arm grease Fence arm grease fitting fitting Figure 29B Figure 29C Baker Blue Streak Portable or Stationary Band Sawmill - Rev 2, 03/07; WWW.BAKER-ONLINE.COM...
- Page 30 Linear rail bearings Linear rail bearings Linear rail bearings Linear rail bearings (2 per side) (2 per side) (2 per side) (2 per side) Figure 30A Figure 30B Baker Blue Streak Portable or Stationary Band Sawmill - Rev 2, 03/07; WWW.BAKER-ONLINE.COM...
- Page 31 DAILY - Clean and inspect the blade guides. Worn guides should be replaced before use. Bullet guide assembly – check pins for wear Flat guide assembly – check pads for wear Figure 31D Figure 31E Baker Blue Streak Portable or Stationary Band Sawmill - Rev 2, 03/07; WWW.BAKER-ONLINE.COM...
- Page 32 1/32” past the front face of wheels A 1-1/4” blade should be flush with the back face of the wheels Figure 32A Figure 32B Baker Blue Streak Portable or Stationary Band Sawmill - Rev 2, 03/07; WWW.BAKER-ONLINE.COM...
- Page 33 Increase or decrease belt Increase or decrease belt tension by adjusting the tension by adjusting the two (2) tensioning bolts two (2) tensioning bolts Figure 33A Baker Blue Streak Portable or Stationary Band Sawmill - Rev 2, 03/07; WWW.BAKER-ONLINE.COM...
- Page 34 Note: If chain tension is adjusted, re-calibration of the measurement dial will be required. Tension should be “taut” with no more than ¼” of play Increase or decrease Figure 34 tension here Baker Blue Streak Portable or Stationary Band Sawmill - Rev 2, 03/07; WWW.BAKER-ONLINE.COM...
- Page 35 Figure 35A Ensure N11 nut Ensure N11 nut remains tight remains tight Figure 35B Note: Spanner wrench may also be blue in color Baker Blue Streak Portable or Stationary Band Sawmill - Rev 2, 03/07; WWW.BAKER-ONLINE.COM...
- Page 36 – back of rail) per side – back of rail) *See page 30 – Figures 30A & 30B Idler wheel bearing (behind wheel) Figure 36A Baker Blue Streak Portable or Stationary Band Sawmill - Rev 2, 03/07; WWW.BAKER-ONLINE.COM...
- Page 37 Inspection and Maintenance: (continued) WEEKLY - Check setscrews on all bearings for tightness. Setscrews on Setscrews Setscrews perimeter of bearing shaft Figure 37 Baker Blue Streak Portable or Stationary Band Sawmill - Rev 2, 03/07; WWW.BAKER-ONLINE.COM...
- Page 38 WEEKLY - Grease idler wheel tension slide bearing. We Idler wheel bearing grease recommend JT-6 grease (no fitting located behind wheel more than 5 pumps). Figure 38A Baker Blue Streak Portable or Stationary Band Sawmill - Rev 2, 03/07; WWW.BAKER-ONLINE.COM...
- Page 39 Raise/Lower shaft bearing and grease fitting Figure 39B Figure 39C (Picture of toe roller and log turner bearings on next page) Baker Blue Streak Portable or Stationary Band Sawmill - Rev 2, 03/07; WWW.BAKER-ONLINE.COM...
- Page 40 Toe roller bearing grease nipple grease fitting grease nipple grease fitting Figure 40 Figure 40A (Picture of forward/reverse shaft, raise/lower shaft and measurement dial spindle bearings on previous page) Baker Blue Streak Portable or Stationary Band Sawmill - Rev 2, 03/07; WWW.BAKER-ONLINE.COM...
- Page 41 One of the first indications of this is having more blades requiring tracking or not staying properly tracked between blade changes. Baker Blue Streak Portable or Stationary Band Sawmill - Rev 2, 03/07; WWW.BAKER-ONLINE.COM...
-
Page 42: Bearing Lubrication Information
Any Temp – 250 degrees F Very Dirty Daily – 2 weeks Any Temp – 250 degrees F Extreme Conditions Daily – 2 weeks * Drive bearing on saw carriage Baker Blue Streak Portable or Stationary Band Sawmill - Rev 2, 03/07; WWW.BAKER-ONLINE.COM... -
Page 43: Changing Blades (Removal And Installation)
(Right side when facing the wheels (Right side when facing the wheels with cowling doors open) with cowling doors open) Dust chute outlet opening Figure 43 Baker Blue Streak Portable or Stationary Band Sawmill - Rev 2, 03/07; WWW.BAKER-ONLINE.COM... -
Page 44: Blade Tracking
Rotate the idler wheel several rotations counter-clockwise and look at the blade gullet in relation to the front face of the wheel. Blade Gullet Figure 44 Baker Blue Streak Portable or Stationary Band Sawmill - Rev 2, 03/07; WWW.BAKER-ONLINE.COM... - Page 45 Center bolts Pivot Point Lead adjustment Pull wheel “outward” bolts tracking adjustment bolts Figure 45 Figure 45A Side view of tracking plate and adjustment bolts Figure 45B Baker Blue Streak Portable or Stationary Band Sawmill - Rev 2, 03/07; WWW.BAKER-ONLINE.COM...
-
Page 46: Blade Lead
Loosen the guide bullets away from the blade. Figure 46A Loosen guide bullets away from blade Loosen guide bullets away from blade Loosen guide bullets away from blade Open moveable guide outward Figure 46 Baker Blue Streak Portable or Stationary Band Sawmill - Rev 2, 03/07; WWW.BAKER-ONLINE.COM... - Page 47 This will ensure proper reading of the blade relative to the bunks. After rotating counter-clockwise, stop wheels so weld is on top Figure 47 Baker Blue Streak Portable or Stationary Band Sawmill - Rev 2, 03/07; WWW.BAKER-ONLINE.COM...
- Page 48 48” straight edge to the top of the 12” straight edge front and back at the end of the straight edge. Figure 48A Figure 48B Baker Blue Streak Portable or Stationary Band Sawmill - Rev 2, 03/07; WWW.BAKER-ONLINE.COM...
- Page 49 NOTE: Check these measurements in several different locations on the blade by rotating the wheels counter-clockwise, but do so without getting the weld of the blade on the bottom near the guides. Baker Blue Streak Portable or Stationary Band Sawmill - Rev 2, 03/07; WWW.BAKER-ONLINE.COM...
- Page 50 Continue repeating the steps above until the proper lead is achieved. NOTE: The lead is set at the factory and should not have to be adjusted unless your machine has more than 500 hrs on it. Baker Blue Streak Portable or Stationary Band Sawmill - Rev 2, 03/07; WWW.BAKER-ONLINE.COM...
-
Page 51: Guides
Note: It is extremely important that the blade tracking be properly set before attempting any guide adjustment. See the “Blade Tracking” section on page 44-45 for more information. Baker Blue Streak Portable or Stationary Band Sawmill - Rev 2, 03/07; WWW.BAKER-ONLINE.COM... -
Page 52: Setting Bullet Guides
Figure 52B Baker Blue Streak Portable or Stationary Band Sawmill - Rev 2, 03/07; WWW.BAKER-ONLINE.COM... - Page 53 Figure 53B Figure 53C Finally, check band blade movement from left to right to ensure guides are holding securely without pinching or binding the band blade. Baker Blue Streak Portable or Stationary Band Sawmill - Rev 2, 03/07; WWW.BAKER-ONLINE.COM...
-
Page 54: Setting The Flat Guides
Left Guide Assembly Right Guide Assembly Baker Blue Streak Portable or Stationary Band Sawmill - Rev 2, 03/07; WWW.BAKER-ONLINE.COM... - Page 55 If required, adjust the two 1/4” bolts that push down (tilt) on the side-to-side adjustment assembly. Baker Blue Streak Portable or Stationary Band Sawmill - Rev 2, 03/07; WWW.BAKER-ONLINE.COM...
- Page 56 5/16” nut. Figure 56A Note: The pad should just touch the blade without deflecting the blade in any direction when the proper adjustments are made. Baker Blue Streak Portable or Stationary Band Sawmill - Rev 2, 03/07; WWW.BAKER-ONLINE.COM...
- Page 57 If required, adjust the two 1/4” bolts that push up and down (tilt) the side-to-side adjustment assembly. Baker Blue Streak Portable or Stationary Band Sawmill - Rev 2, 03/07; WWW.BAKER-ONLINE.COM...
- Page 58 5/16” nut. Bottom Pad Note: The pad should just touch the blade without deflecting the blade in any direction when the proper adjustments are made. Baker Blue Streak Portable or Stationary Band Sawmill - Rev 2, 03/07; WWW.BAKER-ONLINE.COM...
-
Page 59: Setting The Guide Holders And Bracket
1/16” to 1/8” behind blade gullet then re- rotate cam away from blade tighten 5/16” & 5/8” bolts Loosen the 5/16” and 5/8” bolts Figure 59A Figure 59 Baker Blue Streak Portable or Stationary Band Sawmill - Rev 2, 03/07; WWW.BAKER-ONLINE.COM... - Page 60 Loosen the 5/16” nuts to make Loosen the 5/16” nuts to make Loosen the 5/16” nuts to make the up/down adjustments the up/down adjustments the side-to-side adjustments the side-to-side adjustments Figure 60 Baker Blue Streak Portable or Stationary Band Sawmill - Rev 2, 03/07; WWW.BAKER-ONLINE.COM...
-
Page 61: Lubricating The Blade
Lubricating the Blade Baker Band Sawmills come standard with a drip type blade lubrication system. They are designed to help prevent residue build up, provide some blade cooling, and maximize blade life. The system consists of a holding tank, tank on/off valve and flow control/regulation valve. -
Page 62: Drive Wheel Adjustment
If the lead is within tolerance (0" - 1/32" up or down lead) proceed to the Idler Wheel Adjustment (page 63). If the blade lead is out of tolerance follow the Blade Lead adjustment procedure as outlined (page 46-50). Baker Blue Streak Portable or Stationary Band Sawmill - Rev 2, 03/07; WWW.BAKER-ONLINE.COM... -
Page 63: Checking The Drive Wheel To Idler Wheel Alignment
Figure 63 Step 2: Take Step 3: Take reading on vertical reading on vertical plane of the idler plane of the pull wheel wheel Figure 63A Figure 63B Baker Blue Streak Portable or Stationary Band Sawmill - Rev 2, 03/07; WWW.BAKER-ONLINE.COM... -
Page 64: Changing The Drive Belt
Replace the blade and re-set for proper blade tension. Remember to also verify proper blade tracking, guide alignment and blade lead. Once the above items have been completed, close the cowling doors. Baker Blue Streak Portable or Stationary Band Sawmill - Rev 2, 03/07; WWW.BAKER-ONLINE.COM... -
Page 65: Calibrating The Measurement Dial
Figure 65 the 1/2" bolt in the center of the measurement dial. You are now ready to cut material and verify dial is properly calibrated. Baker Blue Streak Portable or Stationary Band Sawmill - Rev 2, 03/07; WWW.BAKER-ONLINE.COM... -
Page 66: Trouble Shooting (Hydraulics; Mechanical; Electrical; Production)
Also, non-required adjustments to the hydraulic system may void your warranty. Hydraulic problems are very rare with Baker Band Sawmills. Most problems can usually be traced to changes in pressure or flow. If a hydraulic part does fail, all valves are modular and are relatively easy to replace. - Page 67 If the gauge on the stand-alone unit shows no pressure the problem is in the pump assembly. Baker Blue Streak Portable or Stationary Band Sawmill - Rev 2, 03/07; WWW.BAKER-ONLINE.COM...
- Page 68 Log turner, fence arms, The affected part is binding and requires lubrication. clamp, or toe rollers will not Grease the appropriate part with grease. rise, but all pressures are good. Baker Blue Streak Portable or Stationary Band Sawmill - Rev 2, 03/07; WWW.BAKER-ONLINE.COM...
- Page 69 12VDC is not being supplied to any of the system components. Check the battery cables and ensure they are clean and tight. Ensure the batteries are properly charged and capable of supplying the required power. Baker Blue Streak Portable or Stationary Band Sawmill - Rev 2, 03/07; WWW.BAKER-ONLINE.COM...
- Page 70 If there is +12VDC and -12VDC as the switch is moved, check the wiring from the terminal to the guide arm for loose or broken connection. Ensure solenoids are energizing. Baker Blue Streak Portable or Stationary Band Sawmill - Rev 2, 03/07; WWW.BAKER-ONLINE.COM...
- Page 71 12VDC is not being supplied from one side of the debarker one direction. switch. Please refer to the Control Schematics section and Panel Layout section for more information. One solenoid may not be energizing. Baker Blue Streak Portable or Stationary Band Sawmill - Rev 2, 03/07; WWW.BAKER-ONLINE.COM...
- Page 72 If there is excessive pitch build up on the blade and the wheels try adding a powder detergent to the lubrication system. Verify proper blade tension and proper blade tracking. Baker Blue Streak Portable or Stationary Band Sawmill - Rev 2, 03/07; WWW.BAKER-ONLINE.COM...
-
Page 73: Parts And Service
PRINCE HYDRAULIC 3/8” CHECK VALVE CYLINDER 2” X 10” 181678 181443 PRINCE HYDRAULIC PRINCE HYDRAULIC CYLINDER 1 ½” X 12” W/ CYLINDER 2” X 12” ROD CLEVIS Baker Blue Streak Portable or Stationary Band Sawmill - Rev 2, 03/07; WWW.BAKER-ONLINE.COM... - Page 74 BEARING 2 7/16” 4 BOLT FLANGE 5/8” BOLT HOLE FLANGE 251103 251181 BUSHING TRANTORQUE BUSHING TRANTORQUE 1” DOUBLE NUT 5/8” 251106 251002 BUSHING TRANTORQUE 1 ½” LONG DOUBLE NUT Baker Blue Streak Portable or Stationary Band Sawmill - Rev 2, 03/07; WWW.BAKER-ONLINE.COM...
- Page 75 (right) 141013 TOP 1 ¼” GUIDE PAD - 141014 (left) BOTTOM LEFT & RIGHT QTY (2) 141015 (right) 1-¼” GUIDE PLATE *Available in 1 ½” and 2” Baker Blue Streak Portable or Stationary Band Sawmill - Rev 2, 03/07; WWW.BAKER-ONLINE.COM...
-
Page 76: Service Contact Information
The model and serial number are located on the front side of the machine near the operator station. Please refer to your serial number and model number when speaking to a service technician or ordering replacement parts. Baker Blue Streak Portable or Stationary Band Sawmill - Rev 2, 03/07; WWW.BAKER-ONLINE.COM...
Need help?
Do you have a question about the Blue Streak 3640E and is the answer not in the manual?
Questions and answers