Table of Contents
Advertisement
Quick Links
Advertisement
Table of Contents

Subscribe to Our Youtube Channel
Related Manuals for Baker BX


Summary of Contents for Baker BX
- Page 1 Ellington Industrial Supply, Inc. P. O. Box 128 Ellington, Missouri 63638 USA Web site: www.baker-online.com E-mail: info@baker-online.com Phone: (573) 663 – 7711 Fax: (573) 663 – 2787...
- Page 2 19-20 FEEDWORKS Feed Speed Hydraulics Conveyor Belts Powered Hold-Down OPTIONAL EQUIPMENT BLADES MAINTENANCE TASK CHECKLIST Trouble Shooting Parts and Service Recommended Spare Parts Service Contact Information Serial Number Location Wiring Diagrams 27-28 Baker Band Resaw - Rev 1, 09/08; WWW.BAKER-ONLINE.COM...
-
Page 3: Introduction
The Baker B Band Resaw is equipped with a 20 HP electric motor and accepts material up to 6” x 12” (15 cm x 30 cm) and uses a 6” wide conveyor while the Baker BX is equipped with a 30 HP electric motor and accepts material up to 12” x 12” (30 cm x 30 cm) with a 12”... -
Page 4: Definition Of Terms
Waning or diminished in some parts; not of uniform size throughout; sawed boards or timber that is tapered or uneven, from being cut too near the outside of the log Yield To generate a return for effort, an amount produced Baker Band Resaw - Rev 1, 09/08; WWW.BAKER-ONLINE.COM... -
Page 5: Manual Contents Notice
B = 0.0035” x 1” x 13’2” hardback or Weight: BX = 30HP TEFC 0.035” x 1 ¼” x 13’2 hardback BX = 0.0035” x 1” x 14’2” hardback or Length: 180 0.035” x 1 ¼” x 14’2 hardback Feedworks/Conveyor Motor: in(Add 55”... -
Page 6: Warranty
CEO or Sales Manager of Baker Products. Our one (1) year warranty period covers all items built at our manufacturing facilities including structural frame, cowlings, doors, shafting, dust chutes and guards. -
Page 7: Defective Parts
Power Source:…………..…………………….…………………………………… Dust Removal: ….……………………………………………………………….… Ellington Industrial Supply, Inc. P. O. Box 128 Ellington, Missouri 63638 USA Web site: www.baker-online.com E-mail: info@baker-online.com Phone: (573) 663 – 7711 Fax: (573) 663 – 2787 Baker Band Resaw - Rev 1, 09/08; WWW.BAKER-ONLINE.COM... -
Page 8: Rules For Safe Operation
No list of safety expectations can ever be complete as every work environment is as different as are the people operating the equipment. Always keep safety as your highest priority and always use this machine with caution and respect. Baker Band Resaw - Rev 1, 09/08; WWW.BAKER-ONLINE.COM... -
Page 9: Control Of Hazardous Energy – (Lockout / Tagout)
1. Failure to stop equipment 2. Failure to disconnect from a power source 3. Failure to dissipate (bleed, neutralize) residual energy 4. Accidental re-starting of equipment 5. Failure to clear work areas before re-starting Baker Band Resaw - Rev 1, 09/08; WWW.BAKER-ONLINE.COM... -
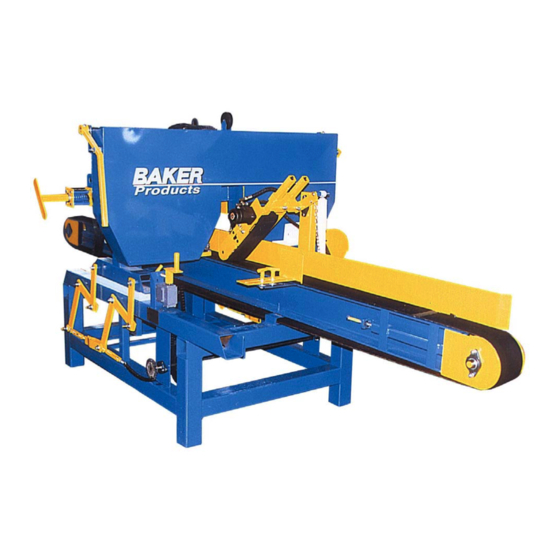
Page 10: Machine Features
MACHINE FEATURES We want to highlight the unique and special features of the Baker B/BX Band Resaw. Head Rig and Powered Hold Down Cowling Door Cowling Handle Blade Tensioning Dust Chute T-handle Adjustable Hydraulic Head Rig Powered Variable Speed Conveyor 15’... -
Page 11: Set-Up
Ensure all wiring and electrical connections are located in a safe position and away from any hazardous conditions. Efficient dust and chip removal requires a minimum of 500 CFM suction at the machine dust removal chute. This is an employer/owner responsibility. Baker Band Resaw - Rev 1, 09/08; WWW.BAKER-ONLINE.COM... -
Page 12: Operator Training
Operator Machine All of these together make up the safety system. Guards Failure of any one of these factors will increase accident potential. Devices Instructions ’ ’ Baker Band Resaw - Rev 1, 09/08; WWW.BAKER-ONLINE.COM... -
Page 13: Changing Blades
Turn the spring tensioning T-handle clockwise until one of the spacers makes contact with both compression plates. Manually turn the wheels to be sure blade is tracking properly. Close door. Spacers T-Handle Figure A: Blade Compression Tensioning T-Handle Plates Baker Band Resaw - Rev 1, 09/08; WWW.BAKER-ONLINE.COM... -
Page 14: Blade Tracking
All adjustments for blade tracking are located on the backside (motor side) of the head rig on the square tube with the spring tensioning assembly located on one end. Vertical Adjuster Bolt Setscrew Horizontal Adjuster Bolt Figure B: Back View with Motor Removed Baker Band Resaw - Rev 1, 09/08; WWW.BAKER-ONLINE.COM... -
Page 15: Drive Wheel Adjustments
Note: When blade is tracking properly, the blade gullet should be flush with the front side of the wheels. Figure C: Vertical View with Covering Removed Baker Band Resaw - Rev 1, 09/08; WWW.BAKER-ONLINE.COM... -
Page 16: Horizontal Adjustments
Do the same after rotating the wheel clockwise. Horizontal Adjuster Bolt Figure D: Top View of Idler Wheel with Cover Removed Effect of Horizontal Adjuster Baker Band Resaw - Rev 1, 09/08; WWW.BAKER-ONLINE.COM... -
Page 17: Cutting Angle Adjustments
Cutting Angle Adjustments If your Baker starts producing boards that are not square, your cutting angle may need to be adjusted. Before proceeding, though, make sure your guides are set properly (see “Setting Guides”) and your blade tracking is correct (see “Blade Tracking”). -
Page 18: Front-To-Back Adjustments
To cut quality lumber, the blade must run parallel to the conveyor. This is preset at the factory. However, if it ever gets knocked out, your Baker B/BX is set up so that the side-to- side cutting angle can be fine tuned. This can be done with head rig adjustments. -
Page 19: Setting Guides
Also, make sure the position and angle of the guides are identical while looking into the dust shoot. Guide Illustrations on the Next Page Baker Band Resaw - Rev 1, 09/08; WWW.BAKER-ONLINE.COM... -
Page 20: Setting Guides
Front-to-Back Guide Bracket Figure H: Back of Guides Positioning Bolt Guide Block Upper Guide Guide Wheel Plate Bolt Bolt Guide Wheel Figure I: Front of Guides Lower Guide Plate Upper Guide Plate Baker Band Resaw - Rev 1, 09/08; WWW.BAKER-ONLINE.COM... -
Page 21: Feedworks
Loosen locking bolts to allow for adjustments Re-tighten when finished Turn indexer nut to tighten Figure K: Conveyor Belt Adjuster Arm (one on each side) belt or adjust belt tracking Baker Band Resaw - Rev 1, 09/08; WWW.BAKER-ONLINE.COM... -
Page 22: Powered Hold-Down
Powered Hold-Down The Baker B/BX is equipped with powered hold-down that holds the wood in place while it is being cut. It can be placed closer to or further away from the blade by loosening the (2) front- to-back bolts on top of the hold-down assembly. -
Page 23: Optional Equipment
Drain the fluid from the Baker B/BX into a clean reservoir so it can be reused. Position the Return Conveyor and thread the supplied bolts into the side of the conveyor and through the holes on the side of the Baker B/BX. Put the nuts on the exposed end of the bolts and tighten. - Page 24 Motors should be greased with one pump of grease from a grease gun Once a Year Check 28” wheel bearings for any wear replace if worn. Check crown of 28” wheel for wear. Re-crown or replace if needed. Baker Band Resaw - Rev 1, 09/08; WWW.BAKER-ONLINE.COM...
-
Page 25: Trouble Shooting
Loose guide plates or improper blade tensioning can generally cause boards to look like the image below. (See “Changing Blades” or “Setting Guides”). These boards can also result from extreme damage to the tilt of the holdover wheels. Baker Band Resaw - Rev 1, 09/08; WWW.BAKER-ONLINE.COM... -
Page 26: Parts And Service
The model and serial number are located on the front side of the machine near the operator station. Please refer to your serial number and model number when speaking to a service technician or ordering replacement parts. Baker Band Resaw - Rev 1, 09/08; WWW.BAKER-ONLINE.COM... -
Page 27: Wiring Diagrams
Wiring Diagrams High Voltage Baker Band Resaw - Rev 1, 09/08; WWW.BAKER-ONLINE.COM... -
Page 28: Wiring Diagrams
Wiring Diagrams (continued) Low Voltage Baker Band Resaw - Rev 1, 09/08; WWW.BAKER-ONLINE.COM...
Need help?
Do you have a question about the BX and is the answer not in the manual?
Questions and answers