Advertisement
Quick Links
FOR CAR USE ONLY/NUR FÜR AUTOMOBILGEBRAUCH/POUR APPLICATION AUTOMOBILE
UNIQUEMENT/SOLO PARA USO EN AUTOMÓVILES/PER IL SOLO UTILIZZO IN AUTOMOBILE
EN
R
DE
Premium Multi Media System
iLX-702LEON
FR
SEAT Leon (5F)
ES
IT
Installation Manual
Einbauanleitung
Manuel d'installation
Manual de instalación
Manuale di installazione
Advertisement

Related Manuals for Alpine ILX-702LEON


Summary of Contents for Alpine ILX-702LEON
- Page 1 FOR CAR USE ONLY/NUR FÜR AUTOMOBILGEBRAUCH/POUR APPLICATION AUTOMOBILE UNIQUEMENT/SOLO PARA USO EN AUTOMÓVILES/PER IL SOLO UTILIZZO IN AUTOMOBILE Premium Multi Media System iLX-702LEON SEAT Leon (5F) Installation Manual Einbauanleitung Manuel d’installation Manual de instalación Manuale di installazione...
- Page 3 Disconnection of battery Trennen der Batterie vom Stromnetz Déconnexion de la batterie Desconexión de la batería Distacco della batteria WARNING: Make sure to disconnect the cable from the negative battery terminal before proceeding. Follow car manufacturer’s guidelines. WARNUNG: Entfernen Sie das Kabel vom Minuspol der Batterie, bevor Sie fortfahren.
- Page 4 Parts List Teileliste Liste de pièces Lista de piezas Elenco dei componenti...
- Page 5 1. Facia Plate 2. Bracket for AV-Unit 3. Power Harness with CAN Interface 4. Antenna Adapter, USB Cable 1. Frontblende 2. Halterung für AV-Gerät 3. Stromversorgungskabelbaum mit CAN-Interface 4. Antennenadapter, USB Kabel 1. Facia Plate 2. Support de l’ensemble AV 3.
- Page 6 Required Tools Benötigte Werkzeuge Outils nécessaires Herramientas necesarias Attrezzi necessari...
- Page 7 1. Universal Radio Removal Tool 2. Torx 20 Screwdriver 3. Torx 25 Screwdriver 4. PH2 Screwdriver 5. Plastic Wedge 1. Universal Radioausbauwerkzeug 2. Torx 20 Schraubendreher 3. Torx 25 Schraubendreher 4. PH2 Schraubendreher 5. Kunstoff-Montagekeil 1. Crochets de retrait 2. Tournevis Torx 20 3.
- Page 8 Removal of OEM Unit (1-4) Ausbau der OEM-Einheit (1-4) Dépose de l’ensemble OEM (1-4) Retirada de la unidad del fabricante original del equipo (1-4) Rimozione dell’unità OEM (1-4)
- Page 9 Retirez l’écran. Dans le cas d’un véhicule après Facelift, retirez d’abord les Retirez et conservez les 4 vis, ils seront nécessaires pour l’installation de l’auto- radio Alpine. Retire la cubierta frontal de la radio original. Inserte las llaves de extracción en las ranuras respectivas y saque la pantalla.
- Page 10 Removal of OEM Unit (5-8) Ausbau der OEM-Einheit (5-8) Dépose de l’ensemble OEM (5-8) Retirada de la unidad del fabricante original del equipo (5-8) Rimozione dell’unità OEM (5-8)
- Page 11 Open the glove box. Use the VAG radio removal keys to remove the disc drive. Remove the connectors from the disc drive. Remove the screws for take out the glove box. Öffnen Sie das Handschuhfach. Verwenden Sie die VAG-Radio-Ausziehwerkzeuge, um das CD-Laufwerk zu entfernen.
- Page 12 Wiring (1-4) Verkabelung (1-4) Câblage (1-4) Cableado (1-4) Cablaggio (1-4)
- Page 13 Remove the glove box. USB adapter. Original USB and AUX socket with USB retention cable. Remove the cover of the climate control panel with a plastic wedge. Entfernen Sie das Handschuhfach. USB Adapter. Originale USB- und AUX-Buchse mit USB-Einbaukabel. Entfernen Sie mit einem Kunstoff-Montagekeil die Blende des Klimabedienteils. Démontez la boite à...
- Page 14 Wiring (5-8) Verkabelung (5-8) Câblage (5-8) Cableado (5-8) Cablaggio (5-8)
- Page 15 Remove the clima panel and disconnect all connectors. Remove the gear shift bag. Remove the tray. Disconnect the original USB adapter and connect the supplied USB adapter to the USB/ AUX IN port. Nehmen Sie das Klimabedienteil ab und entfernen Sie alle Stecker. Entfernen Sie den Schaltknaufbalg.
- Page 16 Wiring (9-12) Verkabelung (9-12) Câblage (9-12) Cableado (9-12) Cablaggio (9-12)
- Page 17 11. Position für AV-Kabelbaum. 12. Position für AV-Kabelbaum (Nahansicht). Faisceau d’alimentation de l’autoradio. 10. Position derrière la boite à gants, pour implémentation du faisceau de l’autoradio Alpine. 11. Position du Faisceau. 12. Position du Faisceau (zoom). Cableado de alimentación de la unidad AV.
- Page 18 Preparation of the AV Unit (1-4) Vorbereitung des AV Geräts (1-4) Préparation de l’ensemble AV (1-4) Preparación de la unidad AV (1-4) Preparazione dell’unità AV (1-4)
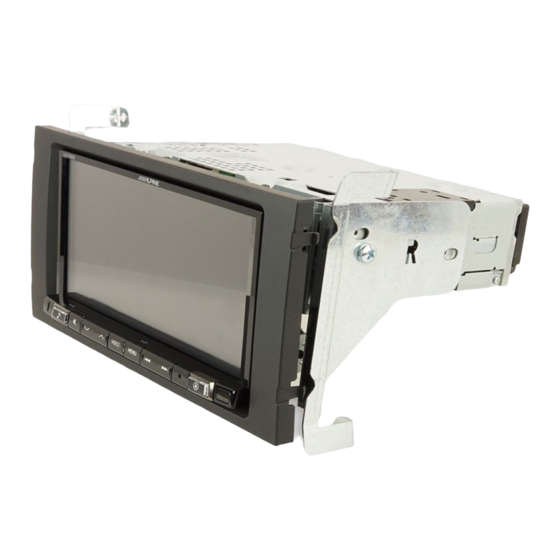
- Page 19 Mount the left bracket marked ‚L‘ with 2 screws to the left side of the AV unit. Mount the right bracket marked ‚R‘ with 2 screws to the right side of the AV unit. The AV unit is ready for install. Befestigen Sie den linken Halter, markiert mit „L“...
- Page 20 Connecting the AV Unit (1-4) Anschließen des AV-Geräts (1-4) Raccordement de l’ensemble AV (1-4) Conexión de la unidad AV (1-4) Connessione dell’unità AV (1-4) AV Unit Fakra Antenna Antenna Adapter Antenna Power (12Volt) Quadlock...
- Page 21 Phantom Antenna adapter. Antenna connection diagram. Attach the Quadlock connector with the vehicle‘s radio connector. Phantom-Antennenspeise-Adapter. Antennenen Anschluss Diagramm. Verbinden Sie die Quadlock-Buchse mit dem werksseitigen Radiostecker. Raccordez le faisceau à l’autoradio. Adaptateur Antenne Phantom. Diagramme de connection de l’antenne. Fixez le connecteur Quadlock au connecteur de l’autoradio du véhicule.
- Page 22 Integration of iLX-702LEON (1-4) Integrieren des iLX-702LEON (1-4) Intégration de l’iLX-702LEON (1-4) Integración del iLX-702LEON (1-4) Integrazione dell’unità iLX- 702LEON (1-4)
- Page 23 Insert the AV unit to the radio cage. Attach the AV unit with 4 screws. Position of the four screws. Attach the original Seat faceplate to the AV unit. Schieben Sie das AV-Gerät in die Radioaufname. Verschrauben Sie das AV-Gerät mit 4 Schrauben. Position der vier Schrauben.
- Page 24 Connections Anschlüsse Raccordements Conexiones Collegamenti...
- Page 25 CAN I/F Connector AV Unit AV Power Connector DVD REMOTE MON REMOTE CAN Interface REMOTE IN REMOTE OUT DVD STATUS IN STEERING REMOTE DVD/ TV Tuner BATT Quadlock To Vehicle...
- Page 26 Accessories Zubehör Accessoires 5Q0.035.726B Accesorios Accessori KAE-DAB1G7 KAE-F2S KAE-F2GT5...
- Page 27 Original VAG USB socket for cars with SmartLink. Available from your VAG part- ner. Allows to use the factory installed on glass antenna as DAB antenna. Allows to retain the original DAB antenna of the vehicle.Attach the original Seat faceplate to the AV unit. Allows to retain the original GPS antenna of the vehicle.
- Page 28 Designed by Alpine Electronics (Europe) GmbH Printed in Germany ALPINE ELECTRONICS ALPINE ELECTRONICS GmbH ALPINE ITALIA S.p.A. MARKETING, INC. Wilhelm-Wagenfeld-Strasse 1-3, Viale C. Colombo 8, 1-7, Yukigaya-Otsukamachi, Ota-ku, 80807 Munich, Germany 20090 Trezzano Sul Naviglio (MI), Italy Tokyo 145-0067, JAPAN...
Need help?
Do you have a question about the ILX-702LEON and is the answer not in the manual?
Questions and answers