
Subscribe to Our Youtube Channel
Related Manuals for LuxaFlex PowerView Pebble

Summary of Contents for LuxaFlex PowerView Pebble
- Page 1 PowerView Reference Guide ® CONTENTS Getting Started PowerView ® Pebble ® Remote PowerView ® Repeaters ® PowerView App & Hub Setup and Operation PowerView ® Scene Controller Troubleshooting Last update August, 2018...
- Page 2 Create a Shortcut to the PowerView® Reference Guide Follow the steps below to create a direct link or shortcut to the PowerView® Reference Guide on an iOS or Android™ device . The guide is located at https://www.luxaflex.co.uk/customer-support/installation/ Getting Started Apple® iPad® or iPhone®...
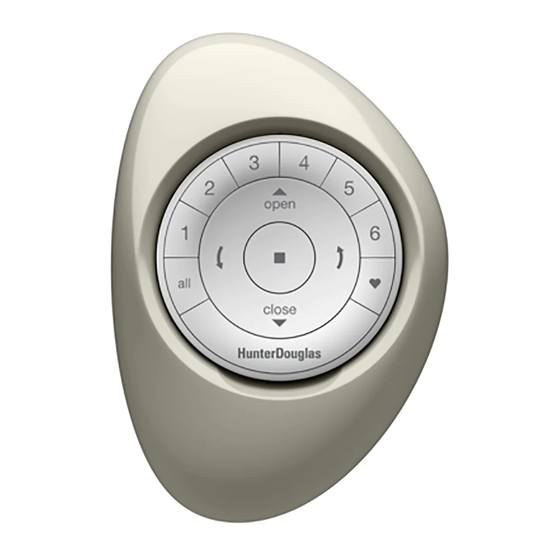
- Page 3 CONTENTS Getting Started with the PowerView® Pebble® Remote Key to Operation PowerView® Pebble® Remote Groups (1-6) Select or de-select Group numbers for programming or operation . Getting Started with the PowerView® Pebble® Remote . . . . . . . . . . . . . . . . . . . . . . . . . . . . . . . . . . . . . . . . . . . . . . . . . . . . . . . 5 Stop Programming Mode .
- Page 4 Programming Mode Pairing Remotes Each PowerView® Remote comes with its own unique Radio Frequency (Network) ID . If multiple Programming Mode is required to perform key remote related programming procedures . In programming mode, remotes (ie . PowerView® Pebble® and/or PowerView® Surface Remotes) will be used in the home, you can set a variety of functions, from joining a shade to a Group number (1-6) on a remote to removing a shade PAIR ALL REMOTES BEFORE JOINING ANY WINDOW COVERING TO GROUP NUMBER(S) (1-6) from a Group number (1-6), to setting Favorite shade positions .
- Page 5 Duplicating a Remote Selecting & De-selecting Groups Duplicating a remote copies a remote’s unique Group programming information and transfers it to Before operating a single window covering you must first select its corresponding Group number (1-6) or the ALL another remote so that they are essentially identical . Window coverings programmed to operate button .
- Page 6 Joining a Shade to a Group Removing a Shade from a Group To operate shades using a remote, shades must be joined to a Group number (1-6) on the remote . A single shade can be joined to multiple Groups on a remote, if desired . PRESS and HOLD n (Stop) on SELECT desired Group number PRESS and RELEASE desired Group...
- Page 7 Setting a Favorite Product Operation: Groups 1-6 All shades come from the factory with a default Favorite position set at 50% open . If you prefer a different shade position, you can create a custom Favorite . Use remote to move shade(s) to PRESS and HOLD n (Stop) on PRESS and RELEASE desired Group number (1-6).
- Page 8 Product Operation: ALL Button Product Operation: Favorite Button The ALL button allows all Grouped shades to be operated simultaneously . The Favorite button moves selected Grouped shades to their individually set Favorite positions . All shades come from the factory with a default Favorite position set at 50% open . If you prefer a different shade position, you can create a custom Favorite .
- Page 9 Product Operation: Top-Down/Bottom-Up Product Operation: Top-Down/Bottom-Up special move The PowerView® Pebble® Remote does not allow for both the middle and top rails to each have a midpoint within For blinds made after 09-2017, the PowerView® Pebble® Remote allows for independent rail movement at the the window at the same time for blinds made before 09-2017 .
- Page 10 Product Operation: Silhouette® Shades Product Operation: Venetian Blinds PowerView® Motorisation with Venetian Blinds can be tilt anywhere in the window position . PRESS and RELEASE desired Group PRESS and RELEASE desired Group number(s) (1-6) or ALL. number(s) (1-6) or ALL. PRESS and RELEASE either: PRESS and RELEASE either: With Shade in Fully Raised,...
- Page 11 Product Operation: Vertical Blinds Product Operation: Roller Blinds & Roman Blinds PRESS and RELEASE desired Group PRESS and RELEASE desired Group PRESS and RELEASE either: PRESS and RELEASE n (Stop) when number(s) (1-6) or ALL. number(s) (1-6) or ALL. the desired shade position is reached . A.
- Page 12 Product Operation: Duette® and Plissé Shades Product Operation: Twist® Shades PRESS and RELEASE desired Group PRESS and RELEASE either: PRESS and RELEASE n (Stop) when PRESS and RELEASE desired Group number(s) (1-6) or ALL. number(s) (1-6) or ALL. the desired shade position is reached . A.
- Page 13 PowerView® Pebble® . Option A. Use the screw holes on the Surface mounting plate to mark the location . The Luxaflex® logo should appear right side up and be horizontal . Option B. To ensure a straight and level appearance, use a small, standard bubble level with a ruled edge .
- Page 14 Inserting the Remote Module into the Pebble® INSERT the PowerView® Remote LINE UP the raised notches around module by GENTLY PRESSING the edge of the PowerView® Remote module with the indentations in the DOWN on the Remote until it rests Pebble®...
- Page 15 CONTENTS Pairing a Repeater to a Remote Repeaters extend the range of the PowerView® Shade Network . Use Repeaters to ensure commands sent from the PowerView® Pebble® Remote, the PowerView® Surface, or the PowerView® Hub reach PowerView® window coverings in large rooms or multiple room applications . NOTE: A Generation 1 (Generation 1) Repeater Kit comes packed with a USB PowerView®...
- Page 16 Pairing a Repeater to a Hub Using Repeaters with the PowerView® App Ideally, Repeaters would be joined to a Hub network at the time of Generation 2 (Generation 2) Repeaters feature a light or glow with adjustable brightness and color . All Generation installation and Hub setup using the Discover function in the PowerView®...
- Page 17 Using Repeaters in the PowerView® App: Scenes Using Repeaters in the PowerView® App: Automations Create a Repeater(s) Scene(s) to change the light color of Generation 2 Repeaters . Then, customize shade operation Automate Scenes and Multi-Room Scenes with Repeaters to schedule timed activation of Repeater light color by using a Repeater Scene in a Multi-Room Scene to change a Repeater’s light color when that Multi-Room Scene change .
- Page 18 CONTENTS PowerView® App Overview and System Requirements PowerView® App & Hub Setup and Operation System Requirements for the PowerView® App The PowerView® App allows for customized control and operation of PowerView® window coverings from Apple® iOS and Android™ tablet or mobile devices . For households wishing to use the PowerView® App to operate shades, as well as utilize the many advanced whole home integration features available through PowerView®...
- Page 19 Getting Started with the Generation 1 Hub Getting Started with the Generation 2 Hub Generation 1 Hub and Generation 1 Repeater Components Generation 2 Hub and Generation 2 Repeater Components PowerView® Hub Generation 1 Power Supply Repeater Ethernet Cable Generation 2 Repeater Generation 1 PowerView®...
- Page 20 Initial App & Hub Setup Hub Setup: Wired A PowerView® Hub is required to use the PowerView® App. To connect to and/or setup a Hub for operation Connecting a PowerView® Hub via ethernet to an internet connected router is the most reliable of PowerView®...
- Page 21 Hub Setup: Wireless Secondary Hub Setup: Wired The WiFi capability of the PowerView® Hub allows it to be placed to a more convenient location A secondary Hub may be introduced to your PowerView® network to extend the reach and strength of the within the home without needing to be tethered to a router .
- Page 22 Secondary Hub Setup: Wireless Migrating Hub Data A secondary Hub may be introduced to your PowerView ® network to extend the reach and strength of the network . Households wishing to benefit from the latest features of PowerView® only available with the Any secondary Hub will be identified by its solid green LED .
- Page 23 Pairing a Remote to a Hub PowerView® Account A Hub previously paired to an existing remote network or that had created its own network during setup can have A PowerView® account is optional . However, it is required for any household wishing to use advanced features offered additional remotes paired to it, even if the remotes are introduced after the initial Hub setup .
- Page 24 Dashboard Discover Shades The Dashboard in the PowerView® App displays favorite Shades, Scenes, and Automations, and is the landing screen To explore the variety of functions offered in the PowerView® App, a PowerView® window covering must be visible in when opening the PowerView® App . The quick glance access available from the Dashboard makes it easy to activate the App .
- Page 25 Room; refresh a shade’s battery status; check the strength of a shade’s radio frequency status; and add a shade to Favorites . NOTE: Consult with a Luxaflex® professional installer or Customer Service Representative before using the Advance Features options in Shade Details .
- Page 26 Creating & Deleting Rooms Assigning Shades to Rooms A Room must be created to create a Scene . A Room can have multiple shades assigned to it . However, a shade cannot Any PowerView® window covering listed in the PowerView® App as a Shade can be assigned to a Room . A Room can be assigned to multiple Rooms .
- Page 27 Shade Operation Creating, Operating and Deleting Scenes and Multi-Room Scenes There are multiple ways to operate a Shade in the PowerView® App . They include: jogging a shade (for shade Rooms are required to create Scenes in the PowerView® App . More than one Room and more than one Scene are identification in the home);...
- Page 28 Creating, Enabling & Disabling, and Automations: Sunrise/Sunset Deleting Automations The Automations function allows for scheduled Sunrise or Sunset activation of Scenes . The Sunrise and Sunset The Automations function allows for scheduled activation of Scenes . Scenes are required to create Automations . Automations feature requires access to your smart device’s geo-location before any Automation can be scheduled Assign days and times of the week for each Automation .
- Page 29 Using RemoteConnect™ RemoteConnect™ is a standard feature of your PowerView® account and is automatically enabled with the creation of a PowerView® account . Use RemoteConnect when you’re away from home to remotely access and activate Scenes and Automations in the PowerView® App on your smart device . NOTE: A registered Hub and verified PowerView®...
- Page 30 CONTENTS Adding a New Scene Controller Scene Controller TAP Menu. TAP Accessories. TAP Scene Controllers. Adding a New Scene Controller . . . . . . . . . . . . . . . . . . . . . . . . . . . . . . . . . . . . . . . . . . . . . . . . . . . . . . . . . . . . . . . . . . . . . . . . . . . . .59 Adding and Configuring Scenes in a Scene Controller .
- Page 31 Adding and Configuring Scenes in a Scene Controller Operating Scenes with the Scene Controller A Scene Controller does not create Scenes . Scenes previously created in the PowerView® App can be added to or removed from a Scene Controller, as desired . PRESS Select to activate the Scene PRESS the Left or Right Arrow to PRESS Select to operate a desired...
- Page 32 CONTENTS Setting Limits: Excluding Roller Blinds Limits identify the position that shades stop when fully open or fully closed . Limits are set at the factory for the correct stop positions according to the ordered height . NOTE: This procedure adjusts limits only . Shade programming is retained, including Group (1-6) number assignments on a remote(s) and shade status in the PowerView®...
- Page 33 Setting Limits: Roller Blinds only Performing a Programming Reset This reset is used to erase all current programming stored in a window covering’s headrail . This includes a reset of the PowerView® Shade Network ID, the elimination of any Group assignments on a remote(s), and the removal of the window covering from the App .
- Page 34 Backing up the Hub Emailing a Hub Backup Backing up the Hub saves all Shades, Rooms, Scenes, Automations, and Hub information (including current Scene Backing up the Hub saves all Shades, Rooms, Scenes, Automations, and Hub information (including current Scene Controller settings) as a local file within the PowerView®...
- Page 35 Restoring a Hub Backup Backing up the Hub saves all Shades, Rooms, Scenes, Automations, and Hub information (including current Scene Controller settings) as a local file within the PowerView® App on your device . 1. TAP Menu 2. TAP Hub 3.
- Page 36 Hub, pair all remote devices first, then complete the Hub setup procedure as directed through PowerView® App . Doing so including battery and plug-in power supplies to fit any application . Luxaflex® offers 18v D . C . power supply option .
- Page 37 PowerView® commands . A: Luxaflex® does not charge any additional fees for App updates . For features that use your mobile wireless network, check with your carrier for data rate charges that may apply .
- Page 38 Frequently Asked Questions (FAQ’s) Q: When Repeater Discovery occurs, do the Repeaters need to be in the intended final location within a home? A: No, if you’e Discovering Repeaters they do not have to be in the intended final location . However, the installer does need to ensure Repeaters are placed in a final location that ensures optimal PowerView®...
- Page 39 Scenario 1 Scenario 2 ISSUE ISSUE Some PowerView® window treatments do not respond to commands from my PowerView® Remote My PowerView® App can only Discover window treatments in one room, but not in any others. I have (ie., Pebble® Remote, Surface Remote or a combination). remotes for all the rooms, and they operate the window treatments in those rooms correctly.
- Page 40 Scenario 3 ISSUE ISSUE continued... I have a remote and a PowerView® Hub. I was able to Discover my PowerView® window treatments I have a remote and a PowerView® Hub. I was able to Discover my PowerView® window treatments using the App, but now I cannot operate any window treatments from the App. using the App, but now I cannot operate any window treatments from the App.
- Page 41 Scenario 4 Scenario 5 ISSUE ISSUE The batteries in my showroom Pebble® Remote(s) don’t last long. PowerView® window treatment does not correctly respond to Scenes in the App. Or, a PowerView® window treatment responds to Scenes to which it does not belong in the App. Cause Solution Cause...
- Page 42 U.S. Radio Frequency FCC Compliance This device complies with Part 15 of the FCC Rules . Operation is subject to the following two conditions: 1) This device may not cause harmful interference, and 2) This device must accept any interference received, including interference that may cause undesired operation . This equipment has been tested and found to comply with the limits for a Class B digital device, pursuant to Part 15 of the FCC Rules .
- Page 43 At Luxaflex® our window treatments start with energy efficiency Light control, , and the convenience motorisation are just some of the innovations that enhance the beauty of every room, every day – five-year guarantee made to measure with a The Art of Window Styling All rights reserved.
Need help?
Do you have a question about the PowerView Pebble and is the answer not in the manual?
Questions and answers
Hallo My remote control is out of control today. New batteries Whats wrong ??
The LuxaFlex PowerView Pebble remote control may not be functioning properly despite having new batteries due to the following possible reasons:
1. Not Paired to a Shade – A shade must first be joined to a group number (1-6) on the Pebble remote to operate.
2. Not Paired to a Network – If multiple remotes or PowerView devices are not paired to a unified network, communication issues may occur.
3. Battery Drain Due to Auto-Wake Feature – If the remote is frequently moved, the auto-wake feature may continuously activate, draining the battery quickly.
4. Network or Grouping Issues – If the window treatment does not respond correctly, it may not be properly grouped or discovered in the PowerView app.
To resolve the issue, ensure the remote is properly paired, grouped, and kept in a stable location to preserve battery life.
This answer is automatically generated