
Related Manuals for Farberware 201797


Summary of Contents for Farberware 201797
- Page 1 AIR FRYER TOASTER OVEN Model Number: 201797 UPC: 655772-01797-0 Customer Assistance 1-855-451-2897 (US) Please consider the option to recycle the packaging material. Air Fryer Oven_201797_FW_US_V13_190426.indd 1 4/26/19 2:33 PM...
-
Page 2: Important Safeguards
IMPORTANT SAFEGUARDS When using electrical appliances, basic safety precautions should always be followed, including the following: • Read all instructions before use. • Do not touch hot surfaces. Use handles or knobs. • WARNING - to protect against electric shock, fire and personal injury: - do not immerse cord, plug or appliance in water or other liquids;... - Page 3 IMPORTANT SAFEGUARDS • Do not store any materials, other than manufacturers recommended accessories, in this appliance when not in use. • Do not place any object made of the following materials in the appliance: paper, cardboard, plastic, wood, rubber, foam and cloth. • Extreme caution should be exercised when using containers constructed of other than metal or glass.
-
Page 4: Additional Safeguards
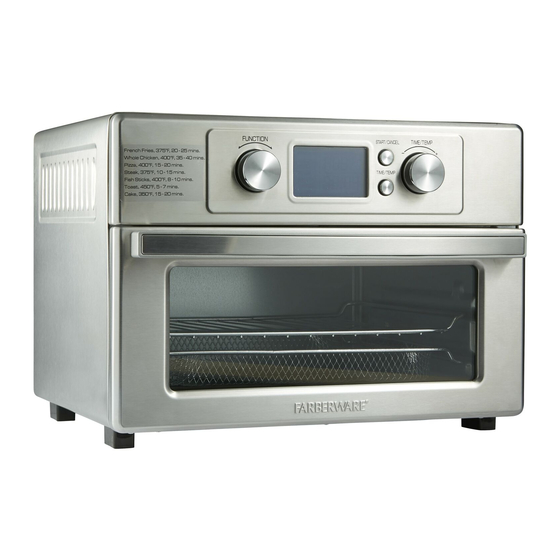
ADDITIONAL SAFEGUARDS This appliance is for HOUSEHOLD USE ONLY. WARNING: - DO NOT OPERATE THIS APPLIANCE, IF THE POWER CORD SHOWS DAMAGE OR IF APPLIANCE WORKS INTERMITTENTLY OR STOPS WORKING ENTIRELY. • A short power-supply cord is provided to reduce the risk resulting from becoming entangled in or tripping over a longer cord. - Page 5 ILLUSTRATIONS PARTS Housing Air Vents START/CANCEL Button FUNCTION TIME/TEMP Knob Knob TIME/TEMP Button Digital LCD Cord Storage Display Rails Glass Door Power Cord with Plug Cooking Basket Handle Heating Element Crumb / Drip Tray Cooking Rack Cooking Pan Air Fryer Oven_201797_FW_US_V13_190426.indd 5 4/26/19 2:33 PM...
-
Page 6: Operation
Prepare your favorite foods and snacks in a quick, healthy, and easy way with your new Farberware Air Fryer Toaster Oven. The Air Fryer Toaster Oven is a versatile oven that uses rapid hot air technology to rapidly and evenly cook all your favorite foods when used on the air frying setting. -
Page 7: Cooking Programs
OPERATION NOTE: - Always use the appliance with the Crumb/Drip Tray and Cooking Basket / Cooking Rack / Cooking Pan. - The appliance may produce an odor and emit smoke when switched on for the first time, as residues from the production process are eliminated. This is normal and does not indicate a defect or hazard. -
Page 8: Using The Appliance
OPERATION WARNING: Always use the appliance with the Crumb/Drip Tray in place under the lower Heating Elements. Default time Default temperature Cooking Rail Display / Time range / Temperature Range Accessories program position (min.) (°F) Cooking Air Fry 25 / 1~45 400 / 150~400 Upper Basket... - Page 9 USING THE APPLIANCE USING THE APPLIANCE • When using the appliance ensure a minimum distance around the appliance of at least 8 inches to other objects, cupboards and walls (ill. 8 inches 8 inches 8 inches WARNING: - Only use accessories recommended by the manufacturer. Do not place any other accessories in the appliance.
- Page 10 USING THE APPLIANCE Danger of burns! - Always pay special attention when placing or removing accessories and food from the appliance. Never place your bare hand inside the appliance to remove accessories (ill. ) or touch the Housing / Glass Door (ill. when the appliance is plugged in and switched on.
- Page 11 USING THE APPLIANCE • Hold the Handle and open the Glass Door (ill. • Make sure the Crumb/Drip Tray is free of food residues and place it on the bottom Rails (ill. • Insert the Cooking Basket / Cooking Rack / Cooking Pan into the appliance and then place the food to be cooked on the Cooking Basket / Cooking Rack / Cooking Pan (ill.
- Page 12 USING THE APPLIANCE Control Panel Button Function Possible settings START/ Starting or cancelling an CANCEL operation Button 1 - 7 minutes / 450°F, Increasing / decreasing operating browning level: TIME/TEMP time and temperature; setting Knob slice quantity: 1 – 6 (TOAST browning level / slice quantity function only) TIME: 1 to 120 minutes...
- Page 13 USING THE APPLIANCE • Rotate the FUNCTION Knob to select the desired cooking function. The selected function will flash and the LCD Display will show the pre-set temperature and time. • Press TIME/TEMP Button to activate temperature / time setting. Rotate the TIME/TEMP Knob to set the temperature / cooking time.
-
Page 14: Making Home-Made Fries
CLEANING AND MAINTENANCE USING THE APPLIANCE • Hold the Handle and open the Glass Door. • Carefully take the Cooking Basket / Cooking Rack / Cooking Pan out of the appliance and place it on a heat resistant trivet or cutting board. • Continue using the appliance to prepare additional food, by repeating previous steps, if desired. -
Page 15: Bake Function
USING THE APPLIANCE BAKE function The 2 lower Heating Elements turn on when using this function. The 2 upper Heating Elements may also turn on to help maintain the set temperature. • Place the cooking tin with food on the Cooking Rack / Cooking Pan and the Cooking Rack / Cooking Pan at the lower rail. -
Page 16: Toast Function
USING THE APPLIANCE TROUBLESHOOTING • Turn the FUNCTION Knob to the BROIL function. • Press TIME/TEMP Button to activate temperature / time setting. Rotate the TIME/ TEMP Knob clockwise or counterclockwise to set the temperature (150°F - 400°F (65°C - 205°C)) and cooking time (1 – 30 minutes). • Press the START/CANCEL Button to start the operation. - Page 17 RECIPES • Spray the air fryer basket with nonstick cooking spray; set aside. • Pound chicken breasts until even and thin. Cut each breast into 4 strips. • In a shallow dish, whisk together the buttermilk and egg. Place chicken strips in milk mixture and submerge.
- Page 18 RECIPES ½ tsp coarse black pepper 1 pound medium shrimp, peeled, deveined and patted dry with paper towels Favorite dipping sauce or cocktail sauce • Spray the air fryer basket with nonstick cooking spray; set aside. • Spray the air fryer basket with nonstick cooking spray; set aside. • In a shallow dish, whisk together the milk, buttermilk and cayenne pepper sauce.
- Page 19 RECIPES • Remove the potatoes from the basket and keep warm. Spray the air fryer basket with nonstick cooking spray. • While potatoes are cooking, prepare the fish. Pat the fish dry with paper towels. • In a shallow dish, combine the crushed potato chips, salt and pepper. Place the flour in another shallow dish.
- Page 20 RECIPES “Fried” Dill Pickles Makes 6 to 8 servings Nonstick cooking spray 1 (16-ounce) jar hamburger dill slices ½ cup buttermilk 1½ cups self-rising flour ½ cup cornmeal 1 tsp salt ½ tsp coarse ground pepper • Spray the air fryer basket with nonstick cooking spray; set aside. • Reserve 2 tablespoons pickle juice from the jar and set aside.
- Page 21 RECIPES • Spray the air fryer basket with nonstick cooking spray; set aside. • In a shallow dish, whisk together the flour, cayenne, salt, garlic powder and pepper. In another shallow dish, whisk together the eggs and buffalo sauce. Place the dry breadcrumbs in another shallow dish.
- Page 22 RECIPES Bang Bang Cauliflower Makes 4 to 6 servings Nonstick cooking spray medium head cauliflower, cut into bite-size florets 2 tbsp olive oil 2 tbsp sweet chili sauce 2 tbsp fresh lime juice 1 tbsp Sriracha sauce Salt and pepper, to taste • Spray the air fryer basket with nonstick cooking spray;...
- Page 23 RECIPES • Spray the air fryer basket with nonstick cooking spray; set aside. • In a shallow dish, whisk together the panko crumbs, Parmesan cheese, garlic powder, salt and pepper. In another shallow dish, whisk the egg whites until well blended.
- Page 24 RECIPES Creamy Cheese Stuffed Mushrooms Makes about 12 mushrooms Nonstick cooking spray 8 ounces whole button mushrooms, stems removed ½ cup garlic-herb flavored spreadable French cheese, such as Boursin® ¼ cup Italian seasoned dry bread crumbs • Spray the air fryer basket with nonstick cooking spray; set aside. • Use a paper towel to wipe the mushrooms clean.
- Page 25 RECIPES Breakfast Egg ‘n Toast Cups Makes 4 servings 3 tbsp butter, melted slices white sandwich bread, crusts removed slices bacon, cooked until crisp and crumbed 1/3 cup shredded Cheddar cheese eggs Salt and pepper to taste • Brush the inside of 4 oven-proof ramekins (about 3½ x 2 inches; 1 cup capacity) lightly with melted butter.
- Page 26 RECIPES • Carefully shake the basket and separate the bites if need be so there is space between them. Cook an additional 3 minutes. • In a medium bowl, combine the sugar and cinnamon. Add hot cinnamon roll bites to the sugar mixture and coat evenly. Place the bites on a serving platter. Stir the icing that was in the cinnamon roll tube and place into a zip-top bag.
- Page 27 RECIPES • Spray the air fryer basket with nonstick cooking spray; set aside. • Lightly flour a surface and roll each pastry sheet to a 10 x 10 inch piece. Cut each sheet into quarters. • In a medium bowl combine the peach pie filling, nutmeg and cinnamon. Stir to blend well.
- Page 28 RECIPES Basil Pesto Mayonnaise Makes about 1 cup ¾ cup mayonnaise ¼ cup basil pesto Fresh basil leaves • In a small bowl, combine the mayonnaise and pesto, stirring to blend well. Garnish with basil leaves. Sriracha Ketchup Dipping Sauce Makes about 2/3 cup ½...
-
Page 29: Hints And Tips
HINTS AND TIPS • This appliance can be used to cook almost any food that can also be prepared in a traditional oven. • Smaller quantities of food normally require a slightly shorter cooking time than larger quantities of food. • To reduce cooking time, defrost food prior to cooking. -
Page 30: Cleaning And Maintenance
CLEANING AND MAINTENANCE Proper maintenance will ensure many years of service from your appliance. Clean the appliance after every use. The appliance contains no user serviceable parts and requires little maintenance. Leave any servicing or repairs to qualified personnel. WARNING: - Always ensure the appliance is switched off. - Page 31 CLEANING AND MAINTENANCE NOTE: - Dry parts surfaces thoroughly before use. Make sure that all parts and surfaces are completely dry before connecting the appliance to a wall outlet. • Before storage, always make sure the appliance is completely cool, clean and dry.
-
Page 32: Troubleshooting
TROUBLESHOOTING Problem Cause Solution The appliance is Appliance not plugged in Insert the plug into the wall outlet not working Wall outlet not energized Check fuses and circuit breaker The START/CANCEL Press the START/CANCEL Button Button not pressed The time is not set Set the time by pressing the TIME/TEMP Button by twice and rotating the TIME/TEMP Knob... - Page 33 TROUBLESHOOTING Problem Cause Solution The appliance The door is not closed Ensure the door is closed properly does not reach properly set temperature Food not fully Cooking time too short Extend the cooking time cooked Cooking temperature too Increase the set temperature Too much food Remove some food;...
-
Page 34: Technical Data
TROUBLESHOOTING Problem Cause Solution The appliance Residues from the Operate the appliance for at least produces an production process are 15 minutes on its highest setting, odor and emits eliminated during first use with no food, until no odor or smoke smoke is present Food residues not properly... -
Page 35: Customer Assistance
© 2019 Farberware Licensing Company, LLC. All Rights Reserved. Copyrights and Trademarks of Farberware Licensing Company, LLC, including FARBERWARE®, are used under license from Farberware Licensing Company, LLC.
Need help?
Do you have a question about the 201797 and is the answer not in the manual?
Questions and answers
where to find model number?
You can find the model number for Farberware part number 201797 on the bottom of the appliance and on the front page of the manual.
This answer is automatically generated
Does Airfryer Model #201797 have an internal replaceable fuse. Mine has unexpectedly ceased working.