Table of Contents
Advertisement
Quick Links
VH2 Quickstart Guide
The VH2 is a studio telephone interface device designed to work on VoIP telephone systems. This guide will
give you the minimum you need to know to get the system hooked up and running. For more details on how
to configure more complex arrangements, see the full user manual.
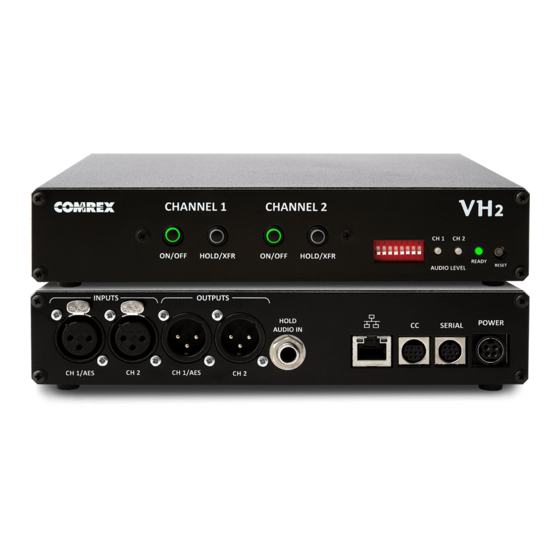
Specifications
The VH2 can handle one or two VoIP accounts (a single account can be assigned to both channels).
The unit has the ability to easily transfer the call on either channel back and forth to a companion VoIP phone.
Caller output audio is available of balanced XLR-M. Send input is available on balanced XLR-F. Clip levels on
XLR feeds are +20dBu.
On-hold audio input is available on a ¼" TRS jack. Two channels may be fed to "on-hold" callers via "Tip-
sleeve" (channel 1) and "Ring-sleeve" (channel 2). These inputs are unbalanced and the clip level is +20dBu.
VH2 has a single 10/1000 Ethernet jack for network connection. The companion phone should be located on
the same physical LAN as the VH2 (no routers between them).
The approved companion phone (Polycom VVX201) can be powered from PoE networks. The VH2 cannot.
The companion phone contains a 2 port Ethernet switch, so the units can be wired as follows:
PoE Ethernet Jack ->Polycom phone->VH2.
If a PoE is not available, you must use the provided power adapter with the Polycom phone.
Requirements
To configure and start using the VH2, you'll need the following information:
1
The user name, password, and server address of a cloud-based VoIP service, an available
account on your PBX, or similar information in order to utilize VH2 on a gateway device.
2
An available static IP on your network, including gateway, netmask and DNS server information.
3
Knowledge of how the VH2 will be attached to your studio audio ports. The choices are:
a
VH2 can take a single "send" feed from your console, or two separate "send" feeds.
b
VH2 can deliver a single "caller" feed to your console, or two separate "caller" feeds.
c
VH2 can be fed a single "on hold" input, two separate "on hold" inputs, or none at all.
d
VH2 can be configured to allow callers to hear each other when "on-air", or they can be
isolated from each other.
e
"Send" and "caller" feeds can be connected via analog or AES3 signals.
Put Comrex On The Line.
Toll Free in USA: 800-237-1776 • www.comrex.com
e-mail: info@comrex.com
19 Pine Road, Devens, MA 01434 USA
Tel: +1-978-784-1776 • Fax: +1-978-784-1717
Advertisement
Table of Contents

Related Manuals for Comrex VH2


Summary of Contents for Comrex VH2
- Page 1 VH2 Quickstart Guide The VH2 is a studio telephone interface device designed to work on VoIP telephone systems. This guide will give you the minimum you need to know to get the system hooked up and running. For more details on how to configure more complex arrangements, see the full user manual.
-
Page 2: Step 1 - Static Ip
Toolbox interface. VH2 is shipped from the factory set to DHCP mode, so it will find an address on your network if possible. The easiest way to find what that address is to use the Comrex Device Manager utility, available on our website for both Windows and Mac platforms. - Page 3 This mode is most useful if you’ve forgotten the unit password. The normal mode of changing any settings in VH2 is by clicking the “Web Configuration” tab in the right pane. This opens the unit’s Toolbox interface. Toolbox is a web-based interface that allows you to set all relevant parameters of the product.
- Page 4 Step 2 - Companion phone If you have the VVX201 IP phone for use with VH2, you’ll need to set it up to be an extension of the VH2. The phone needs to be on the same physical LAN as the VH2, but it doesn’t need a static IP address. You’ll only need to program the static address of the VH2 into the phone.
- Page 5 Once the phone is on your LAN, it will get a DHCP address from the network. You can find what this is by pressing the menu button(home icon) on the phone and navigating to the following using the direction cursor and enter key: Settings->4)Status->2)Network->1)TCP/IP Parameters Open a browser on your local computer and input into the URL bar https://<polycom_ip_address>.
-
Page 6: Time Setting
Time setting To stop the annoying time display from flashing an incorrect time and date, set a default SNTP server and time zone on the phone. Navigate to Preferences->Date & Time and set the fields to read the following: SNTP Server-> pool.ntp.org (or any other SNTP server of your choosing) Time Zone->... - Page 7 VH2 settings To put the details of your VH2 into the phone, go to Settings->Lines. Note the two sub-sections, Line 1 and Line 2. You will need to program information into both of these pages.
- Page 8 On the Line 1 page, set the following fields: Under Identification : Display Name -> ‘Line 1’ Address-> ‘1100@<VH2_ip_address>’ (remove ‘ and <>) Label ->’Line 1’ Type->Private Third Party Name->’none’ Number of Line Keys->1 Calls per Line->1 Under Authentication : Leave the Use Login Credentials to Disabled! Domain ->...
- Page 9 Your Line 1 Page should read like this (but with your VH2 IP address) Click Save on the bottom of the page and then Yes to confirm. Next, select Line 2 On the Line 2 page, set the following fields: Display Name ->...
- Page 10 Retry Maximum Count->3 Line Seize Timeout->30 (leave the rest of the fields at default) Your Line 1 Page should read like this (but with your VH2 IP address) Click Save on the bottom of the page and then Yes to confirm.
- Page 11 To complete the setup of the Polycom VVX201, all encoders except for G.711 must be removed from the “Audio Codec Priority” list. Hover over the “Settings” menu and select “Audio Codec Priority.” Using the Left Arrow in between the “Unused” and “In Use” lists, highlight and remove all codecs except for G.711Mu and G.711A as shown above.
- Page 12 Step 3 - SIP Details To use VH2, you must input the account details for at least one voice provider or PBX extension. You can have up to two providers, and it’s also possible to establish two accounts with the same provider, or on the same PBX.
- Page 13 You can have up to two providers, and each provider can be assigned to one or both channels. Channel assignment is done in Toolbox via Channel Configuration->Channel Assignments. The figure shows each channel assigned to a different provider. Each channel could also be assigned to the same provider, and the usual behavior is for calls to “hunt”...
-
Page 14: Auto Answer
About Mix Minus When we refer to “send” audio to the caller, we’re talking about the feed that it attached to the VH2 channel 1 and 2 inputs. This is the audio that the caller hears when “on-air”. It is essential that these feeds are specially mixed so that the caller output is not part of that mix. - Page 15 Caller Ducking Selects whether VH2 applies an algorithm to the caller audio to reduce it when the host voice is detected. This allows the host to “dominate” the conversation. Ducking, if enabled, has three choices (Low, Medium, High) that allows selection of how much the caller is reduced when the host speaks.
-
Page 16: General Operation
the companion telephone set. The set will ring, but the call will remain in its previous state (“on-hold” or “on- air”) until the handset is answered. Indications The ON/OFF and HOLD/XFR buttons are lit to indicate the state of each particular channel ON/OFF HOLD/XFR Function... -
Page 17: Ending Calls
This menu gives you the ability to control each channel either by placing the calls on-air, on-hold, transferring to the handset or dropping the call. This allows you to control the VH2 channels without having to physically push the buttons. - Page 18 Additionally, it will show the status at the top of the screen for both channels.
Need help?
Do you have a question about the VH2 and is the answer not in the manual?
Questions and answers