Table of Contents
Advertisement
Available languages
Available languages
Quick Links
Engine Block Heater Timer with
Temperature Sensor
Art.no 36-6047
Model EMT448
Please read the entire instruction manual before using the product and then
save it for future reference. We reserve the right for any errors in text or images
and any necessary changes made to technical data. In the event of technical
problems or other queries, please contact our Customer Services.
Safety
•
Never try to dismantle, repair or modify the product in any way.
•
Make sure that the electrical socket that the product is plugged into is
easily accessible in case it and the connected product need to be quickly
disconnected from the mains electricity.
•
Do not connect products of this type to each other.
•
Do not cover the product.
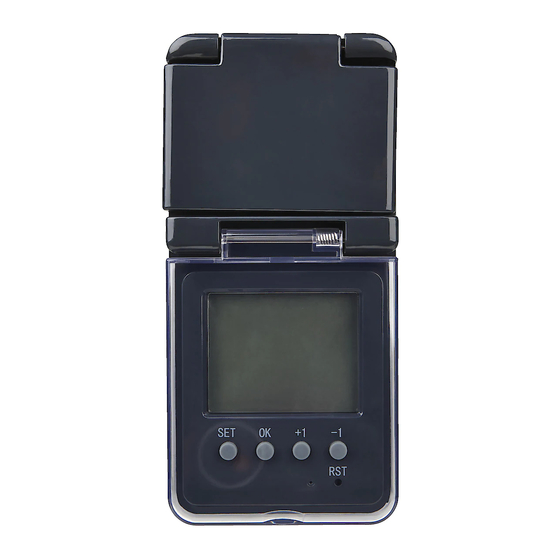
Buttons and functions
1
2
3
4
1. Clock
2. Departure time
3. [ SET ] departure time setting
4. [ OK ] clock setting, confirm
5. Time elapsed since the heater was switched on
6. [ −1 ] Setting
7. [ RST ] Reset all settings (the departure time resets to a default setting of 07:00)
8. [ +1 ] Setting
UNITED KINGDOM • CUSTOMER SERVICE tel 020 8247 9300 e-mail customerservice@clasohlson.co.uk internet www.clasohlson.co.uk postal 10 – 13 Market Place, Kingston upon Thames, Surrey, KT1 1JZ
Operating instructions
Note: The timer has a built-in battery which is charged when the timer is
plugged into a wall socket (charging time is 2 hours). It is therefore possible to
make settings (if the battery is charged) even when the timer is not plugged into
the wall socket. The display backlight cannot be lit when the timer is unplugged
from the wall socket.
Setting the clock
1. Hold in [ OK ] until the hours flash.
2. Press or hold in [ +1 ] or [ −1 ] to set the hours.
3. Press [ OK ] – the minutes display will flash.
4. Press or hold in [ +1 ] or [ −1 ] to set the minutes.
5. Press [ OK ] to confirm and exit the clock set mode.
Setting the departure time
1. Press [ SET ]. The hours will then begin to flash.
2. Press or hold in [ +1 ] or [ −1 ] to set the hours.
3. Press [ OK ] – the minutes display will flash.
4. Press or hold in [ +1 ] or [ −1 ] to set the minutes.
5. Press [ OK ] to confirm and exit the settings mode.
Display backlight
Note: The display backlight can only be lit when the timer is plugged into
a wall socket.
•
The backlight will come on for 10 seconds whenever any of the buttons
is pressed.
•
Hold in [ SET ] for 3 seconds to switch the backlight to "always on" mode.
•
Hold in [ SET ] again to switch off the backlight and set it to "on for
10 seconds when button pushed" mode. Note: After you have held in
the button for 3 seconds to change the backlight from "always on" mode,
5
the backlight will shine for 10 seconds before going out.
Preset programmes
If you have for
and the temperature
6
example set your
where the timer is
departure time to ...
located is ...
7
07:00
5 °C ± 2 °C
8
07:00
0 °C ± 2 °C
07:00
−5 °C ± 2 °C
07:00
−10 °C ± 2 °C
07:00
−15 °C ± 2 °C or lower
Note:
Time elapsed since the heater has been switched on only
shows when the heater is switched on.
•
The timer will not switch the heater on if
the temperature where the timer is located is above
5 °C. If the temperature rises to above 7 °C when
the heater is on, the timer will switch the heater off.
•
The heater will stay on 30 minutes past the set
departure time. Example: It is −10 °C and the timer
switches the heater on 120 min before the set
departure time (see above). During these two hours,
the temperature drops to −15 °C, the timer does not
react to the change in temperature but operates in
accordance with the initial temperature detection of −10 °C.
•
It takes about 45 minutes for the timer to adapt to
a new temperature such as when it is taken out into
the cold from a warm indoor environment.
•
Always make sure to insert the timer into the wall
socket so it is orientated as shown in the picture.
Care and maintenance
•
Clean the timer by wiping it with a dry cloth.
•
The timer should be unplugged from the wall socket if it is not to be used for
a long time.
Troubleshooting guide
The timer
•
Check the clock and timer settings and adjust if necessary.
does
•
Try plugging the engine/car heater directly into the wall
not work.
socket without the timer, to see if everything works.
•
Make sure that the cable between the timer and the car is
intact and properly plugged into both the timer and car.
•
Check that the car heater is switched on, that the cable is
intact and properly plugged into the outlet in the passenger
compartment.
•
Try plugging the car heater into another electrical outlet to
make sure that it works.
•
Is the wall socket that the timer is plugged into live?
the timer will switch
Responsible disposal
the heater on at
This symbol indicates that this product should not be disposed of
with general household waste. This applies throughout the entire EU.
30 min before departure
In order to prevent any harm to the environment or health hazards
caused by incorrect waste disposal, the product must be handed in
60 min before departure
for recycling so that the material can be disposed of in a responsible
manner. When recycling your product, take it to your local collection
90 min before departure
facility or contact the place of purchase. They will ensure that
the product is disposed of in an environmentally sound manner.
120 min before departure
180 min before departure
Specifications
Power supply
Load capacity
Operating temperature
IP rating
230 V AC, 50/60 Hz
3680 W, 16 A
−20 to 45 °C
IP44
Advertisement
Table of Contents

Subscribe to Our Youtube Channel
Related Manuals for CO/Tech EMT448


Summary of Contents for CO/Tech EMT448
- Page 1 (if the battery is charged) even when the timer is not plugged into • The heater will stay on 30 minutes past the set Art.no 36-6047 Model EMT448 the wall socket. The display backlight cannot be lit when the timer is unplugged departure time. Example: It is −10 °C and the timer from the wall socket.
- Page 2 är utdragen ur vägguttaget. Displaybelysningen går dock inte att tända avgångstid. Exempel: Det är −10 °C och timern Art.nr 36-6047 Modell EMT448 när timern är utdragen ur vägguttaget. slår på 120 min före inställd avgångstid (se ovan). Under dessa två timmar sjunker temperaturen till Ställ in klockan...
- Page 3 Det forutsetter selvfølgelig at timeren er ladet. Display- Eksempel: Det er −10 °C og timeren slår på 120 min Art.nr. 36-6047 Modell EMT448 belysningen kan ikke tennes når timeren er koblet fra strømuttaket. før innstilt avgangstid (se ovenfor). I løpet av to timer synker temperaturen til −15 °C, timeren føler...
- Page 4 Tämä edellyttää, että akussa on virtaa. pidempään. Esimerkki: Ulkona on −10 °C ja ajastin Tuotenro 36-6047 Malli EMT448 Näytön valaistusta ei voi sytyttää, kun ajastin ei ole pistorasiassa. kytkeytyy päälle 120 minuuttia ennen asetettua lähtöaikaa (katso yllä). Näiden kahden tunnin aikana Kellonajan asettaminen Lue käyttöohje ennen tuotteen käyttöönottoa ja säilytä...
- Page 5 Einstellungen zu tätigen, auch wenn der Timer nicht in der Steckdose sitzt • Der Timer ist 30 min länger eingeschaltet als der ein gestellte Art.Nr. 36-6047 Modell EMT448 (so lange der Akku geladen ist). Die Displaybeleuchtung geht nicht an, wenn Abreisezeitpunkt. Beispiel: Es ist −10 °C und der Timer der Timer von der Steckdose getrennt wurde.
Need help?
Do you have a question about the EMT448 and is the answer not in the manual?
Questions and answers