Advertisement
Thank you for purchasing a Sealey product. Manufactured to a high standard this product will, if used according to these instructions
and properly maintained, give you years of trouble free performance.
IMPORTANT: PLEASE READ THESE INSTRUCTIONS CAREFULLY. NOTE THE SAFE OPERATIONAL REQUIREMENTS, WARNINGS & CAUTIONS.
USE THE PRODUCT CORRECTLY AND WITH CARE FOR THE PURPOSE FOR WHICH IT IS INTENDED. FAILURE TO DO SO MAY CAUSE
DAMAGE AND/OR PERSONAL INJURY AND WILL INVALIDATE THE WARRANTY. PLEASE KEEP INSTRUCTIONS SAFE FOR FUTURE USE.
1.
SAFETY INSTRUCTIONS
GENERAL SAFETY.
WARNING! Ensure Health & Safety, local authority, and
!
general workshop practice regulations are adhered to
when using this equipment.
WARNING! Wear approved safety hand and eye
!
protection (standard spectacles are not adequate).
WARNING! TRAPPING DANGER – Keep hands and fingers
!
away from the spring and compressing jaws when in use.
Keep the work area clean, uncluttered and ensure there
"
is adequate lighting.
Maintain correct balance and footing. Ensure the floor is
"
not slippery and wear non-slip shoes.
Remove ill-fitting clothes. Remove ties, watches, rings,
"
other loose jewellery. Contain and/or tie back long hair.
Wear appropriate protective clothing.
"
Familiarise yourself with the applications, limitations and
"
potential hazards of the spring compressor.
DO NOT use the spring compressor for a task it is not
#
designed to perform.
DO NOT allow untrained persons to use the spring
#
compressor.
PRE OPERATIONAL SAFETY.
Strut and Spring Compression station should be securely
"
bolted to the workshop floor before use.
Apply grease to the front and rear faces of the main upright
"
to assist the smooth action of the compressor.
DO NOT operate spring compressor if parts are damaged
#
or missing as this may cause failure and/or personal injury.
Before commencing compression, make visual inspection
"
of machine to ensure pins are securely positioned and that
there is no sign of wear or fatigue – if found, do not use the
unit and refer to your local Sealey dealer for advice and
replacement parts.
Ensure jaw locating pins are properly positioned and safety
"
clips are attached correctly.
Before commencing compression of spring, ensure coils of
"
the spring are seated securely in the jaws of the
compressor and cannot slide out during compression.
Always fit a safety chain around strut and spring (ensure
"
chain is not trapped in the coils of the spring being
compressed).
OPERATIONAL SAFETY.
When applying compression to the spring, always stand to
"
one side of the unit.
DANGER! Do not put hands or fingers near the spring as it is
$
being compressed.
DANGER! Stop compressing the spring before the coils touch.
$
Before attempting to remove top cap nut, always use a tool
"
or short stick to test if the compression has been relieved.
Do not use your hands / fingers.
Sealey recommends the use of purpose made strut tools to
"
remove the top-nut from the shock absorber piston.
Once compressed, and the strut removed, we recommend
"
releasing the tension on the spring. Do not leave the spring
under compression in the machine unattended and do not
leave in compression for prolonged periods i.e. overnight.
Before releasing the compression ensure that the top
"
strut-nut is securely fastened to the maker's tolerance.
Release the compression slowly keeping your hands and
"
fingers away from the spring assembly.
Be sure that the tension on the spring is fully controlled by
"
INSTRUCTIONS FOR:
FOR RE230 SPRING COMPRESSOR
MODEL NO:
the strut assembly before removing it from the jaws of the
compressor.
POST OPERATIONAL SAFETY.
When not in use, clean and store the spring compressor
"
in a safe, dry, childproof location.
Maintain the spring compressor in good condition.
"
Replace or repair damaged parts. Use genuine parts only.
Unauthorised parts may be dangerous and will
invalidate the warranty.
2. INTRODUCTION & KIT CONTENTS
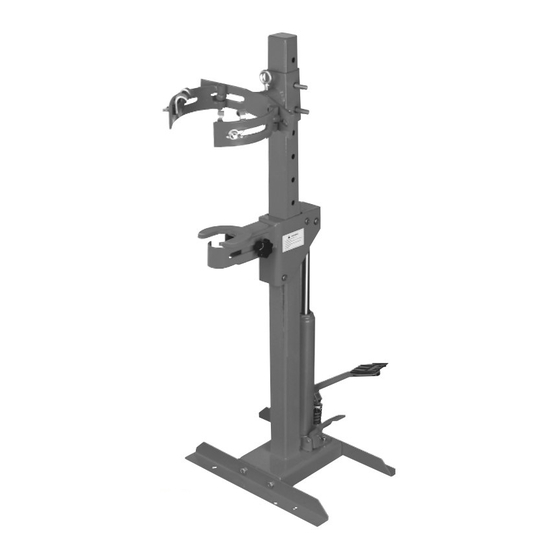
2.1
The RE230UK kit enables owners of the RE230 spring
compressor to fit an improved type of clamping jaw to their
existing units ( See figs.1 & 2 below ). This system allows
removal of the shock absorber from the spring without the
need to remove the assembly from the compressor. The plastic
coated yokes reduce the risk of spring slippage or damage
and are suitable for springs from Ø102mm to Ø160mm.
Before using the converted unit you must read the safety
guide on this page and the revised instructions for use over-
leaf. When converted the unit should conform to the technical
specification shown in section 3.
2.2 CONTENTS: UPPER STRUT SUPPORT
LOWER STRUT SUPPORT
ONE PAIR SMALL JAWS
ONE PAIR LARGE JAWS
SAFETY CHAINS AND ATTACHMENTS
RE230
(ORIGINAL)
Fig.1
3. TECHNICAL SPECIFICATION
Maximum Load . . . . . . . . . . . . . . . . . . . . . . . . . . . . . .1000kg
Lower Yoke Travel . . . . . . . . . . . . . . . . . . . . . . . . . . .340mm
Spring Diameters . . . . . . . . . . . . . . . . . . . . . . . .102-160mm
Upper Yoke positions . . . . . . . . . . . . . . . . . . . . . . . . . . . . . .7
CONVERSION KIT
RE230UK
RE230
CONVERTED
Fig.2
RE230UK - 1 - 060706
Advertisement
Table of Contents

Related Manuals for Sealey RE230UK


Summary of Contents for Sealey RE230UK
- Page 1 RE230UK MODEL NO: Thank you for purchasing a Sealey product. Manufactured to a high standard this product will, if used according to these instructions and properly maintained, give you years of trouble free performance. IMPORTANT: PLEASE READ THESE INSTRUCTIONS CAREFULLY. NOTE THE SAFE OPERATIONAL REQUIREMENTS, WARNINGS & CAUTIONS.
- Page 2 Before commencing compression, make a visual inspection of machine to ensure pins are securely positioned and that there is no sign of wear or fatigue – if found, do not use the unit and refer to your local Sealey dealer for advice and replacement parts.
- Page 3 Before attempting to remove top cap nut, always use a tool or short stick to test if the spring compression has been relieved from the top plate. Do not use your hands / fingers. Sealey recommends the use of purpose made strut tools to remove the top-nut from the shock absorber piston (SX300, SX301, SX302).
Need help?
Do you have a question about the RE230UK and is the answer not in the manual?
Questions and answers