Table of Contents
Advertisement
Quick Links
Advertisement
Table of Contents

Related Manuals for CSC FT750-26


Summary of Contents for CSC FT750-26
- Page 1 FT750-26 and FT750-20 Owner’s Manual...
-
Page 2: Table Of Contents
FT750-26 and FT750-20 Owner’s Manual Contents A Word From Steve ............................... 2 Safety ..................................3 Caution and Warning Symbols ..........................4 Pre-Ride Safety Checks ............................4 General Information.............................. 5 Operation ................................5 Electric Bicycle Components ..........................6 LCD Displays and Switch Functions ........................7 Switching On Electric Bicycle .......................... -
Page 3: A Word From Steve
Thank you for purchasing your new CSC electric bicycle. Your CSC FT26 or FT20 is a great bicycle and we are very proud of it. Your CSC electric bicycle is easy to maintain, it’s reliable, and it’s fun. You’ve made a wise purchase decision. -
Page 4: Safety
F or above 95 F. Exercise caution if riding the bicycle when it is dark outside. Do not exceed the bicycle’s maximum weight capacity: 330 pounds for the FT750-26; 264 pounds for the FT750-20. Be aware of the battery’s charge state, and do not ride such that the battery power is depleted and you do not have the ability to make it to your destination. -
Page 5: Caution And Warning Symbols
FT750-26 and FT750-20 Owner’s Manual Dispose of the battery in accordance with applicable battery disposal regulations. Always ride with both hands on the handgrips. Use the charger provided with your electric bicycle. Never attempt to use an unauthorized charger. Charge the battery in a well-ventilated area. -
Page 6: General Information
Pre-Ride Safety Checks in this Owner’s Manual. Please read this manual in its entirety prior to operating your CSC electric bicycle. Please refer to the electric bicycle components section (shown on the next page) when reading each section of this Owner’s... -
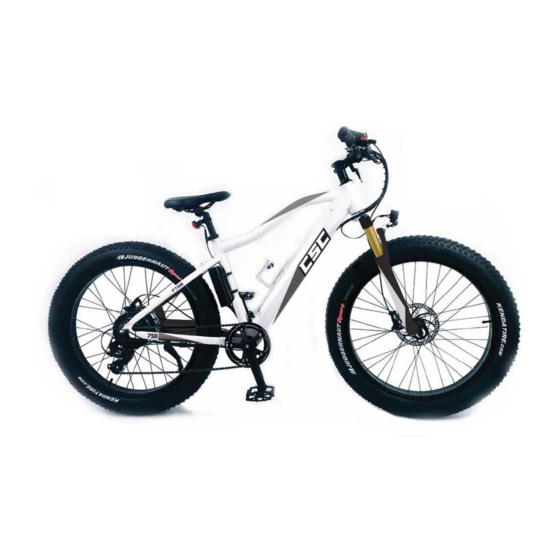
Page 7: Electric Bicycle Components
FT750-26 and FT750-20 Owner’s Manual Electric Bicycle Components 1. Frame Top Tube 15. Rear Derailleur 2. Frame Down Tube 16. Chain 3. Front Fork 17. Kickstand 4. Headlight 18. Chainring 5. Brake Levers 19. Crank 6. Stem 20. Pedals 7. Water Bottle Holder 21. -
Page 8: Lcd Displays And Switch Functions
FT750-26 and FT750-20 Owner’s Manual LCD Displays and Switch Functions The LCD (mounted in the center handlebar area) provides a large array of information in several display modes. Turning the bicycle’s LCD on, making electric motor power available to drive the bicycle, LCD display information, and numerous bicycle settings are all controlled by three switches contained in a switch housing on the left handlebar (shown to the right). -
Page 9: Switching On Electric Bicycle
FT750-26 and FT750-20 Owner’s Manual Switching On Electric Bicycle Turn on the bicycle by depressing Switch 2 in the photo shown to the right until the LCD illuminates. Turning off the bicycle requires depressing Switch 2 and holding it down a second time. -
Page 10: Illuminating Display Backlight
FT750-26 and FT750-20 Owner’s Manual Display 1 shows actual speed, as indicated by the red arrow in the photo to the right. Display 1 also shows other information as shown in the photo to the right. Display 2 shows average speed during the ride, as indicated by the red arrow in the photo to the right. -
Page 11: Toggling Between Imperial And Metric Units
FT750-26 and FT750-20 Owner’s Manual Toggling Between Imperial and Metric Units Within 15 seconds of turning the LCD on, depress Switches 1 and 3 for 5 seconds until you see the screen start to flash. At this point, by repeatedly depressing Switch 2 you can toggle through a... -
Page 12: Thumb Throttle
Maximum Electric Motor Bicycle Speed Your CSC electric bicycle’s maximum speed that can be attained through electric motor power is 20 mph. You can attain higher speeds by pedaling the bicycle with higher rear derailleur gears selected, but no additional electric power will be provided above 20 mph. -
Page 13: Shifting Drive Gears
FT750-26 and FT750-20 Owner’s Manual Beyond 20 mph, though, no additional electric motor power will be provided to drive your electric bicycle to higher speeds. Shifting Drive Gears Drive gear changes are accomplished through the use of the gear selector located on the handlebar near the right handgrip. -
Page 14: Charging The Battery
FT750-26 and FT750-20 Owner’s Manual Charging the Battery The battery may be charged either on or off the bicycle. To charge the battery on the bicycle: Connect the charger’s plug with the AC power supply first (the plug on the wall). -
Page 15: Battery Range
LCD, as shown in the photograph to the right. Battery Disposal When your battery is no longer serviceable, please contact CSC for a replacement at 909-445-0900. Do no throw your battery away as normal trash. Dispose of the battery in an approved battery disposal facility. -
Page 16: Front Suspension
FT750-26 and FT750-20 Owner’s Manual Front Suspension The FT750’s front suspension is adjustable for spring preload and damping. Preload refers to the how much the front springs are compressed initially. Damping refers to how quickly the suspension can compress or rebound. Preload and damping are controlled with two rotary knobs, each located atop the fork as shown below. -
Page 17: Adjusting Your Bicycle To Fit You
FT750-26 and FT750-20 Owner’s Manual these adjustments while riding, as doing so may cause you to crash. Adjusting Your Bicycle to Fit You Your electric bicycle can be adjusted for fit to your body by making adjustments to seat height, seat position, seat angle, handlebar angle, and brake lever positions. - Page 18 FT750-26 and FT750-20 Owner’s Manual The handlebars should be adjusted such that they point straight ahead for most people. If your arms are of slightly unequal length, you can adjust the angle of the handlebars with respect to the fore-and-aft axis of the bicycle such that you can easily reach each handgrip.
-
Page 19: Tire Pressure And Tire Maintenance
(or CO cartridges) with you whenever you ride your bicycle. When you need any of these items, please contact CSC at 909-445-0900. Caution! You should check tire pressure prior to each ride. Do not ride the bicycle if the tires are underinflated. -
Page 20: Assembling Your Electric Bicycle
FT750-26 and FT750-20 Owner’s Manual Assembling Your Electric Bicycle Uncrating Your CSC electric bicycle will be delivered in a cardboard box as shown here. Open the box top. Using a wire cutter, remove the zip ties securing the boxed and wrapped components container. - Page 21 FT750-26 and FT750-20 Owner’s Manual Cut the zip ties and remove the bubble wrap container from the wheel. You will also see the front skewer and the headlight. Remove the Styrofoam packing on the side of the bicycle. Using a box cutter and taking care not to contact the bicycle, its tires, or any other bicycle components, slice the sides of the container open.
- Page 22 FT750-26 and FT750-20 Owner’s Manual Open the side of the cardboard box as shown here after it has been sliced. Remove the zip ties securing the water bottle rack to the front tire. Remove the zip ties securing the front wheel to the electric bicycle frame.
- Page 23 FT750-26 and FT750-20 Owner’s Manual Handlebar Installation Remove the zip ties securing the handlebar assembly to the electric bicycle frame. Remove the foam packing materials from the electric bicycle frame, taking care not to scratch the frame with any cutting tools.
- Page 24 FT750-26 and FT750-20 Owner’s Manual Rotate the stem such that it faces forward, as shown here. Using the Allen wrench, remove all four Allen bolts from the stem. Remove the handlebar clamp from the stem. Position and center the handlebar in the stem as shown here.
- Page 25 FT750-26 and FT750-20 Owner’s Manual Place the handlebar clamp over the handlebars. Install all four handlebar clamp Allen bolts. Tighten all four handlebar clamp Allen bolts. Tighten all three handlebar stem Allen bolts.
- Page 26 FT750-26 and FT750-20 Owner’s Manual Seat Installation Remove the zip tie securing the seat and post assembly from the bicycle frame. Note the markings on the seat post showing the minimum seat post insertion line. Never install the seat post such that the seat post is higher than this line.
- Page 27 FT750-26 and FT750-20 Owner’s Manual Close the clamp such that the seat post is secure in the frame. Front Wheel Installation Flip the electric bicycle such that is stands on the handlebars and the seat. Remove the packing materials from the fork posts, taking care not to scratch the fork legs with any cutting tools.
- Page 28 FT750-26 and FT750-20 Owner’s Manual Remove the plastic protective covers from both sides of the front wheel hub. Install the front wheel in the front forks, positioning the brake disc between the pads in the front brake caliper. Allow the front wheel to rest in the inverted bicycle’s front forks, as shown here.
- Page 29 FT750-26 and FT750-20 Owner’s Manual Insert the skewer from the disc brake side of the front wheel, pushing it all the way through the front axle. Install the conical spring, small diameter end first, onto the skewer on the opposite side of the axle.
- Page 30 FT750-26 and FT750-20 Owner’s Manual Pedal Installation Cut the zip ties and remove the packing materials on the rear electric bicycle frame members, taking care not to scratch the frame with the cutting tools. Locate the bicycle pedals, previously removed from the packing materials.
- Page 31 FT750-26 and FT750-20 Owner’s Manual Headlight Installation Locate the headlight, previously removed from the packing materials. Install the headlight onto the fork crossover bracket with the provided bolt. Place the washer over the bolt. Tighten the self-locking nut on the headlight mounting bolt.
- Page 32 FT750-26 and FT750-20 Owner’s Manual You can adjust the headlight aim by loosening the Phillips head screw and positioning the headlight. Note that the headlight connector is indexed, as indicated by the arrows in the photo shown here. Mate the headlight connector, positioning the harness as shown here.
- Page 33 FT750-26 and FT750-20 Owner’s Manual Insert one end of the taillight clamping strap through the taillight mounting as shown here. Locate the taillight nut in the previously unpacked items. Thread the nut onto the taillight mounting bracket as shown. Hand tighten the nut.
- Page 34 FT750-26 and FT750-20 Owner’s Manual Bell Installation Locate the bell in the previously unpacked materials. Remove the Phillips head screw from the mounting clamp. Position the bell on the left handlebar, install the previously-removed Phillips head screw and tighten it.
- Page 35 FT750-26 and FT750-20 Owner’s Manual Position the front reflector on the stem as shown here. Tighten the front reflector mounting bracket Phillips head screw. Water Bottle Holder Installation Locate the water bottle holder in the previously unpacked materials. Remove the two Phillips head screws and washers from the...
- Page 36 Clean and lubricate broken tightness. Brake operation. drivetrain. True wheels and components. Shifting. Chain condition. adjust spoke tension if necessary. Please contact CSC for chain cleaners and lubricants, bicycle tools, or to answer any questions related to the above at 909-445-0900.
-
Page 37: Troubleshooting
FT750-26 and FT750-20 Owner’s Manual Troubleshooting Symptom Potential Causes Corrective Action Failed speed change or too low Low battery voltage Fully charge the battery maximum velocity Throttle failure Replace throttle or controller Controller failure Turn on the power supply, but... -
Page 38: Torque Specifications
FT750-26 and FT750-20 Owner’s Manual Torque Specifications Area Fasteners Torque (nt m) Torque (ft lb) Handlebar Area Handlebar Stem Clamp Bolts Handlebar Area Stem Faceplate Bolts Handlebar Area Brake Lever Clamp Bolt Handlebar Area Shifter Clamp Screw Brakes Caliper Adapter to Frame... -
Page 39: Bicycle Specifications
FT750-26 and FT750-20 Owner’s Manual Bicycle Specifications Item FT7 50- 20 FT7 50- 26 Body Position Forward, upright Forward, upright Suggested Use Street, sand, snow, trail Street, sand, snow, trail E-Bike Class Class 2, throttle on demand Class 2, throttle on demand... - Page 40 FT750-26 and FT750-20 Owner’s Manual Item FT7 50- 20 FT7 50- 26 Stem Aluminum alloy, 80mm length, 10mm Aluminum alloy, 80mm length, 10mm rise, 25-degree angle, 1-15mm cone rise, 25-degree angle, 1-15mm cone spacer, 3-10mm spacer, 1-5mm spacer spacer, 3-10mm spacer, 1-5mm spacer...
-
Page 41: Warranty
1 year and for unlimited mileage from the date of purchase by the original purchaser. This warranty is non-transferable. Any part found to be defective during this period will be repaired or replaced at the discretion of CSC. Any part replaced under the warranty will be covered for the remaining period of the warranty. Any parts replaced under warranty must be returned to CSC and will become the property of CSC. - Page 42 4. Defects induced or caused by incorrect maintenance, incorrect adjustment, or unauthorized repairs or modifications are not covered by this warranty. 5. Defects caused by the use of parts and accessories not authorized by CSC are not covered by this warranty.
- Page 43 FT750-26 and FT750-20 Owner’s Manual...
Need help?
Do you have a question about the FT750-26 and is the answer not in the manual?
Questions and answers