Advertisement
Quick Links
Advertisement

Related Manuals for Left Hand Robotics RT-1000


Summary of Contents for Left Hand Robotics RT-1000
- Page 1 INSTALLATION GUIDE: Assembly Guide: RT-1000 BASE STATION Version 2017.12.14...
- Page 2 Initial Assembly Instructions Tools Required ● Utility Knife ● 7/16” Wrench ● 7/16” Socket ● 3/4" Wrench ● 3/4" Socket ● 11/16” Wrench ● 1 ⅛” wrench or adjustable wrench...
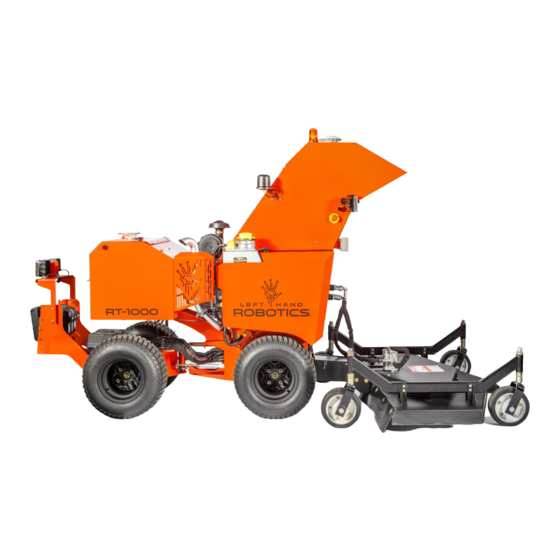
- Page 3 Unpacking You should have received two or three pallets with a robot and any field attachments included in the order. Start by unwrapping the robot pallet which also contains a Path Collection Tool and Base Station (if not shipped previously) and a cardboard box. The contents of the box are: GPS Antenna Flashing Amber Light Mounting Hardware for Deicer and Rear Sensor Bar...
- Page 4 Attaching the Deicer (if utilizing deicer) The SnowEx Drop Spreader attaches to the rear of the robot using a rod at the top and the two ½” bolts in the bottom mounting holes. Step 1: Stage the deicer behind the machine, Step 2: Using two people or the lifting rings verify the hanger rod is in place in the top on the interior of the deicer, lift the deicer at...
- Page 5 Installing Suitcase Weights (if not utilizing deicer) To maintain usable weight distribution on the RT-1000 when not using a deicer, three, 42lb, suitcase weights must be installed on the rear attachment bracket. Step 1: Lift the three suitcase weights into the...
- Page 6 Installing the Rear Sensor Bar The “Rear Sensor Bar” holds two lights and the rear facing camera. It fastens to the robot using the four ¼” bolts after the deicer has been attached. Step 1: Using the bottom set of holes on the Step 2: Locate the three cables near the sensor bar, install the four ¼”...
-
Page 7: Installing The Gps Antenna
Installing the GPS Antenna The forward/upper GPS antenna and flashing amber light are removed before shipping to mitigate damage risk. They are to be installed on the top surface of the robot: Step 1: Remove brass bolt from bottom of Step 2: Install cable (located at top of robot) GPS antenna onto antenna by screwing it on. - Page 8 Installing the Flashing Amber Light Step 1: Remove nut from light Step 2: Place light in hole at top of robot, rubber washer placed between light and robot Step 3: Slip light cable through nut and Step 4: Locate robot side of cable near oil tighten nut cooler and connect...
-
Page 9: Next Steps
Next Steps Before using the RT-1000, please consider the following: ● Charge the robot battery ○ Charge only using a 12V battery charger rated for automotive or equipment use and preferably 10amps or less ○ Connect your charger directly to the battery terminals. The battery is located in a weather resistant box at the rear of the robot.
Need help?
Do you have a question about the RT-1000 and is the answer not in the manual?
Questions and answers