Advertisement
Quick Links
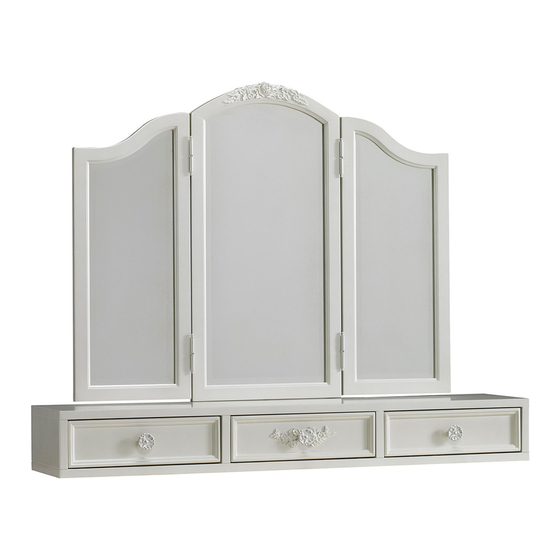
Vanity Mirror
Vanity Hutch
IMPORTANT! Please keep these instructions for future reference. Please read
these instructions before assembly and use of this product.
Adult assembly is required.
Allen wrench (included) required for assembly.
Product features and decorations may vary from illustrations.
Do not use power drills or drivers.
Phillips Head Screwdriver (Not included) required for assembly.
MADE IN VIETNAM
Bulletin NO.: 164053-00
Advertisement

Related Manuals for Dolce Vanity Mirror


Summary of Contents for Dolce Vanity Mirror
- Page 1 Vanity Mirror Vanity Hutch IMPORTANT! Please keep these instructions for future reference. Please read these instructions before assembly and use of this product. Adult assembly is required. Allen wrench (included) required for assembly. Product features and decorations may vary from illustrations.
-
Page 2: Part List
Part List A. Hutch X 1 B. Support Rail X 2 C. Left Mirror X 1 D. Middle Mirror X 1 E. Right Mirror X 1 Page 2... - Page 3 Part List HARDWARE AND TOOL DIAGRAM 1-1/4" Allen head bolt X 10 Flat Washer X 10 Spring Washer X 10 Allen Wrench X 1 Page 3...
- Page 4 Furniture Care Instructions Room Climate Control Wood, when first cut contains more than 50 percent water. When it is prepared for furniture construction it is placed in a Kiln and the moisture content is brought down to 8 to 10 percent. Wood is porous and responds to its environment.
- Page 5 STOP IF YOU EXPERIENCE ANY ISSUES WITH THIS PRODUCT BEFORE YOU RETURN THIS TO THE RETAILER PLEASE FOLLOW PROCEDURES ON THE BACK PAGE Page 5...
-
Page 6: Option 1: Assembly Step
OPTION 1: Assembly Step 1 A. Hutch X 1 Step 1: Place the Hutch (A) onto the top of the Vanity Desk. Turn the brackets down over the edge of the dresser (FIGURE 1). Screw the Brackets into the Vanity Desk using a Phillips Head Screwdriver. FIGURE 1 Vanity Desk Remove one screw and... - Page 7 OPTION 1: Assembly Step 2 Flat Washer X 4 1- 1/4" Allen head bolt X 4 Spring Washer X 4 Allen Wrench X 1 B. Support Rail X 2 Step 2: - Attach Support Rails (B) to Vanity Desk as shown in large Diagram below. - Insert Bolts (F) through Spring Washers (H), Flat Washers (G), holes on Support Rails (B) into inset nuts on back panel of Vanity Desk.
- Page 8 OPTION 1: Assembly Step 3 Flat Washer X 4 1- 1/4" Allen head bolt X 4 Spring Washer X 4 Allen Wrench X 1 D. Middle Mirror X 1 Step 3: - Attach Middle Mirror (D) to Support Rails (B) as shown in large Diagram below. - Insert bolts (F) through Spring Washers (H), Flat Washers (G), holes on Support Rails (B), into inset nuts on back panel of Middle Mirror (D).
- Page 9 OPTION 1: Assembly Step 4 E. Right Mirror X 1 C. Left Mirror X 1 Step 4: - Attach Left Mirror (C), and Right Mirror (E) to Middle Mirror (D) as shown in large Diagram and (FIGURE 4). FIGURE 4 Vanity Desk OPTION 1 Page 9...
- Page 10 OPTION 2: Assembly Step 1 Flat Washer X 4 1- 1/4" Allen head bolt X 4 Spring Washer X 4 Allen Wrench X 1 B. Support Rail X 2 Step 1: - Attach Support Rails (B) to Vanity Desk as shown in large Diagram below. - Insert Bolts (F) through Spring Washers (H), Flat Washers (G), holes on Support Rails (B) into inset nuts on back panel of Vanity Desk.
- Page 11 OPTION 2: Assembly Step 2 Flat Washer X 6 1- 1/4" Allen head bolt X 6 Spring Washer X 6 Allen Wrench X 1 D. Middle Mirror X 1 Step 2: - Attach Middle Mirror (D) to Support Rails (B) as shown in large Diagram below. - Insert Bolts (F) through Spring Washers (H), Flat Washers (G), holes on Support Rails (B) into inset nuts on back panel of Middle Mirror (D).
- Page 12 OPTION 2: Assembly Step 3 E. Right Mirror X 1 C. Left Mirror X 1 Step 3: - Attach Left Mirror (C) and Right Mirror (E) to Middle Mirror (D) as shown in large Diagram and (FIGURE 3). FIGURE 3 Vanity Desk OPTION 2 Page 12...
- Page 13 Product Assistance Procedures You have purchased a quality piece of furniture. Our International team has spent many hours designing and engineering this piece and packaging to ensure you will be satisfied with your purchase. But if for any reason you need help with your purchase please contact us at any time.
Need help?
Do you have a question about the Vanity Mirror and is the answer not in the manual?
Questions and answers