FULTON F2 Manual
Hide thumbs
Also See for F2:
- User manual ,
- Instructions manual (11 pages) ,
- Installation instructions manual (9 pages)
Table of Contents
Advertisement
Available languages
Available languages
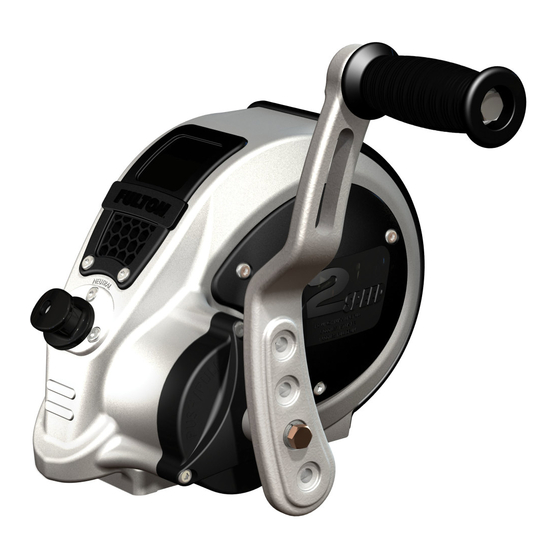
Trailer Winch
Read, Understand, Follow and Save These Instructions
Read, understand and follow all of these instructions and warnings (Instructions) before installing and using this product. Install and use this product only
as specified in these instructions. Improper installation or use of this product may result in property damage, serious injury, and/or death. Never allow
installation or use of this product by anyone without providing them with these instructions. You must read, understand and follow all instructions and
warnings for any product(s) to which this product is used in conjunction with or installed. Save these instructions with the product for use as a reference
for any future installation and use of the product.
WARNING
• Purchaser/owner must ensure that product is
installed according to these instructions.
Purchaser/owner must not alter or modify the
product.
• Operator and bystanders should never position any
part of body under or on the path of any portion of
this product or the load being supported or moved.
• Do not allow children to play on or around this
product or the load being supported, or moved.
• Do not use winch to move humans.
• Never exceed the maximum rated capacity. Refer
to stamped markings on winch to obtain rated
capacity. If uncertain, contact Cequent Trailer
Products at 1-800-521-0510 or
www.cequentgroup.com
▪ Capacity is based on direct line pull on third layer
of the strap on the drum. Capacity is reduced as
strap builds up on the drum.
• Never stand along side winch or guide the strap
Installation Instructions
The mounting surface must be equal to or greater than the footprint of the winch frame. When attaching the trailer winch, always use three (3) 3/8" dia.
grade-5 carriage bolts/lock nuts and torque to 28-30 ft-lbs. Check final installation and make sure winch is secure to mounting structure.
Handle
Installation
Cap
Bolt
Lock Washer
Installing Handle Roller Assembly:
Assemble handle assembly as shown and torque locknut to 20-25 ft-lbs., using a 9/16" socket.
Adjustable Handle (6" to 9" and Right or Left Hand Drive):
This handle can be mounted not only in different length configurations, but also in a right or left hand orientation. In order to switch to a right or left hand
drive first remove the bolt and washers from each side of the drive shaft. Push the hex shaft 1/2"-3/4" through to the other side. Do not try to remove the
shaft completely in order to keep the internal gears and bushings inline. Place the handle bolt and washers on the handle side and torque to 22-25 ft-lbs.
Then repeat for the opposite side of the shaft. Do not over torque.
Attaching Winch Strap:
Use strap anchor provided with winch as pictured above. Pass the strap loop under the cross bolt or through the center hub slot, insert strap anchor in the
strap loop, then pull tight. Always maintain a minimum of three complete wraps of strap on the drum.
- Inspect strap and replace if damaged.
- Check mounting hardware for proper tightness and re-torque if necessary.
- Gears, ratchet contact points and shaft bushings must be kept lubricated with a thin oil or grease.
Failure to follow these warnings and instructions may result
in property damage, serious bodily injury, and/or death.
with your hands.
•Never operate with slippery, wet, or oily hands and
always maintain a firm grip on the winch handle.
▪ Do not attempt to stop a winch by grabbing the
handle while in motion.
• Always maintain a minimum of three layers of
strap on the drum.
• A loud clicking sound from the ratchet must be
heard when pulling the load. If properly engaged
and loud clicking sound is not heard, do not use
and replace ratchet components immediately.
• Never release the crank handle unless the ratchet
plunger/pawl is fully engaged and the load is
supported.
• Winch will not hold the load when load is being
let out.
• Winch is designed for manual operation only and
the load rating is based on an intermittent duty
cycle.
Handle Roller
Assembly
Adjustable
Winch Handle
Large Flat Washer
Prior to Use
Warning: Failure to follow all installation instructions could result in
winch failure.
Strap
Loop
Handle
Bolt
Lock Washer
Small Flat Washer
• Excessive force in turning winch handle may
indicate overload. Fulton brand winches will
require a max of 45 lbs of handle force to pull
rated load.
• If you cannot crank the winch with one hand you
are potentially overloading the winch.
• Winches are not designed to secure boats to trail-
ers while towing. Boat tie downs must be used
for this purpose.
• Periodically check mounting hardware for proper
torque and tighten if necessary.
▪ Do not use cable or rope.
• Always replace bent, broken, or worn parts before
using this product.
• On two-speed winches, make sure that the ratchet
plunger is properly engaged and holding the load
before attempting to change gears.
Cross Bolt
Hub
Slot
Strap
Anchor
F3797 (Rev-B 18039) 10/12
Strap
Installation
Winch
Mounting
Advertisement
Table of Contents

Subscribe to Our Youtube Channel
Related Manuals for FULTON F2


Summary of Contents for FULTON F2
- Page 1 • Excessive force in turning winch handle may installed according to these instructions. •Never operate with slippery, wet, or oily hands and indicate overload. Fulton brand winches will Purchaser/owner must not alter or modify the always maintain a firm grip on the winch handle.
-
Page 2: Operation
Maintenance The F2 winch is designed with precision fit components and corrosion resistant materials to minimize the frequency of maintenance. Occasional cleaning with mild soap and water along with light oil lubrication of contact points will prolong peak performance and appearance. Use only Cequent Trailer Prod- ucts’... -
Page 3: Avant D'utiliser
à portée santes et humides ou huileuses et toujours main- treuils Fulton requièrent une force maximum de de tout élément du produit ou du chargement tenir une prise ferme sur la poignée du treuil. -
Page 4: Entretien
Entretien Le treuil F2 est conçu avec un ajustement précis des composantes et des matériaux résistants à la corrosion, pour réduire la fréquence d'entretien. Un nettoyage occasionnel avec un savon doux et de l'eau ainsi qu’une lubrification légère avec de l’huile sur les points de contact prolongera la performance à point et l'appa- rence. -
Page 5: Vor Dem Benutzen
Anhaenger Winde Lesen, Verstehen, Folgen und Heben Sie diese Anleitung auf Lesen, verstehen und folgen Sie allen Instruktionen und Watnungen, bevor Sie dieses Produkt installieren und benutzen Installieren und benutzen Sie dieses Produkt nur wie in diesen Instruktionen vorgeschrieben. Falsche Installation oder Benutzung dieses Produkts kann zu Sachschaeden, ernsthaften Verletzungen und / oder Tod fuehren. -
Page 6: Bedienung
Wartung Die F2 Winde wurde entwickelt mit prezise passenden Komponenten und Rostabweisenden Materialien um die Notwendigkeit zur Wartung zu verringern. Ab und zu mit milder Seife und Wasser reinigen und die Kontaktpunkte mit einem leichten Oel schmieren verlaengert die Leistung und Aussehen. Verwenden Sie nur Cequent Cequent Trailer Products -Teile oder Teile mit vergleichbarer Qualität zur Reparatur. -
Page 7: Antes De Usar
Los El comprador/dueño no debe alterar o modificar el • Nunca manipule el artefacto con manos resbalosas, cabrestantes de la marca Fulton requieren un máximo producto. mojadas o aceitosas. Sujete el manubrio del cabres- de 45 lbs de fuerza de manubrio para halar la carga •... -
Page 8: Mantenimiento
Mantenimiento El cabrestante F2 ha sido diseñado con componentes que se ajustan con precisión y con materiales resistentes a la corrosión a fin de minimizar la frecuencia de manten- imiento. Una limpieza ocasional con jabón suave y agua, así como una ligera lubricación de los puntos de contacto prolongarán el alto rendimiento y la apariencia del producto. -
Page 9: Vóór Gebruik
Lieren van het merk Fulton behoeven •Bediener en omstanders mogen nooit enig •Bedien de lier nooit met gladde, natte of vette handen maximaal 20,4 kg kracht op de hendel om de... - Page 10 Schakelen (alleen bij lieren met twee versnellingen): Zorg ervoor dat de palplunjer correct is ingeschakeld en de lading vastzit voordat u overschakelt op een andere versnelling. Grijp de hendel van de F2-lier stevig beet, op het punt waar deze aan de invoeras is bevestigd. Ingeschakeld Ingeschakeld Om te schakelen moet u duwen of trekken.
Need help?
Do you have a question about the F2 and is the answer not in the manual?
Questions and answers