Table of Contents
Advertisement
Quick Links
Advertisement
Table of Contents

Related Manuals for Ruide Theodolite RT-2


Summary of Contents for Ruide Theodolite RT-2
- Page 1 RT-2 Theodolite U S E R M A N U A L...
- Page 2 Thank you for choosing RUIDE theodolite RT-2. Please read this manual carefully before use. PRECAUTIONS Do not collimate the objective lens directly to the sun without a filter. Do not store the instrument in extremely high or low temperature. When the instrument is not in use, store it in the case and avoid shock, dust and humidity.
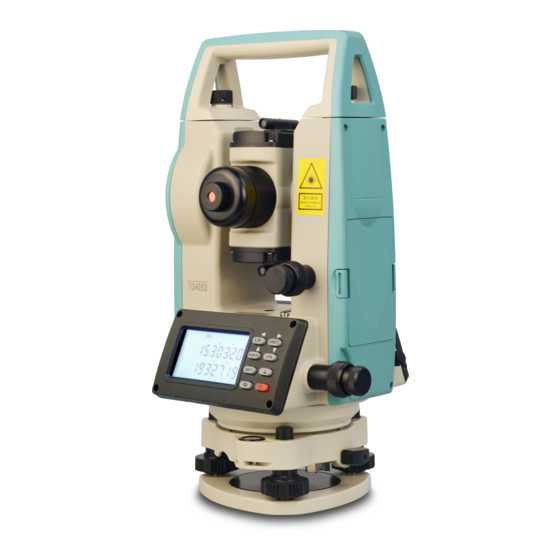
- Page 3 1. PART NAMES 1. Collimator 2. Objective Lens and Cover 3. Focusing Screw 4. Telescope Eyepiece 5. Horizontal Tangent Screw 6. Battery 7. USB Interface 8. Screen and Keyboard 9. Tribrach 10. Tribrach Lock 11. Vertical Tangent Screw...
- Page 4 2. KEYS AND SIGNS Keys Function Shift Face Left / Right. ◄ Move Left. 0SET Set horizontal angle to 0°. ► Move right. HOLD Hold the value of horizontal angle. ▲ Move up. Shift the display mode of vertical angle. ▼...
- Page 5 Signs on Screen Signs Meaning Laser plummet is on (optional). Power status Auto power off is activated. HOLD Horizontal angle value is held. BEEP Sector beep is activated. Horizontal angle Vertical angle Face Left (Face 1) Face Right (Face 2) TILT Tilt compensation is on.
- Page 6 3. OPERATION Starting Up Press Power key for 3 seconds to power it on. If you see a sign “b” like below, it means it is not levelled well. Adjust the tribrach screws to level the theodolite more precisely until this Sign “b” disappears. You can also turn off the compensation to skip this error (Refer to Session 5.6 to see how).
- Page 7 “HOLD” status. The interval between 2 pressing should not be more than 3 seconds. 3.3.2 Hold Horizontal Angle It is used in the circumstances when you need to hold the value of horizontal angle. When rotating to a certain degree, press HOLD to freeze the current horizontal angle value, while a sign of HOLD will be shown...
- Page 8 Notice: When the vertical angle is out of range of -45° to 45°,the slope will show error.
- Page 9 4. SETTING Press the key SET to enter to Setting menu. Select different settings by pressing ◄, ► (L/R, 0SET). Press ▲, ▼ (HOLD, V/%) to choose different options in a specific setting. Press SET again to confirm the settings. Backlight and Crosshair Light Press the key to turn on the screen backlight and crosshair light.
- Page 10 is close to 0°, 90°, 180°and 270°. Press ▲, ▼ (HOLD, V/%) to shift different options, and then press SET to confirm the setting. A sign of BEEP will show on screen. Beep Off Beep On Angle Unit 3 units of angle: dms, gon, mil. Press ▲, ▼ (HOLD, V/%) to shift different options, and then press SET to confirm the setting.
- Page 11 Minimum Change of Angle Change the minimum change of the angle as below. Press ▲, ▼ (HOLD, V/%) to shift different options, and then press SET to confirm the setting. Step 1 Step 5 1” 5” 0.00.05 0.00.15 0.05 0.10 Tilt Compensation Turn on and off the tilt compensation.
- Page 12 Set Vertical 0 To set the vertical 0 position to horizontal zero or zenith zero. Press ▲, ▼ (HOLD, V/%) to shift different options, and then press SET to confirm the setting. Horizontal Zero Zenith Zero...
- Page 13 5. CALIBRATION Notice: A specific and precise collimator is required for calibrations. Hold 0SET and press Power at the same time to turn on the theodolite, to calibrate the i angle, which is referred to the vertical index difference. Step 1: Rotate the theodolite to Face Left (Face 1), collimate the crosshair center of a collimator and adjust the focus until it seems clearly.
- Page 14 6. SPECIFICATION TELESCOPE Image Erect Magnification 26.5X Aperture (telescope) 40mm Resolution 3” Field of View 1°30” Min. Focusing 1.5m Length 155mm ANGLE Type Absolute Encoding Accuracy 2” Minimum Reading 1” Diameter of Disk 79mm Detecting Method Horizontal: dual; Vertical: dual LEVEL Plate Vial 30”/2mm...
- Page 15 INTERNAL MEMORY POWER Type Li-on and AA Battery Case Voltage 7.4V Working Time ENVIRONMENT Working Temperature -20°C - +50°C SIZE & WEIGHT Size 165 X 160 X 340 mm Weight 4.7kg...
- Page 16 7. ERROR CODE Error Code Cause E-01 Upper Vertical CCD Error E-02 Lower Vertical CCD Error E-03 Left Horizontal CCD Error E-04 Right Horizontal CCD Error E-05 Vertical Angle Error E-06 Horizontal Angle Error E-07 Vertical Rotating Error E-08 Horizontal Rotating Error E-11 Communication Error E-20...
- Page 18 Edition: EN1907 http://www.ruide.xyz support@ruideinstrument.com...
Need help?
Do you have a question about the Theodolite RT-2 and is the answer not in the manual?
Questions and answers