Table of Contents
Advertisement
Quick Links
Advertisement
Table of Contents

Related Manuals for Ruide rts-820 series


Summary of Contents for Ruide rts-820 series
- Page 1 Тахеометры http://taheometr-geo.ru +7 (499) 643-33-80...
-
Page 2: Table Of Contents
Тахеометры http://taheometr-geo.ru +7 (499) 643-33-80 CONTENT FORWORDS ..................1 PRECAUTIONS: ................2 1. APPEARANCE AND FUNCTIONS ......... 3 1.1 APPEARANCE .............................. 3 1.2 DISPLAY ................................4 1.3 KEYPAD ................................4 1.4 SOFT KEYS ..............................5 1.5 SYMBOLS ................................ 6 1.6 ILLUMINATION & SOUND ........................7 1.7 AUTO POWER OFF ............................ - Page 3 Тахеометры http://taheometr-geo.ru +7 (499) 643-33-80 3.3.3 Select Target Set ....................26 3.3.4 Enter a Field Note ....................27 3.4 START SURVEY ............................27 3.5 ANGLE MEASUREMENT ........................29 3.5.1 0SET.........................29 3.5.2 Enter the Horizontal Angle ................30 3.5.3 Repeat Angle Measurement ................30 3.5.4 Face-1/Face 2 Measurement ................32 3.5.5 Hold..........................33 3.6 QUICK CODES ..........................
- Page 4 Тахеометры http://taheometr-geo.ru +7 (499) 643-33-80 7.3.2 Mim Cont......................79 7.4 REMOTE ELEVATION MEASUREMENT (REM) ..............80 7.5 2-PT REFERENCE PLANE (V-PLANE) ..................82 7.6 3-PT REFERENCE PLANE (S-PLANE) ..................83 7.7 ROADS ................................85 7.7.1 Define HZ Alignment ..................85 7.7.2 Edit Horizontal Alignment Data...............90 7.7.3 Receive HZ AL ....................91 7.7.4 Delete Horizontal Alignment Data ..............92 7.7.5 Define Vertical Alignment ................93...
- Page 5 Тахеометры http://taheometr-geo.ru +7 (499) 643-33-80 11.4.1.1 ST Records ........................ 124 11.4.1.2 SO Records ........................ 124 11.4.1.3 CO (code) Records ....................124 11.4.2 Delete Raw Records ..................125 11.4.3 Edit Raw Records ..................126 11.4.4 Search Raw Records ..................126 11.4.5 View Coordinates Data................127 11.4.6 Delet Coordinate Records ................
- Page 6 Тахеометры http://taheometr-geo.ru +7 (499) 643-33-80 12.8 INSTRUMENT CONSTANT (K) ....................156 12.9 ....157 PARALLEL BETWEEN LINE OF SIGHT AND EMITTING PHOTOELECTRIC AXIS 12.10 TRIBRACH LEVELING SCREW ....................158 12.11 RELATED PARTS FOR REFLECTOR ..................158 13. SPECIFICATION ..............159 14.
-
Page 7: Forwords
+7 (499) 643-33-80 FORWORDS Thank you very much for purchasing the Ruide Total Station RTS-820 series! This manual will give a detailed and complete instruction about this new type total station. Please read it carefully before using the instrument. -
Page 8: Precautions
Тахеометры http://taheometr-geo.ru +7 (499) 643-33-80 PRECAUTIONS: 1. Do not collimate the objective lens directly to the sunlight without a filter. 2. Do not store the instrument in extremely high or low temperature, in order to avoid the sudden or great change of temperature. 3. -
Page 9: Appearance And Functions
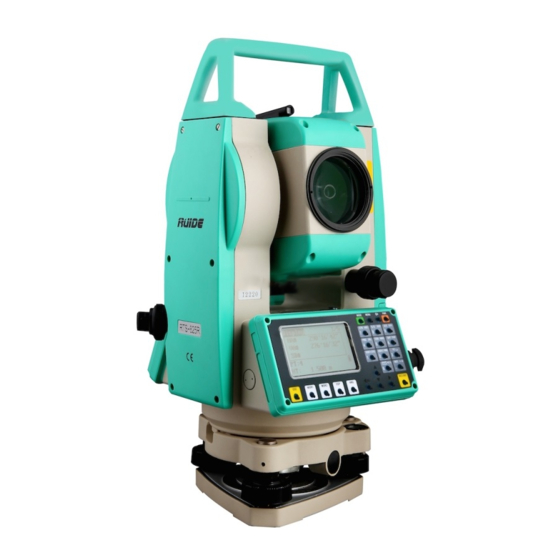
Тахеометры http://taheometr-geo.ru +7 (499) 643-33-80 1. APPEARANCE AND FUNCTIONS 1.1 APPEARANCE 1) Objective lens 8) Optical plummet 2) Instrument center mark 9) Leveling screw 3) Eyepiece 10) Screen 4) Battery 11) Telescope focusing wheel 5) Circular vial 12) Vertical screw 6) Temperature-Pressure sensor 13) Horizontal screw 7) Collimator... -
Page 10: Display
RTS-822R5 Number:S15000 Version:09.05.19 Display 30°21′50″ 273°13′45″ PT:RUIDE HT: 1.000 m Basic Measurement Menu ● Confirm the battery power shown on the display. Replace it with another charged battery or change it when battery level is low. Refer to section 2.3 “Battery Power Remaining Display”. -
Page 11: Soft Keys
Тахеометры http://taheometr-geo.ru +7 (499) 643-33-80 1.4 SOFT KEYS Function Power ON/OFF Illumination ON/OFF Displays the Function Menu 1. Job 2. Cogo 3. Set 4. Data 5. Comm 6. 1 Sec. 7. Adjust 8. Time 9. Format 10. Info Changes the mode of input: alphabetic/numeric; launches quick code mode in basic measurement screen. -
Page 12: Symbols
Тахеометры http://taheometr-geo.ru +7 (499) 643-33-80 Displays RAW, XYZ, or STN data, depending on your setting. Inputs number 6, and letter P, Q, R. Executes the function that is assigned to the User Key. Inputs number 1, and letter S, T, U. Executes the function that is assigned to the User Key. -
Page 13: Illumination & Sound
1.6 ILLUMINATION & SOUND Display 30°21′50″ 273°13′42″ PT: RUIDE HT: 1.000 m Press the illumination key ( ) to turn the LCD backlight ON and OFF. Press illumination key for 1 second to open a 3-switch window described above. -
Page 14: Auto Power Off
Display 30°21′50″ the item of LCD light, press [1] to 273°13′42″ switch off the light; press again to switch it on. PT:RUIDE HT: 1.000 m LCD backlight ON LCD backlight OFF ③ Press [2] or [▼] to move to Display [2] or [▼]... -
Page 15: Preparation For Measurement
Тахеометры http://taheometr-geo.ru +7 (499) 643-33-80 2. PREPARATION FOR MEASUREMENT 2.1 UNPACKING AND STORE OF INSTRUMENT · Unpacking Place the case lightly with the cover upward, and unlock the case, take out the instrument. · Store of instrument Cover the telescope cap, place the instrument into the case with the vertical clamp screw and circular vial upwards (Objective lens towards tribrach), and slightly tighten the vertical clamp screw and lock the case. - Page 16 Тахеометры http://taheometr-geo.ru +7 (499) 643-33-80 ② Turn the leveling screw C to move the bubble to the center of the circular vial. 4) Precisely leveling by using the plate vial ① Rotate the instrument horizontally by loosening the Horizontal Clamp Screw and place the plate vial parallel to the line connecting leveling screw A and B, and then bring the bubble to the center of the plate vial by turning the leveling screws A and B.
-
Page 17: Battery Power Remaining Display
Repeat this operation till the instrument collimate precisely to the measurement station point. 2.3 BATTERY POWER REMAINING DISPLAY Battery power remaining display indicates the power condition. Display 30°21′50″ 273°13′42″ PT: RUIDE HT: 1.000 m Note: ① The battery operating time will vary depending on the environmental conditions... - Page 18 Тахеометры http://taheometr-geo.ru +7 (499) 643-33-80 such as ambient temperature, charging time, the number of times of charging and discharging etc. It is recommended for safety to charge the battery beforehand or to prepare spare full charged batteries. ② The battery power remaining display shows the power level regarding the current measurement mode.
-
Page 19: Reflector Prisms
Тахеометры http://taheometr-geo.ru +7 (499) 643-33-80 2.4 REFLECTOR PRISMS When measuring distance, a reflector prism needs to be placed at the target place. Reflector systems come with single prism and triple prisms, which can be mounted with tribrach onto a tripod or mounted onto a prism pole. Reflector systems can be self-configured by users according to the job. -
Page 20: Inputting Mode
DISPLAY Input STN ①Make sure that the current ST: HI: 1.000 m inputting mode is alphabet mode. If CD:RUIDE not, press [MODE]. List Stac ②Press [6] 3 times to input R. Input STN Press [1] 3 times to input U. -
Page 21: Edit Characters
+7 (499) 643-33-80 Input STN ST: RUIDE800 HI: 1.000 m ④Press [8] and [0]. ※1) CD:RUIDE List Stac ⑤After inputting, press [REC/ENT] [REC/ENT] to confirm.※2) ※1) The maximum length of character of point ID or point number is 16. ※2) If the point ID is wrong, press [ESC] and input again. -
Page 22: Enter An Existing Point
10.000 m searches the PtID in internal Z: 10.000 m memory. When this PtID exists, its PT:AD1 coordinate will be displayed on the CD: RUIDE screen. Input STN ③ Press [REC/ENT] to return to the ST: HI: 1.000 m screen. The point is called up. The [REC/ENT] CD:RUIDE... -
Page 23: Search Via Wildcard
Stac Input STN ST: HI: 1.000 m ③Return. The cursor moves to next CD:RUIDE item. List Stac 2.8.3 Search Via Wildcard “*” Wildcard “*” can be represented a character that needs to be found. The function of searching via wildcard is useful when the point ID that needs to be searched is unknown, or a series of points needs to be found. -
Page 24: Enter A Point From The Point List
Z: 5.000 m be displayed on the screen. Press PT:1 [REC/ENT] to return. CD: RUIDE B: If the inputted PtID does not B: exist, it is required to input N: coordinate (as shown on the right). -
Page 25: Enter A Point From The Stack
DISPLAY Input STN ①When the cursor is on PT field, ST: HI: 1.000 m press [Stac]. [Stac] CD:RUIDE List Stac [▲]/[▼] ②The stacks of the points are displayed. Press [▲]/ [▼] to select the PtID, and press [REC/ENT]. [REC/ENT] ③When you return to the PT input Input PT01 PT:... -
Page 26: Press [Rec/Ent] Without A Point Name
Тахеометры http://taheometr-geo.ru +7 (499) 643-33-80 Input PT01 PT: ⑤ Return to PT inputting screen. HT: 1.000 m Move the cursor to next item. CD: List Stac The stack shows the last 20 point names used, in chronological order from last used to first used. -
Page 27: Leveling
Please refer to “2.2 Instrument Setup” for detailed leveling instruction. RUIDE Total Station RTS-820 Series compensates the vertical angle reading as well as both vertical and horizontal angle reading due to inclination of the vertical axis in the X direction and XY directions. - Page 28 Тахеометры http://taheometr-geo.ru +7 (499) 643-33-80 ② Tilt compensation value is Tilt: X displayed. X:-0°00′21″ If the value is within ±5′, it indicates Y: Over that automatic compensation range of the raster disc. Press [ESC] to return to measurement function. If it is beyond ±5′, it means that it needs to be leveled manually.
-
Page 29: Routine Measurements
All shown displays are examples. It is possible that local software versions are different from the basic one. Example of a possible measuring display: Display 30°21′50″ 273°13′45″ SD: PT:RUIDE HT: 1.000 m 3.2 EDM SETTING Press [MSR1] or [MSR2] for 1 second to enter each measurement function it is specified. STEP... -
Page 30: Hot Key
Тахеометры http://taheometr-geo.ru +7 (499) 643-33-80 Rec: Enter, All, Meas. This mode controls the mode operation of [MSR1]/MSR2] in basic measurement function. If “Enter” is adopted, a screen of “Rec Pt” is displayed to inform the user to check and confirm before data is recorded. -
Page 31: Set The Temperature & Pressure
Тахеометры http://taheometr-geo.ru +7 (499) 643-33-80 Display ④ Press [REC/ENT] to return to 280°56′10″ 46°29′06″ basic measurement screen. [REC/ENT] PT:1 HT: 1.000 m 3.3.2 Set the Temperature & Pressure Atmosphere Correction: The speed of light in air is extremely fast. And it is not a constant, but changes with the temperature and pressure of atmosphere. -
Page 32: Select Target Set
Тахеометры http://taheometr-geo.ru +7 (499) 643-33-80 ③ The program calculates the Temp&Pres atmosphere correction value, and 20.0 ℃ Temp: return to normal measurement Press: 1013.2 hPa screen. ※2) PPM=0.0 ④Press ON to activate the Temp&Pres Auto automatic temperature and 28.0 ℃ Temp: pressure sensor, which will detect Press:... -
Page 33: Enter A Field Note
Тахеометры http://taheometr-geo.ru +7 (499) 643-33-80 1 < N,0, 1.000 > 2 < S,0, 1.000 > 3 < N,0, 1.000 > ②Press [▲]/[▼] or numeric keys [▲]/[▼] 4 < P,0, 2.000 > [1]~[5] to select target set, and then 5 < N,0, 1.000 >... - Page 34 Тахеометры http://taheometr-geo.ru +7 (499) 643-33-80 Please set a job, station and backsight azimuth before measurement. STEP OPERATION DISPLAY Display ①Collimate to the center of target 29°44′21″ [MSR1]/ 265°20′53″ prism, press [MSR1] or [MSR2]. [MSR2] PT:1 HT: 1.000 m Display ②While the instrument is taking a 29°44′21″...
-
Page 35: Angle Measurement
OPERATION DISPLAY Display ①In BMS press [ANG] to enter 30°21′50″ AZ: HD: angle observation function. [ANG] SD: PT:RUIDE HT: 1.000 m -------------------- Angle ---------------------- ②To select a command from this 359°21′11″ HA: menu, press the corresponding 1.0SET 4.F1/F2 2. Input 5.Hold... -
Page 36: Enter The Horizontal Angle
③ Program returns basic 87°04′21″ measurement screen, and displays the horizontal angle just input. PT:RUIDE HT: 1.000 m ※1) To enter 159°46′25″, type 159.4625. 3.5.3 Repeat Angle Measurement This program is used to accumulate repeated angle measurement, displaying the sum of and average value of all observed angles. It records the observation times at the same time. - Page 37 Тахеометры http://taheometr-geo.ru +7 (499) 643-33-80 RePt. N=00 HR∑ 0°00′00″ ②System sets the initial value of HR - HA HOLD - as 0. *Sight BS Press [ENT] ③Sight the first target point which is Sight RePt. N=01 HR∑ 0°00′00″ used repeat angle backsight 79°42′26″...
-
Page 38: Face-1/Face 2 Measurement
Press [ENT], program will calculate the observation value of [ENT] Abrt F1/F2. ※2) Display ④If you are satisfied with the result, 20°00′00″ [OK] HA: 273°16′00″ VA: press [OK], and otherwise press SD: [Abrt]. Screen returns to BMS. [Abrt] PT:RUIDE HT: 1.000 m... -
Page 39: Hold
60°00′00″ [ENT] AZ: HD: angle of the target. SD: PT:RUIDE HT: 1.000 m 3.6 QUICK CODES Quick codes (Qcodes) let you shoot and record many points with feature codes in the field. Using the quick code function, a predefined code can be called up directly via numeric keypad on the instrument. - Page 40 (e.g.: 01->: first code in the code list. 10-> tenth code in the code list).About editing Quick Code, please refer to “11.4.14.4 Add a code”; users can also use the data transferring software provided by RUIDE to create and upload codes, please refer to “Appendix A 3: Code List”....
- Page 41 Тахеометры http://taheometr-geo.ru +7 (499) 643-33-80 ④ While finishing measurement, the Rec Pt PT: found code is called up, and screen HT: 1.000 m displays a dialog box for result CD: FANGJIAO recording. “CD” column shows the found code. ※2) List Stac ※1) If no quick code is allocated to the codes, the code is numbered in accordance with the order in which the codes were entered in the code list, so you can enter serial...
-
Page 42: Key
Тахеометры http://taheometr-geo.ru +7 (499) 643-33-80 To open the Station Setup menu, press in the BMS. 4.1 SET UP A STATION WITH KNOWN POINTS 4.1.1 Set up a Station with Known Coordinates STEP OPERATION DISPLAY ---------------- Stn Setup ---------------------- ①In [Stn Setup] menu press [1] to Known Rese. - Page 43 Input STN then press [ENT]. instrument ST: HI: 1.000 m To re input the known PtID,press CD:RUIDE [▲] to move to the ST item, then [ENT] input the PtID. ④Select an input method for Backsight defining the backsight point: 1. XYZ 2.
- Page 44 Тахеометры http://taheometr-geo.ru +7 (499) 643-33-80 ④Sight the BS on Face-1 (F1), Stn Setup 30°21′50″ press [MSR1] or [MSR 2] to record AZ: HD: a full shot (with HA/VA/SD value). SD: ※1) * Obs.BS [MSR]/[ENT] If the horizontal circle is on Face-2, [MSR 1]/ screen would display “Turn to F1”.
- Page 45 Тахеометры http://taheometr-geo.ru +7 (499) 643-33-80 ⑦Procedure records the station and Display 280°56′10″ raw data to current job and finish setting up station. Screen returns to BMS. PT:1 HT: 1.000 m ※1)AZ:Azimuth calculated by coordinates. ※2)Press [▼] or [DSP] to switch QA screen (dHD/dVD)。 dHD/dVD: indicates the difference between the measured distance and the distance calculated from the known coordinates.
-
Page 46: Sight The Backsight By Entering The Azimuth Angle
Тахеометры http://taheometr-geo.ru +7 (499) 643-33-80 4.1.2 Sight the Backsight by Entering the Azimuth Angle STEP OPERATION DISPLAY Backsight ① To enter the azimuth angle to the 1. XYZ 2. Angle backsight point, press [2] in the Backsight screen. ②Input a point name, and press Input BS PT [ENT]. - Page 47 Тахеометры http://taheometr-geo.ru +7 (499) 643-33-80 ④Sight the backsight point on F1 Sight BS point Input BS PT and press [ENT]. The screen BS: HT: 0.000 m displays as the right graph. Enter Input height of CD: the target height of backsight point target and press [ENT].
-
Page 48: Multiple Point Resection
Тахеометры http://taheometr-geo.ru +7 (499) 643-33-80 4.2 MULTIPLE POINT RESECTION A resection sets up the station using angle/distance measurements to known points. --- You can use a maximum of 10 points in a resection. --- Measurements can be distance and angle, or angle only. --- Calculation starts automatically when enough measurements are taken. - Page 49 Тахеометры http://taheometr-geo.ru +7 (499) 643-33-80 ④Sight the center of first target RESE <Sight 01> 345°06′14″ prism on F1and press [MSR1] or [MSR2] to start survey. If only need Sight to measure angle, press [ENT]. * Press [MSR]/[ENT] If the horizontal circle is on Face-2, [MSR1]/ screen would display “Turn to F1”.
- Page 50 Тахеометры http://taheometr-geo.ru +7 (499) 643-33-80 A: RESE ⑨When the instrument has enough dHD: 0.002 m dZ: -0.001 m data; it calculates the station (STN) coordinates. As shown in the right * Press [Rec] End graph A. If more than 2 points are View Rec.
-
Page 51: Quick Station
Тахеометры http://taheometr-geo.ru +7 (499) 643-33-80 Input STN (11)Press [ENT] or [Rec.] to record [ENT] ST: HI: 1.800 m the station when the results are OK, CD: as shown in the right graph. [Rec.] BS: 1 The “ST” column defaults to the last List Stac recorded PT+1. - Page 52 Тахеометры http://taheometr-geo.ru +7 (499) 643-33-80 new point, MP (0, 0, 0) is stored as the coordinates. When the ST is manually changed to a known point name, the station is set up on the coordinates of the known point. Even if both ST and BS are known points, this function does not calculate the backsight angle (AZ) automatically.
-
Page 53: Height Transfer (Determining Station Elevation)
Тахеометры http://taheometr-geo.ru +7 (499) 643-33-80 4.4 HEIGHT TRANSFER (DETERMINING STATION ELEVATION) This function determines the height of the instrument from measurements to target points with known heights, in two faces. After measuring, the new height of station is displayed. STEP OPERATION DISPLAY ---------------- Stn Setup ----------------------... - Page 54 Тахеометры http://taheometr-geo.ru +7 (499) 643-33-80 ⑥Sight the center of prism, press level point 355°61′59″ [MSR1] or [MSR2] to start survey. Sight the target If the horizontal circle is on Face-2, screen would display “Turn to F1”. [MSR 1]/ * Sight Press [MSR] Rotate the telescope and alidade, [MSR 2] and sight the BS point in Face-1.
-
Page 55: Checking And Resetting The Backsight Direction
7°21′28″ ③Screen returns to the basic 87°04′21″ measurement screen, and HA is set. PT:RUIDE HT: 1.000 m ※1)HA: Current HA reading BS: The HA to the BS in the last station setup. ●You must complete a station setup before you use the BS check function. -
Page 56: Key
Тахеометры http://taheometr-geo.ru +7 (499) 643-33-80 To display the Stakeout menu, press 5.1 STAKE OUT ANGLE AND DISTANCE Specifying the stakeout point by angle and distance STEP OPERATION DISPLAY ①Press numeric key [8] to enter ! Station not set into stake-out function. 1.Continue You should setup station and 2.Stn Setup... - Page 57 Тахеометры http://taheometr-geo.ru +7 (499) 643-33-80 ----------------------SO --------------------- ③After the program record STN data, screen returns to SO main HA-HD menu. PartLine Ref. Line ④Press [1] to display the input HA-HD screen for the distance and angle to HD: dVD: the target. Enter the values and HA:...
- Page 58 Тахеометры http://taheometr-geo.ru +7 (499) 643-33-80 ⑧Move the prism forward or 0°00′00″ backward according 0.000 m arrowhead until IN/OUT field 0.000 m displaying 0 m, 0.201 m :moving towards to station * Press [ENT] Rec :moving away from station ⑨When both R/L and IN/OUT 0°00′00″...
- Page 59 Тахеометры http://taheometr-geo.ru +7 (499) 643-33-80 15°42′13″ This page displays the slant distance HA: VA: 20° 03′05″ measurement of target prism. Press SD: 2.359 m [HOT] to enter into HOT Key menu. *Press[HOT] Change ↓ Press ---------------------- HOT Key --------------- 1.Input HT When the cursor is on “Input ht”, 2.Temp&Pres Press [ENT] to enter into Input HT...
- Page 60 Тахеометры http://taheometr-geo.ru +7 (499) 643-33-80 344°17′46″ HL: V%: 70.07% User can change the memory taken Z: 1.236 up by display screen. Press [ ]/[ ], * Press [DSP] 1Sec. [▲]/[▼] to select, and use Display user-defined softkey to change, press [ENT] or Press [DSP] for 1 second↓...
-
Page 61: Coordinates Stakeout
Тахеометры http://taheometr-geo.ru +7 (499) 643-33-80 5.2 COORDINATES STAKEOUT Input the XYZ of stakeout point, and carry on stake-out. STEP OPERATION DISPLAY ------------ SO --------------------------------- ①In SO menu, press [2] to enter 1. HA-HD 2. XYZ into coordinate stakeout function. 3. PartLine 4. - Page 62 Тахеометры http://taheometr-geo.ru +7 (499) 643-33-80 N: 10.020 m E: 10.004 m ④Screen displays coordinates of Z: 6.189 m the selected point name., press [ENT] PT:1 [ENT] to confirm. CD: List Stac ⑤The delta angle and the distance PT:1 to the target (HD) are shown. Rotate 123°41′23″...
-
Page 63: Partline So
Тахеометры http://taheometr-geo.ru +7 (499) 643-33-80 ⑩ A: Input PT A:After recording the point, the PT: display returns to the observation Rad: screen. You’re your press [ESC], the CD: display returns to the PT/CD/R input Fr/To List Stac screen. If you entered the stakeout B:... - Page 64 Тахеометры http://taheometr-geo.ru +7 (499) 643-33-80 STEP OPERATION DISPLAY ------------------------ SO ---------------------- ①In SO menu press [3] to enter into 1. HA-HD 2. XYZ PartLine SO function. 3. PartLine 4. Ref.Line ②Set up the baseline. Sight the PartLine 123°41′23″ target, and press [MSR1]/ [MSR 1]/ [MSR2] to start survey.
-
Page 65: Refline Stakeout
Тахеометры http://taheometr-geo.ru +7 (499) 643-33-80 ⑦If the third line “L/R” does not PartLine <1/3> HD: 0.667 m display 0 m, ask the rodman to 0.000 m adjust the target position. 0.000 m : Rodman moves to his left side. * Press [ENT] Rec Prev Next : Rodman moves to his right side. - Page 66 Тахеометры http://taheometr-geo.ru +7 (499) 643-33-80 Enter the 1st Input P1 ②Enter the first point (P1) of the point of the P1: P2: line. ※1) line. [ENT] Meas List Stac Enter the Input P2 ③Enter the second point (P2) of the second point P1:...
-
Page 67: Guide Light
Тахеометры http://taheometr-geo.ru +7 (499) 643-33-80 ⑧When both R/L and IN/OUT 0°00′00″ display 0m, it indicates the prism is 0.000 m on the stakeout point. 0.000 m The fifth line shows the data of fill or 0.201 m dig. * Press [ENT] Rec ⑨After staking out, your can press N:... - Page 68 Тахеометры http://taheometr-geo.ru +7 (499) 643-33-80 When only seeing the yellow light, move the prism to the right When only seeing the red light, move the prism to the left. When seeing both lights blinking alternately, it means the prism is in the correct line.
-
Page 69: Key
Тахеометры http://taheometr-geo.ru +7 (499) 643-33-80 6.1 DISTANCE OFFSETS STEP OPERATION DISPLAY ①Press numeric key [9] to enter ! Station not set Offset function. 1.Continue You should setup station and 2. Stn Setup backsight azimuth before offset *Press [ESC] Abrt measurement. Otherwise screen displays as the right graph. -
Page 70: Measuring Angle Offsets
Тахеометры http://taheometr-geo.ru +7 (499) 643-33-80 ④If you have not taken a distance 15°42′13″ 264°01′13″ measurement before entering this [MSR 1]/ function, a temporary measurement [MSR 2] HT: 1.000 m screen appears. Sight the target and * Sight Press [MSR] press [MSR 1]/[MSR 2]. Enter O/S Dist ⑤Enter combination of distance... - Page 71 Тахеометры http://taheometr-geo.ru +7 (499) 643-33-80 ④To take the angle offset, rotate the O/S Ang. 25°09′01″ alidade and telescope. The 90°06′01″ measured distance (HD) remains 3.971 m unchanged. Abrt ⑤To record the offset point, press 25°09′01″ HA: 90°06′01″ VA: [OK], and otherwise press [Abrt]. SD:...
-
Page 72: Two-Prism Pole
Тахеометры http://taheometr-geo.ru +7 (499) 643-33-80 6.3 TWO-PRISM POLE STEP OPERATION DISPLAY ----------------- Offset ------------------------- ①In [Offset] menu, press [3] to enter O/S Dist O/S Ang. the 2Prism Pole function. O/S 2D +HA Line Input HD Sight the first O/S 2D <No. -
Page 73: Ha Line
Тахеометры http://taheometr-geo.ru +7 (499) 643-33-80 P1-P2=5.000(5.005) ,P2-Tgt=2.000 6.4 +HA LINE This function is to extend a line by horizontal angle offset. STEP OPERATION DISPLAY -------------------Offset ----------------------- ①In [Offset] menu, press [4] to enter O/S Dist O/S Ang. the line extension (+HA) function. O/S 2D +HA Line Input HD... -
Page 74: Input Hd
Тахеометры http://taheometr-geo.ru +7 (499) 643-33-80 ⑥Enter a PT (and CD) value, and 16°22′59″ Enter a PT and HA: 36°11′39″ VA: press [ENT] to Record the point. CD value SD: 5.228 m The height of target is fixed to PT:29 0.0000 for the offset point. [ENT] CD:... -
Page 75: Calculate A Corner Point
Тахеометры http://taheometr-geo.ru +7 (499) 643-33-80 6.6 CALCULATE A CORNER POINT STEP OPERATION DISPLAY ①In [Offset] menu, press [▼] to -------------- Offset ----------------------------- display the second page of Offset. CornerPt Column Press [6] to enter the corner point InputdSD function. ②Take a distance measurement to Sight the first CornerPt <No. -
Page 76: Column
Тахеометры http://taheometr-geo.ru +7 (499) 643-33-80 ⑥Enter a PT (and CD) value and Enter PT and Rec Pt PT: press [ENT], The target point is HT: 1.000 m calculated and recorded as an SS CD: record. [ENT] List Stac 6.7 COLUMN STEP OPERATION DISPLAY... -
Page 77: Extend The Slope Distance
Тахеометры http://taheometr-geo.ru +7 (499) 643-33-80 ⑤A: A:Press [Calc]. N: 29.369 m If you have taken a distance E: 25.566 m measurement to the center of the Z: -14.177 m column, press the Calc softkey to Rd = 5.369 m calculate the offset using one edge Redo angle observation. - Page 78 Тахеометры http://taheometr-geo.ru +7 (499) 643-33-80 ②If you have not taken a distance 47°42′13″ 94°01′13″ measurement before entering this function, a temporary measurement HT: 1.000 m screen appears. Sight the target and * Sight Press [MSR] press [MSR1]/ [MSR2]. ③Enter the slope distance You can InputdSD 47°25′14″...
-
Page 79: Key
Тахеометры http://taheometr-geo.ru +7 (499) 643-33-80 7.1 2 POINT REFLINE STEP OPERATION DISPLAY ---------- Program ----------------------------- ①In [Program] menu, press [1] to 2Pt.Ref.L Ref.Arc enter 2Pt.Ref.Line function. MlmRadial Mlm Cont. InputP1 ②Enter the first point for the P1: P2: reference line P1. ※1) Input P1 Meas List... -
Page 80: Reference Arc
Тахеометры http://taheometr-geo.ru +7 (499) 643-33-80 Rec Pt P1: HT: 1.000 m ⑥press [ENT] to record. [ENT] CD: Meas List Stac ※1) About method to input PtID, please refer to “2.8 METHOD TO INPUT PTID”. ※2) Press [▲]/[▼] or [DSP] to view other pages. 7.2 REFERENCE ARC Measuring distance and offset values on the arc-curve. - Page 81 Тахеометры http://taheometr-geo.ru +7 (499) 643-33-80 Define Arc ④Choose a method to define the P2-AZ2 arc, as shown in the graph. Rad-AZ2 Rad-Len ⑤ A: A: Use P2-AZ2 to define arc. Define Arc Input point name of P2 and azimuth P2: AZ2:...
-
Page 82: Remote Distance Measurement
Тахеометры http://taheometr-geo.ru +7 (499) 643-33-80 ⑧After measuring, the results Ref.Arc display. ※3) STA# -2.320 m O/S# -0.362 m Sta Horizontal distance from P1 to -0.327 m the measure point along the P1-P2 * Sight Press [MSR] line * Press [ENT] Rec O/S:Horizontal offset from the P1-P2 line to the measured point dZ:Vertical offset from the P1-P2... -
Page 83: Mimradial
Тахеометры http://taheometr-geo.ru +7 (499) 643-33-80 7.3.1 MimRadial Measuring between the current and the first point measured STEP OPERATION DISPLAY -------- Program ----------------------------- ①In [Program] menu, press [3] to 1. 2Pt.Ref.L 2. Ref.Arc enter MimRadial function. 3. MlmRadial 4. Mlm Cont. 5. - Page 84 Тахеометры http://taheometr-geo.ru +7 (499) 643-33-80 ④Sight the second point press MimRadial [MSR 1]/[MSR 2] the distances rSD# 2.593 m rVD# 0.016 m between the first and rHD# 2.593 m second point are displayed.rSD: * Sight Press [MSR] Slope distance between two points * Press [ENT] Rec.
-
Page 85: Mim Cont
Тахеометры http://taheometr-geo.ru +7 (499) 643-33-80 7.3.2 Mim Cont. Measuring between the current point and the immediately preceding point. Other operations are same as MimRadial. STEP OPERATION DISPLAY -------- Program ------------------------------ ① In [Program] press [4] to enter 1. 2Pt.Ref.L 2. Ref.Arc Mim Cont. -
Page 86: Remote Elevation Measurement (Rem)
Тахеометры http://taheometr-geo.ru +7 (499) 643-33-80 The second page: Press [▲] or [▼] to display next MimRadial page. 77°51′00″ rAZ# rAZ: Azimuth from first point to rV%# -1.58% second point rGD# -63.372:1 rV%:Percentage of grade * Sight Press [MSR] * Press [ENT] Rec. rGD:Vertical grade (rHD/rVD) ⑤To record the distance and angle Rec CO Data... - Page 87 Тахеометры http://taheometr-geo.ru +7 (499) 643-33-80 1:Target point 2:Vh 3:Slope Distance 4:Base point STEP OPERATION DISPLAY -------- Program ---------------------------- 1. 2Pt.Ref.L 2. Ref.Arc ①In [Program] press [5] to enter 3. MlmRadial REM function. 4. Mlm Cont. 5. REM HT: 0.000 m ②Enter the height of target HT.
-
Page 88: 2-Pt Reference Plane (V-Plane)
Тахеометры http://taheometr-geo.ru +7 (499) 643-33-80 7.5 2-PT REFERENCE PLANE (V-PLANE) Measuring distance and offset values on the vertical plane. STEP OPERATION DISPLAY ----------- Program ------------------------------ ①In the second page of [Program] [▼] V-Plane S-Plane press[6] to enter 2-Pt Reference Roads Plane (V-Plane) function. -
Page 89: 3-Pt Reference Plane (S-Plane)
Тахеометры http://taheometr-geo.ru +7 (499) 643-33-80 3/3: V-PLANE 78°45′19″ 162°30′26″ * Press [ENT] Rec. ⑤To record the point, press [ENT] 78°45′19″ HA: 162°30′26″ VA: on any screen. Input PT and CD SD: 13.333 m and then press [ENT] in the dialog [ENT] PT:221 box shown as the right graph. - Page 90 Тахеометры http://taheometr-geo.ru +7 (499) 643-33-80 InputP1 P1: P2: ②Input the first point to define the Input P1 P3: slope plane. Meas List Stac InputP1 P1: P2: ③Input the second point. Input P2 P3: Meas List Stac InputP1 ④Input the third point on the plane. P1:...
-
Page 91: Roads
Тахеометры http://taheometr-geo.ru +7 (499) 643-33-80 ※1) If the plane is defined by two points, the vertical plane is the same as the plane used in the V-Pln function, but the indicating factors are Sta and dZ, not a and b. 7.7 ROADS This program enables you to easily define a line or curve or spiral as a reference for measurements and stake outs. - Page 92 Тахеометры http://taheometr-geo.ru +7 (499) 643-33-80 Define HZ AL CH : 1.000 m AZ : 0°00′00″ Trns The screen displays: current chainage, the azimuth angle of the tangent on the chainage, and the function key of the establishing new line. The system provides four functions: defining line, curve, spiral, and point.
- Page 93 Тахеометры http://taheometr-geo.ru +7 (499) 643-33-80 Define HZ AL CH : 1.000 ⑤The display enters into the Define 0°00′00″ AZ : HZ alignment main menu. Trns Straight Line When the start point or other line type is defined, user can define line. A line consists of azimuth angle and distance.
- Page 94 Тахеометры http://taheometr-geo.ru +7 (499) 643-33-80 Press [ARC] in “Define HZ AL” menu to define the arc. A curve consists of arc length and radius. The rule of radius value: along the forward direction of the curve. When the arc turns right, the radius value is positive; while the arc turns to left, the radius value is minus.
- Page 95 Тахеометры http://taheometr-geo.ru +7 (499) 643-33-80 STEP OPERATION DISPLAY Define HZ AL CH : 1.000 ①In Define HZ AL screen press AZ : 0°00′00″ [Trns] to enter into defining transition [Trns] screen. Trns Transition Rad : ②Input radius and arc length, and Input radius Len :...
-
Page 96: Edit Horizontal Alignment Data
Тахеометры http://taheometr-geo.ru +7 (499) 643-33-80 STEP OPERATION DISPLAY Define HZ AL CH : 1.000 ①In Define HZ AL screen press [Pt] AZ : 0°00′00″ to enter into defining point function. [Pt] Trns Input N, E N : 0.000 m ②Input N and E coordinates, radius coordinates, E :... -
Page 97: Receive Hz Al
Тахеометры http://taheometr-geo.ru +7 (499) 643-33-80 Start Pt 01/05 CH: 10.000 ②Screen displays the start point N : 10.000 m data. Press [Next] softkey to find [Next] E : 10.000 m the alignment data needed to edit. Next Straight 02/05 ③Input the new data and press Input new data 30°00′10″... -
Page 98: Delete Horizontal Alignment Data
Тахеометры http://taheometr-geo.ru +7 (499) 643-33-80 ⑤After receiving data, the program quit automatically, and returns to HZ Alignment menu. 7.7.4 Delete Horizontal Alignment Data The horizontal alignment data in internal memory can be deleted. Operation is shown below. STEP OPERATION DISPLAY HZ Alignment ①In HZ Alignment select “Delete 1. -
Page 99: Define Vertical Alignment
Тахеометры http://taheometr-geo.ru +7 (499) 643-33-80 7.7.5 Define Vertical Alignment A vertical alignment consists of a series of intersections, including a chainage, height and curve length. The length of start point and end point must be zero. Chainage 1000 1300 1800 2300 Height Curve length 0... -
Page 100: Edit Vertical Alignment Data
Тахеометры http://taheometr-geo.ru +7 (499) 643-33-80 7.7.6 Edit Vertical Alignment Data It is able to be applied to edit vertical alignment data. The operation steps are similar to that of editing horizontal alignment. STEP OPERATION DISPLAY VT Alignment ① In VT Alignment select “Edit VT 1. -
Page 101: Stn Setup
Тахеометры http://taheometr-geo.ru +7 (499) 643-33-80 ③Press [OK] to delete VT AL, all the VT Alignment 1. Define VT AL vertical alignment data in internal 2. Edit VT AL memory will be deleted. 3. Receive VT AL The system returns to VT Alignment [OK] 4. -
Page 102: Stake Out Roads
Тахеометры http://taheometr-geo.ru +7 (499) 643-33-80 Input STN ④In OF item input the offset of the Input Offset CH: 100.000 OF: 0.000 m chainage to center line. And press HI: 0.000 m [ENT]. [ENT] ⑤The screen displays detailed data Input height of Input STN about the chainage. - Page 103 Тахеометры http://taheometr-geo.ru +7 (499) 643-33-80 In the process of stake-out, user should first stake out points on the central line, then the featured points on both sides. The method to stake out alignment is similar to that of point stake-out, with 3 methods available: Take points on the central line for example.
- Page 104 Тахеометры http://taheometr-geo.ru +7 (499) 643-33-80 ④Steps: Stake out points on the CH: 1.000 central line first, and then press O/S: 0.000 m dVD: 0.000 m [LOFS]( or [ROFS]) to stake out ( or * Press [ MENU] Slope SO right) chainage. Press [LOFS] (or [ROFS]), the LOFS ROFS...
- Page 105 Тахеометры http://taheometr-geo.ru +7 (499) 643-33-80 ⑧After measuring, the deviation Stake Out Roads 0°00′00″ value between measure point and 0.000 m stakeout point is shown. ※2), ※3) 13.971 m dHA:Difference in horizontal angle 0.743 m to the target point * Press [ENT] Rec. R/L: Right/Left (Lateral error) IN/OUT: In/Out (Longitudinal error) CUT/FIL: Cut/Fill...
-
Page 106: Slope Stake-Out
Тахеометры http://taheometr-geo.ru +7 (499) 643-33-80 7.7.10 Slope Stake-out Slope Stake Out can be launched as part of the Alignment Stake-Out. It is a must to define horizontal and vertical alignments in Road menu previously. In stake-out main screen, press [menu] to enter into slope stake-out function. Slope stake-out screen:... - Page 107 Тахеометры http://taheometr-geo.ru +7 (499) 643-33-80 STEP OPERATION DISPLAY CH: 1.000 ①In the Stake-out main menu, input O/S: 0.000 m dVD: 0.000 m (or select) the side chainage to be [MENU] * Press [MENU] Slope SO slope staked out. Press [MENU] to start.
- Page 108 Тахеометры http://taheometr-geo.ru +7 (499) 643-33-80 ⑥After finishing staking out this Select (Left) or (Right) point, press [ESC] to return to the Cut L: 1.000 Fill L: 2.000 main screen of Slope Stake Out, Cut R: 2.000 input other slope to be staked out to Fill R:...
-
Page 109: Key
A: A:Input the CD manually. The InputCod input code will be entered into Stac in chronological order. CD: RUIDE List Stac B: B:Select code from [List] window to input. To add, delete or edit code in the List, please refer to “11.4.14 Point Name List and Code List”... - Page 110 PT:1 HT: 1.000 m Rec Pt PT: ⑤Press [Rec/Ent] to see if the HT: 1.000 m default code is the setting you just CD: RUIDE List Stac ※1) About method to input Code, please refer to “11.4.14.4 Add a Code”.
-
Page 111: Key
Тахеометры http://taheometr-geo.ru +7 (499) 643-33-80 When you press [DAT] in the basic measurement screen or in observation screens in functions such as Stakeout, 2Pt RefLine, etc, the data in the current job is displayed. Hold [DAT] for one second in the basic measurement screen or an observation screen to display the Data Type screen. -
Page 112: Key
Тахеометры http://taheometr-geo.ru +7 (499) 643-33-80 If you use a certain function frequently in the field, you can assign it to the [USR1] or [USR2] key. Whenever you press a [USR] key, the function which is predefined is activated directly. The following functions can be assigned to the [USR] keys: Input HT BS Check Cogo→... - Page 113 Тахеометры http://taheometr-geo.ru +7 (499) 643-33-80 ※1) The current predefined function is indicated by an asterisk (*) beside the function name. ※2) Once you have defined a function to a [USR] key, it is activated directly whenever you press that [USR] key in the basic measurement screen.
-
Page 114: Menu Key
2.Cogo 7. Adjust shows as the right graph. [Menu] 3.Set 8.Time 4.Data 9.Format 5.Comm 10.Info JobMgr. ②Press [1] to open the Job * RUIDE 07-01-20 @ MQ 07-01-25 Manager. ※1) RTS800 07-01-25 SURVEY 07-01-25 Ctrl Info JobMgr. ②Select the item by [▲]/[▼], and... -
Page 115: Create A New Job
Тахеометры http://taheometr-geo.ru +7 (499) 643-33-80 11.1.2 Create a New Job STEP OPERATION DISPLAY Job Mgr. ①Press [New ] in the job list. [New] * RUIDE 07-01-20 @ MQ 07-01-25 RTS800 07-01-25 SURVEY 07-01-25 Ctrl Info Enter a job Create Job ②Enter a job name (within eight... -
Page 116: Delete Jobs
Create a new job automatically while pressing [Enter] in the last field. 11.1.3 Delete Jobs STEP OPERATION DISPLAY Job Mgr. ①In the job list,move the cursor to * RUIDE 07-01-20 @ MQ 07-01-25 [▲]/[▼] the job that you want to delete by RTS800 07-01-25 [▲]/[▼]. -
Page 117: Display Job Information
Тахеометры http://taheometr-geo.ru +7 (499) 643-33-80 ③Press [ENT] or [OK] to confirm, Job Mgr. * RUIDE 07-01-20 otherwise cancel it by [ESC] or [ENT] 07-01-25 [Abrt] and return to the previous @ RTS800 07-01-25 screen. If a control job is already... - Page 118 Тахеометры http://taheometr-geo.ru +7 (499) 643-33-80 STEP OPERATION DISPLAY ------------------- Menu---------------------- ①In the [Menu], press [2] or 1.Job 6.1 Sec. 2.Cogo 7. Adjust ([▼]+[Enter]). 3.Set 8.Time 4.Data 9.Format 5.Comm 10.Info --------- Cogo--------------------------------- Inverse AZ&Dist ②Display the Cogo menu. Area LineOff. InputXYZ -------- Inverse------------------------------ PT-PT 3PT Ang.
- Page 119 Тахеометры http://taheometr-geo.ru +7 (499) 643-33-80 D: D: 32°05′34″ By pressing [MSR], as the D graph 22°26′25″ shows. Press [MSR1] or [MSR2] to measure a point as the first point of HT: 1.000 m the line. *Sight Press [MSR] E: E: Press [list] to use the point in the MP,1, MP,2...
-
Page 120: 3Pt Angle
Тахеометры http://taheometr-geo.ru +7 (499) 643-33-80 ※1)Gd:Grade (HD/VD) V%:100/Gd rSD:Slope distance PT1 to PT2 11.2.1.2 3PT Angle The 3pt angle calculates the angle between two lines defined by three points. PT1 is the base point. Two lines are to be defined by P2 and P3, both from P1. STEP OPERATION DISPLAY... -
Page 121: Azimuth And Distance (Az&Dist)
Тахеометры http://taheometr-geo.ru +7 (499) 643-33-80 Page 2: 3PT Ang. HD3: 2.000 m *HD1=P1-P2 HD HD2=P1-P3 HD HD3=P2-P3 HD Next ⑥To continue 3 Pt. Angle function, press [Next]; To quit, press [End], screen returns to Inverse menu. 11.2.2 Azimuth and Distance (AZ&Dist) Use angle and distance to calculate coordinate. -
Page 122: Store
Тахеометры http://taheometr-geo.ru +7 (499) 643-33-80 ⑤A recording point screen with the N: 3.879 m E: 2.684 m calculated coordinates appears. PT Z: 4.000 m defaults to the last recorded PT + 1. PT:2 Input code and press [ENT] to store CD:... -
Page 123: Calculate Area
Тахеометры http://taheometr-geo.ru +7 (499) 643-33-80 Input P2 ⑥Screen returns to the point input screen. P1 (base PT) defaults to the previously recorded PT. P2 defaults P1: P2: to the previous P1. Meas Data List Stac ⑦Enter the plus-minus angle, Input+AZ, HD, Input+AZ horizontal distance, and vertical +AZ:... -
Page 124: Line And Offset
Тахеометры http://taheometr-geo.ru +7 (499) 643-33-80 Input other Points ③Continue to enter points until you points PT: have defined all the points in the lot. * Press [MEMU] View [ENT] Meas Calc List Stac ④Press [Calc] to calculate the area Area: 64.000 m and perimeter. - Page 125 Тахеометры http://taheometr-geo.ru +7 (499) 643-33-80 B: InputAZ or P2 B:Skip AZ item, enter a value in P2 field to specify a azimuth bearing. P1: AZ: P2: Meas Data List Stac LineOff. ④Enter the horizontal distance Input STA STA: along the baseline (STA).※1) O/S:...
-
Page 126: Input Coordinates Manually
Тахеометры http://taheometr-geo.ru +7 (499) 643-33-80 11.2.5 Input Coordinates Manually STEP OPERATION DISPLAY ----------- Cogo-------------------------------- ①In Cogo menu press key [5] (or Inverse AZ&Dist use [▼] + [ENT]) to manually enter Area the XYZ coordinates. LineOff. InputXYZ Input N: E: ②Enter the coordinates using the coordinates Z:... - Page 127 Тахеометры http://taheometr-geo.ru +7 (499) 643-33-80 <Angle> ④Press [ ] to change the [ ]/[ ] VA0:Zenith Min Ang:5″ settings, and press [ENT]. HA:0 to BS ⑤If any of these settings are <Angle> changed while a job is open, a Job set to be changed confirmation screen appears, asking * Close current job?...
-
Page 128: View Records
+7 (499) 643-33-80 Power off:5 min/10 min/30 min/ OFF Power EDM off:Now/0.1 min/0.5 min /3 min /10 min/ OFF Sleep:1 min/3 min/5 min/OFF Mode:Ruide/Setting Baud:1200/2400/4800/9600 /19200/38400/57600/115200 Comm Data.L:8/7 Parity:None/Even/Odd Stop:1/2 Add PT:This field sets the default point number to record observed data in stakeout. -
Page 129: View Raw Data
E: 58974652.011 Z: 553.011 PT: CD: RUIDE Edit ※1)SS:Sideshots (topo shots). All shots from the basic measurement screen are stored as SS records. CP:Shots taken in the Angle or Repeat menus, or in the basic measurement screen. F1/F2:Face-1 /Face-2 measurements. -
Page 130: St Records
Тахеометры http://taheometr-geo.ru +7 (499) 643-33-80 11.4.1.1 ST Records ST (station) records contain “ST”, “HT”, “BS” and “AZ”. Press [Dsp] to view XYZ coordinates. ●When you assign a new ST point name in Stn Setup > QuickStn, the coordinates of the station is recorded as (0, 0, 0). 11.4.1.2 SO Records SO:Stakeout shots. -
Page 131: Delete Raw Records
Тахеометры http://taheometr-geo.ru +7 (499) 643-33-80 Record of temp, pressure CO,Temp:26.0℃ Press:1023.0 hPa Prism:-30mm 2007.02.03 and prism constant (SY 11:19:00 record),which are saved when you finish station setup. 11.4.2 Delete Raw Records STEP OPERATION DISPLAY RAW Data ▲ F1,10, F2,10, CP,9,V ①In the RAW Data screen, use SS,5 [▲]/[▼] to highlight the record that... -
Page 132: Edit Raw Records
RAW Data ③Program executes the selected ▲ F1,10, F2,10, operation, and returns to RAW Data CP,9,V screen. SS,5,RUIDE, Edit Srch 11.4.4 Search Raw Records In the RAW Data screen, press Srch to access the raw data search function. STEP OPERATION DISPLAY RAW Data ①In RAW Data screen, press... -
Page 133: View Coordinates Data
Тахеометры http://taheometr-geo.ru +7 (499) 643-33-80 ②Input the search criteria. Search RAW Data Type:All PT: HT: List Stac A: A: Search RAW Data To find a point by name, enter the Type:All name in the PT field and press PT: [ENT] twice. HT:... -
Page 134: Delet Coordinate Records
553.011 more detailed information. Press [ENT] PT: [ESC] to return to the list.※3) CD: RUIDE Edit ※1)UP:uploaded point coordinates MP:manually input point coordinates CC:points calculated in Cogo RE:Points calculated in Resection. SS:Sideshots, All shots from the basic measurement screen are stored as SS records. -
Page 135: Edit Coordinate Data
[ENT]), press Press [ENT]: [Edit]. N: 54697561.386 E: 58974652.011 Z: 553.011 PT: CD: RUIDE Edit ②You can edit PT, CD and N: 0.000 m E: 0.000 m coordinate data. Input new data Z: 0.000 m Input the new data manually, and PT:... -
Page 136: Search Coordinate Records
Тахеометры http://taheometr-geo.ru +7 (499) 643-33-80 11.4.8 Search Coordinate Records Press [Srch] to access the XYZ data search function. STEP OPERATION DISPLAY XYZ Data ▲ SS,10, MP,10, ①In XYZ Data screen, Press [Srch]. [Srch] SS,9,V MP,5 Edit Srch Inp. ②Input the search criteria. Search XYZ Type:All PT:... -
Page 137: Enter Coordinates
Тахеометры http://taheometr-geo.ru +7 (499) 643-33-80 11.4.9 Enter Coordinates STEP OPERATION DISPLAY XYZ Data ▲ SS,10, MP,10, ①In XYZ Data menu, press [Input]. [Input] SS,9,V MP,5 Edit Srch Inp. ②A new input point screen. N: E: Displays. The PT field defaults to the Input new data Z:... -
Page 138: Delete Station Records
Тахеометры http://taheometr-geo.ru +7 (499) 643-33-80 RAW Data ④Press [ENT] again display all the SS,10, SS,10, observation data from the selected [ENT] SS,9,V station. ※1) SS,5 Edit Srch ※1) For detailed information about each point type and format, see “11.4.1 Viewing Raw Data”. 11.4.11 Delete Station Records ●When you delete a ST record, all the observation data from the station is also deleted. -
Page 139: Edit Station Records
Тахеометры http://taheometr-geo.ru +7 (499) 643-33-80 11.4.12 Edit Station Records The system will not recalculate the measurements if you change the station record. STEP OPERATION DISPLAY Stn Data ST,10, ST,15, ST,19, ①In Stn Data list, use [▲]/[▼] to [▲]/[▼] ST,20 highlight the record that you want to Edit Srch edit. -
Page 140: Search Station Records
Тахеометры http://taheometr-geo.ru +7 (499) 643-33-80 11.4.13 Search Station Records STEP OPERATION DISPLAY Stn Data ST,10, ST,15, ①In Stn Data list, press [Srch]. [Srch] ST,19, ST,20 Edit Srch ②Input the search criteria. Search Stn Type:ST PT: CD: List Stac A: To find a point by name, enter the A:... -
Page 141: Delete Points/Codes
Тахеометры http://taheometr-geo.ru +7 (499) 643-33-80 PT=C1, C2, C3 The code list is a list of feature codes. You can use it to store your own codes. 11.4.14.1 Delete Points/Codes STEP OPERATION DISPLAY --------------- View/Edit ---------------- ①In Data menu, press numeric key 1.RAW Data 2.XYZ Data [4] to open PT list. -
Page 142: Add A Point Name
②Enter the serial number in the CD CD: field. Input code content in Rec Input CD and (Rec: RUIDE ) field. If you leave the REC field content blank, the CD value is stored. After * REC=text rec (If code not match) inputting, press [ENT]. -
Page 143: Communication
For example if you input“12” in “CD” field, and input “RUIDE” in “Rec”, it means you input RUIDE as a code, with the serial number 12.In Quick Code function you can input serial number (CD) to call up code. - Page 144 Тахеометры http://taheometr-geo.ru +7 (499) 643-33-80 b. Click “COM” and then “Download”.
- Page 145 Тахеометры http://taheometr-geo.ru +7 (499) 643-33-80 Then the system requests to confirm if you are ready to transfer the data. Caution: before you click “OK” and start the transfer, make sure you have made the following operation on the total station. STEP OPERATION DISPLAY...
- Page 146 RUIDE Frmt:SDR33 Data: RAW Data Comm A:Press [Job] A:Press [Job], and then [▲]/[▼] to Job Mgr. select the jobs from which the data * RUIDE 07-01-20 @ MQ 07-01-25 is going to be downloaded. Press RTS800 07-01-25 [ENT] to return.
-
Page 147: Upload The Coordinate Data
Тахеометры http://taheometr-geo.ru +7 (499) 643-33-80 ※1) RTS-820R series is supportable to mini USB port and SD card. ※2) It is a must to install the cable driver if you use a multi-port cable (RS232 and mini USB intergrated). 11.5.2 Upload the Coordinate Data Connect the total station to the PC with communication cable, and set the communication settings in accordance with that of the total station. - Page 148 Тахеометры http://taheometr-geo.ru +7 (499) 643-33-80 Clisk “COM” and then “Upload”. The system asks for a confirmation to start the transfer. Before you click OK to transfer, you should operate the following procedure.
- Page 149 * Open Xon/Xoff Comm Edit A:Press [Job] A:As shown in the right graph, Job Mgr. press Job and then [▲]/[▼] to select * RUIDE 07-01-20 @ MQ 07-01-25 the one to load data, and press RTS800 07-01-25 [ENT] to return..
-
Page 150: Upload A Pt List Or Code List
Тахеометры http://taheometr-geo.ru +7 (499) 643-33-80 ④To stop sending, press [Stop]. Link cable Job: RUIDE After sending data, program returns Rec: to [Comm] menu automatically. ※2) Stop ※1)In the terminal program, set flow control to Xon/Xoff. ※2) As each point is received by the instrument, the value in the Records field is increased. -
Page 151: Sec-Keys
Тахеометры http://taheometr-geo.ru +7 (499) 643-33-80 11.6 1 SEC-KEYS 1 Sec.Keys are the functions that when you hold down a certain key for 1 second, the setting of this key will be activated. In the menu, press [6] to enter into the setting of [MSR], [Disp], [User], [SO] and [Data] keys. -
Page 152: Disp] Key Settings
Тахеометры http://taheometr-geo.ru +7 (499) 643-33-80 11.6.2 [DISP] Key Settings To change the display items in the basic measurement screen, and in SO observation screen, press [2. Disp] in the 1Sec. key menu. STEP OPERATION DISPLAY ------------- 1Sec.key--------------------- ①In 1 Sec. key menu, press [2] to 1.[Meas] 2.[DISP] >>Change... -
Page 153: So] Key Settings
Тахеометры http://taheometr-geo.ru +7 (499) 643-33-80 【User1】 [▲]/[▼] select ②Use Input HT BS Check [▲]/[▼] expecting function, and then press [ENT]. Cogo→ * Offset→ ※2) [ENT] If an item on the list has an arrow ↓ “→” beside, and if you select this 【Cogo (Menu】... -
Page 154: Data] Key Settings
Тахеометры http://taheometr-geo.ru +7 (499) 643-33-80 11.6.5 [Data] Key Settings STEP OPERATION DISPLAY ------------ 1Sec.key----------------------- ①In 1 Sec. Key menu, press [5] to 1.[Meas] >>Set 2.[Disp] enter into [Data] setting. DataType 3.[User] [DAT]Key 4.[SO] 5.[Data] 【Data type】 ②The asterisk (*) indicates the * 1.RAW Data 2.XYZ Data currently selected view format. -
Page 155: Format
Тахеометры http://taheometr-geo.ru +7 (499) 643-33-80 Press [ESC] to cancel the input. 11.8 FORMAT Format 1. Delete All Datas 2. Delete All Job 3. Initialization Delete All Datas:Delete all data in the memory, with the jobs and job settings unchanged. Delete All Job:Delete all files in the memory. Initialization:Delete all data and files, and return to initial setting. -
Page 156: Check And Adjustment
Тахеометры http://taheometr-geo.ru +7 (499) 643-33-80 12. CHECK AND ADJUSTMENT This instrument has undergone a strict process of checking and adjustment, which ensures that it meets quality requirement. However, after long periods of transport or under a changing environment, there may be some influences on the internal structure. -
Page 157: Inclination Of Reticle
Тахеометры http://taheometr-geo.ru +7 (499) 643-33-80 4.Adjust three adjustment screws for several times until circular bubble is centered; 5.The force power fixing three adjustment screws must be consistent when circular level is centered at last. 12.3 INCLINATION OF RETICLE Check 1. Sight object A through the telescope and lock the horizontal and vertical clamp screws. -
Page 158: Perpendicularity Between Line Of Sight And Horizontal Axis (2C)
Тахеометры http://taheometr-geo.ru +7 (499) 643-33-80 12.4 PERPENDICULARITY BETWEEN LINE OF SIGHT AND HORIZONTAL AXIS (2C) Check 1. Set object A at about 100 meters away the same height as the instrument, and make the vertical angle with ± 3° . Then level and center the instrument and turn on the power 2. -
Page 159: Vertical Index Difference Compensation
Тахеометры http://taheometr-geo.ru +7 (499) 643-33-80 --------------Adjustments ------------------- ⑤After setting, the screen displays 1.VO Adjustments 2.Collimation “set” ,and returns to Adjustment 3.Inst. Constant menu automatically. 4.VADJ Set 5.VO/Axis const. B. Optics Adjustment (professional maintenance man only) 1. Use the tangent screw to adjust the horizontal angle to the right reading which has been eliminated C, R+C=190°13′40″-15″=190°13′25″... -
Page 160: Adjustment Of Vertical Index Difference (I Angle) & Setting Vertical Index O
Тахеометры http://taheometr-geo.ru +7 (499) 643-33-80 12.6 ADJUSTMENT OF VERTICAL INDEX DIFFERENCE (I ANGLE) & SETTING VERTICAL INDEX O Inspect the item after finishing the inspection and adjustment of items in 12.3 and 12.5. Check 1. Power on after leveling the instrument. Collimate object A in Face I and read the Vertical angle value L. -
Page 161: Optical Plummet
Тахеометры http://taheometr-geo.ru +7 (499) 643-33-80 of the adjustment and the collimation are right. Then set again according to the requirement. 2. If Index Difference still not meets the requirement after the repeated operation, the instrument should be returned to factory for inspection and repair. 12.7 OPTICAL PLUMMET Check 1. -
Page 162: Instrument Constant (K)
Тахеометры http://taheometr-geo.ru +7 (499) 643-33-80 12.8 INSTRUMENT CONSTANT (K) Instrument constant has been checked up and adjusted in the factory, K=0. It seldom changes and it is suggested to check one or two times every year. The inspection should be made on the base line, also can be made according to the following method. -
Page 163: Parallel Between Line Of Sight And Emitting Photoelectric Axis
Тахеометры http://taheometr-geo.ru +7 (499) 643-33-80 Input Instrument Constant: STEP OPERATION DISPLAY --------------Adjustments --------------------- ①In Adjustments menu press “3. 1.VO Adjustments 2.Collimation Inst. Constant”。 3.Inst. Constant 4.VADJ Set Inst. Constant ②Input the constant, and press Input constant Const: 0.0 mm [OK] or [Enter]. If not input, press [Abrt]. -
Page 164: Tribrach Leveling Screw
Тахеометры http://taheometr-geo.ru +7 (499) 643-33-80 12.10 TRIBRACH LEVELING SCREW If the leveling screw appears flexible, adjust the two adjusting screw in the leveling screw to tighten the screw appropriately. 12.11 RELATED PARTS FOR REFLECTOR 1. The Tribrach and Adapter for Reflector The plate vial and optical plummet in the adapter and tribrach should be checked. -
Page 165: Specification
Тахеометры http://taheometr-geo.ru +7 (499) 643-33-80 13. SPECIFICATION RTS-822A/825A RTS-822R /825R RTS-822R /825R TELESCOPE Length 154mm Objective Lens Diameter Telescope: 45mm Distance Meter: 50mm Magnification Image Erect 1°30’ Field of View 3” Resolving Power Mini. Focus 1.0m DISTANCE MEASUREMENT Single Prism 2000m 5000m Non-Prism... - Page 166 Тахеометры http://taheometr-geo.ru +7 (499) 643-33-80 8’/2mm Circular Level OPTICAL PLUMMET (OPTIONAL– INTERNAL LASER PLUMMET) Image Erect Magnification 0.3m ~ ∞ Focusing Range Field of View 5° DATA STORAGE & INTERFACE Internal Memory >10,000 points or >20,000 coordinates Data Interface RS232 R232/SD Card/Mini-USB GENERAL Laser Class - EDM...
- Page 167 Тахеометры http://taheometr-geo.ru +7 (499) 643-33-80 Range With reflector Atmospheric conditions Standard prism Reflecting sheet 3000m 600m 20km 5000m 1200m Without reflector No reflector(white No reflector Atmospheric conditions target)※ (grey,0.18) Object in strong sunlight, RTS-820R : 270m RTS-820R :150m severe heat shimmer RTS-820R : 460m RTS-820R...
-
Page 168: Error Code List
Тахеометры http://taheometr-geo.ru +7 (499) 643-33-80 14. ERROR CODE LIST ERROR INFORMATION ERROR CODE DESCRIPTION SOLUTION System Error 001 Error in opening the system parameter file Format. format invalidation, the instrument System Error 002 Error in opening files should be sent for repair. System Error 003 Error in initializing files System Error 004... -
Page 169: Safety Guide
Тахеометры http://taheometr-geo.ru +7 (499) 643-33-80 15. SAFETY GUIDE 15.1 INTEGRATED DISTANCE METER (VISIBLE LASER) Warning The total station is equipped with an EDM of a laser grade of 3R/Ⅲa. It is verified by the following labels. On the vertical tangent screw sticks an indication label “CLASS III LASER PRODUCT”. -
Page 170: Laser Plummet
Тахеометры http://taheometr-geo.ru +7 (499) 643-33-80 c) Prevent any person to look straight at or use optical instrument to observe the laser beam. d) To prevent the harm caused by laser, block the laser beam at the end of the working route. When the laser beam exceeds the limit area (harmful distance*) and when there are motivating persons, stopping the laser beam is a must. -
Page 171: Accessories
Тахеометры http://taheometr-geo.ru +7 (499) 643-33-80 16. ACCESSORIES item quantity carrying case total station main body battery charger plummet correcting pin fur brush screw driver hexagon wrench cloth dryer operating manual warrenty certificate rain cover software CD... -
Page 172: Appendix-A】Design Road Line Data
+7 (499) 643-33-80 【APPENDIX-A】DESIGN ROAD LINE DATA 1. RAW DATA The format of data transmitted from total station to the PC is as follows: RUIDE FORMAT: Take RTS item as example Data Transferred to PC Explanation CO,Ruide Raw data The type of transmitted data... -
Page 173: Coordinate Data
,,, target height, slope distance, HA, VA, time 2. COORDINATE DATA The format of uploaded/downloaded coordinate data is determined by user’s setting. For example: the coordinate format is set as: PointID, E,N,Z,Code 101,994.890,1000.964,100.113,RUIDE 102,993.936,1007.799,100.800,STN 103,998.515,1009.639,100.426,STN 104,1002.068,1002.568,100.342,STN 1001,1004.729,997.649,100.1153,PT 1002,1003.702,990.838,100.799,PT 1003,7911.990,990.358,100.403,PT 1004,997.311,998.236,100.354,PT... -
Page 174: Horizontal Line
Тахеометры http://taheometr-geo.ru +7 (499) 643-33-80 5,ROAD 6,PATH 7,DRAIN 8,CONTROL 9,DRAIN 10,UTILITY 11,UTILITY 4. HORIZONTAL LINE The horizontal line is transmitted from computer to instrument through line element, including initial definition. It should be included in initial definition the number of the start stake and coordinate of this point. The line elements include point, straight, arc, and transition curve. -
Page 175: Vertical Curve
Тахеометры http://taheometr-geo.ru +7 (499) 643-33-80 5. VERTICAL CURVE Input vertical curve data from computer through typical point and stake number, the vertical curve data should include the height, curve length, and the curve length of start point and terminal point is zero. Data format is: Stake number, height, length For example:... -
Page 176: Appendix-B】Calculate Road Alignment
2) Road alignment data is managed by chainage. 1. ROAD ALIGNMENT ELEMENTS There are two ways to enter the alignment elements: 1) Download from PC. 2) Manually entered on the RTS-820 series. How to enter the alignment data is explained below: Alignment Element Parameter... -
Page 177: Calculation Road Alignment Elements
Тахеометры http://taheometr-geo.ru +7 (499) 643-33-80 Example: To enter the following data select DEF AL of ROADS in PROG menu: Stake number 0 1100.000 1050.000 Press [ENT] and then press [F4] (PT), Enter the following data: 1300.000 1750.000 100.000 80.000 80.000 Enter the following data in the above way: 1750.000 1400.000... - Page 178 Тахеометры http://taheometr-geo.ru +7 (499) 643-33-80 =64 m =64 m (2)Calculation of Deflection Angle = 0.32 =18°20′06″ = 0.32 rad 2 (3)Calculation of transition coordinates ...
- Page 179 Тахеометры http://taheometr-geo.ru +7 (499) 643-33-80 R °20′06″) 1.700 Symmetry spiral transition (5)Calculation of Spiral Transition coordinates =63.348-100sin18°20′06″=31.891 s i n Symmetry spiral transition (6)Calculation of Tangent Distance ...
- Page 180 Тахеометры http://taheometr-geo.ru +7 (499) 643-33-80 (8)Calculation of Arc Length =R(111°55′47″-2 * 18°20′06″) =100( 75°15′35″ =131.353 m (9)Calculation of the coordinate KA2 c o s ...
- Page 181 Тахеометры http://taheometr-geo.ru +7 (499) 643-33-80 here: (Bearing from IP1 to IP2) = 322°07′30.1″ (Bearing from IP2 to EP) = 57°59′40.6″ 1750 - 221.615 * cos322°07′30.1″ =1575.068 m 1400 - 221.615 * sin322°07′30.1″ =1536.058 m 1750 –(-221.615) * cos57°59′40.6″=1867.456 m ...
- Page 182 Тахеометры http://taheometr-geo.ru +7 (499) 643-33-80 straight line EC· EP 2000 1867 1800 1587 Start point coordinate (BP) 1100.000 m 1050.000 m Straight line ( between BP and KA1 ) Bearing 74° 03′16.6″ Distance 545.543 m Transition clothoid (between KA1 and KE1) Radius -100 m (“-”sign is turn left curve toward the end point )
- Page 183 Тахеометры http://taheometr-geo.ru +7 (499) 643-33-80...
Need help?
Do you have a question about the rts-820 series and is the answer not in the manual?
Questions and answers