Advertisement
Available languages
Available languages
Quick Links
Models
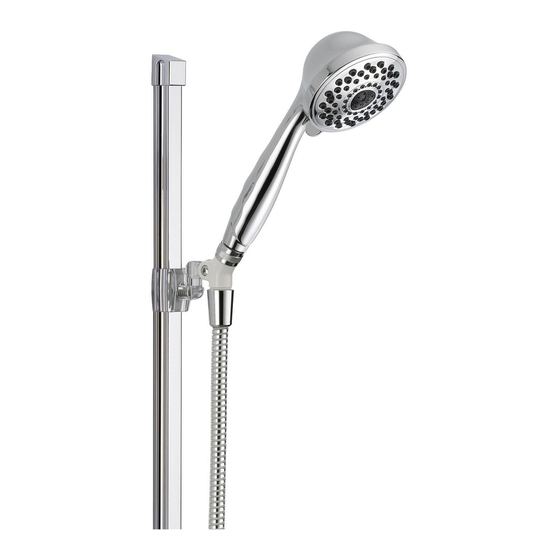
51551 & 51751
REMOVE
1.
SHOWER HEAD
Congratulations. You've purchased
what we believe is the world's finest hand
shower. These are general instructions
that cover several similar models, so
don't be alarmed if parts are displayed
that are not included in the unit you
purchased.
TOOLS REQUIRED
You will need a pair of pliers, a piece of
cloth, six inches of plumber tape, and a
large towel.
IMPORTANT
g Always protect the finish of parts with
a heavy cloth when using pliers or a
wrench.
g Align threads properly when
assembling components to avoid
damaging or stripping threads.
g Suggestion: Place a towel on the
bottom of the tub beneath the old
shower head. If you accidentally drop
something this can help avoid losing
it down the drain or chipping the finish
of your tub.
www.deltafaucet.com
72634 Rev. C
INSTALL
2.
MOUNT
Write purchased model number here.
ATTACH
3.
HOSE
REMOVE THE EXISTING
1.
SHOWER HEAD
Your goal is to unscrew the existing
shower head without
unscrewing or
rotating the shower
arm that it is
attached to. Your
existing shower
head will un-screw
COUNTERCLOCKWISE.
Note: If your shower arm has a ball
on the end, it will not work with this
shower unit and will need to be
replaced with a standard shower arm.
We suggest a Delta
After removing the
shower head clean the
threads of the shower
arm with a piece of
cloth or wire brush
if necessary. Then wrap the six inches
of plumber tape around the threads
of the shower arm in a CLOCKWISE
manner. Be careful to stretch the tape
into the grooves of the threads. The tape
provides a lubricant and added sealant
for the threads even when a gasket is
used.
NEVER USE PIPE DOPE.
1
Hand Shower Units
Do-It-Yourself
Instructions
ATTACH
4.
HAND SHOWER
model RP40593.
®
CHECK FOR
5.
LEAKS
07/21/2020
Advertisement

Related Manuals for Delta 51551


Summary of Contents for Delta 51551
- Page 1 Hand Shower Units Do-It-Yourself Instructions Models 51551 & 51751 Write purchased model number here. REMOVE INSTALL ATTACH ATTACH CHECK FOR SHOWER HEAD MOUNT HOSE HAND SHOWER LEAKS REMOVE THE EXISTING Congratulations. You’ve purchased SHOWER HEAD what we believe is the world’s finest hand shower.
- Page 2 INSTALLING SHOWER MOUNTS Shower arm pin mount Shower arm fork mount Insert the thick gasket into the nut on Insert the thick gasket into the nut on the the end of the shower arm mount and end of the shower arm mount and screw screw the nut the nut CLOCKWISE onto the exposed CLOCKWISE...
- Page 3 CONNECT THE HOSE TO CONNECT THE OTHER WATER END OF THE HOSE Hose to hand shower The hose must connect to the source of water: either the outlet of the shower The hose will arm, or the outlet of the shower arm connect directly to mount.
-
Page 4: Operation And Maintenance
CONVENIENCE of a hand held shower the hose. unit by inserting a shower arm diverter, Hang your hand shower on its mount. Delta Model U4923, between the shower ® Slowly turn on the cold water and head and the shower arm. The diverter look for leaks. - Page 5 (b) five (5) years for all other commercial applications, in each case from the date of original purchase. For purposes of this warranty, the term “multi-family residential application” refers to the purchase of the faucet from an authorized Delta seller by a purchaser who owns but does not live in the residential dwelling in which the faucet is initially installed, such as in a rented or leased single unit or multi-unit detached home (duplex or townhome), or a condominium, apartment building or community living center.
- Page 6 REGADERAS DE TELÉFONO Hágalo-Usted-Mismo Instrucciones Modelos 51551 & 51751 Escriba el número de modelo comprado aquí. COLOQUE LA RETIRE LA INSTALE EL SOPORTE COLOQUE REVISE QUE NO REGADERA DE REGADERA USADA DE LA REGADERA LA MANGUERA TELÉFONO EXISTAN FUGAS Felicidades. Usted ha adquirido la RETIRE LA REGADERA USADA regadera de teléfono que consideramos...
- Page 7 INSTALE EL SOPORTE DE LA REGADERA Soporte de Perno Soporte con Brazo Inserte el empaque grueso en la tuerca que Inserte el empaque grueso en la tuerca que está en el extremo del soporte y enrosque está en el extremo del soporte y enrosque la tuerca en sentido la tuerca en sentido de las manecillas del de las manecillas...
- Page 8 CONECTE LA MANGUERA CONECTE EL OTRO AL AGUA EXTREMO DE LA MANGUERA La manguera Manguera a regadera manual debe conectarse La manguera a una salida de se conecta agua: ya sea a la directamente a salida del brazo, la regadera. Si o a la salida tiene un empaque, del soporte del...
- Page 9 Modelo Delta U4923, que se ® Cuelgue su regadera en el soporte. Lentamente coloca entre el brazo y su regadera actual.
- Page 10 Estos son sus remedios exclusivos. Lo que no cubre. Debido a que Delta Faucet Company no puede controlar la calidad de los productos Delta vendidos por vendedores no autorizados, a menos que la ley lo prohíba, esta garantía no cubre los productos Delta comprados a vendedores no autorizados.
Need help?
Do you have a question about the 51551 and is the answer not in the manual?
Questions and answers