
Related Manuals for Comica LinkFlex AD3

Summary of Contents for Comica LinkFlex AD3
- Page 1 Two-channels XLR/3.5mm/6.35mm--3.5mm Audio Preamp Mixer / Adapter / Interface for Camera and Smartphone User Manual...
-
Page 3: Main Features
Thanks for purchasing COMICA LINKFLEX AD3 Two-channels XLR/3.5mm/6.35mm--3.5mm Audio Preamp Mixer / Adapter / Interface for Camera and Smartphone. The LINKFLEX AD3 is a Two-channels XLR/6.35mm/3.5mm Audio Preamp Mixer/Adapter/Interface for shooting videos with any camera and smartphone. It is designed with the functions of 'Support... -
Page 4: Package Contents
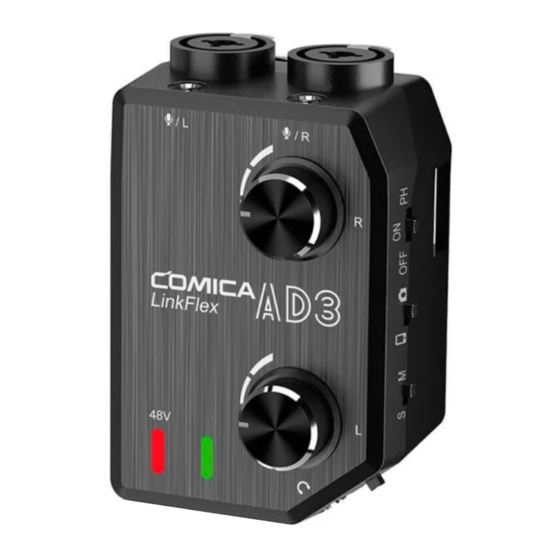
Notice When the Interface works with iPhone with lightning audio input, you need to use the original adapter cable; For the Android system smartphone, the Interface works well in audio mode, but video mode will happen with incompatibility trouble while working with some smartphone;(Then we suggest that you try the 3rd party’s video APP);... - Page 5 Components and Instruction Magic-tape Fixing Slot Belt Clamp Battery Cover Phantom Power Indicator Light Power Indicator Light 3.5mm Audio Monitor Output Jack Phone / Mic Monitor Switch Right Gain-Control Knob Left Gain-Control Knob Left 3.5mm Mono Audio Input Jack Left XLR Mono Audio Input Jack Left 6.35mm Mono Audio Input Jack Right 6.35mm Mono Audio Input Jack Right XLR Mono Audio Input Jack...
-
Page 6: Installation And Usage
Installation and Usage 1.Battery installation Press the battery cover and open it in the direction of the arrow, Install the 9V battery according to the corresponding positive and negative poles. Step 1: Press the battery cover Step 2: Open it in the direction of the arrow... - Page 7 Negative Pole 9V Battery Positive Pole Step 3: Install the battery Please note that the positive and negative poles of the battery should correspond to the positive and negative poles of the product...
- Page 8 2.Usage method Hang the belt clamp on the belt to use; Pass the Magic-tape through the Magic-tape Fixing Slot and attach it to the fixture for use;...
- Page 9 3.Left/right mono audio input This product supports XLR/3.5mm/6.35mm audio jack, Please insert the microphone plug into the corresponding jack when using 3.5mm Audio Plug 3.5mm Audio Plug XLR Audio Plug XLR Audio Plug Right Mono Audio Input Left Mono Audio Input 6.35mm Audio Plug 6.35mm Audio Plug The 6.35mm and XLR are in the same jack and...
- Page 10 4.Installation method (Take XLR audio plug for example) 1. After installing the recording Step 1: device, adjust the output mode Install left and right according to the device mono microphones :Smartphone Mode :Camera Mode 2.After installing the monitor headphones, please adjust the monitor mode according to the Step 2: requirements...
- Page 11 5.Left and right channel gain-control knobs Rotate the corresponding audio gain-control knob to adjust the gain of the corresponding audio input channel Left Mono Audio Input Right Mono Audio Input Right Mono Audio Gain Adjustment (Adjust the gain of the Right Mono Audio Input) Left Mono Audio Gain Adjustment (Adjust the gain of the Left Mono Audio Input) 6.
- Page 12 7.Mono/Stereo output switch S: Stereo Mode; M: Mono Mode Stereo Mode Mono Mode When there is only one group microphone connected with this device, then you have to set the M/S to Mono mode 8.Smartphone/Camera output mode switch :Smartphone Output Mode :Camera Output Mode Smartphone Output Mode Camera Output Mode...
- Page 13 Tech Parameters Input XLR x 2(L/R), 6.35mm x 2(L/R), 3.5mm x 2(L/R) Output 3.5mm audio output, 3.5mm headphone output Frequency Response 20Hz~20kHz, ±1dB Gain Range Maximum increase +20dB THD+Noise <0.02%, RL=2K , f=20Hz~20kHz, Vo=1Vrms Battery 9V 6LR61/6F22 x 1 Size 70 x 53 x 102mm Net Weight 159g...
- Page 15 双声道卡侬/3.5mm/6.35mm-3.5mm相机手机专用 音频前置放大混音器/转接器/连接座 产品使用说明书...
- Page 17 前 言 感谢您购买科唛LINKFLEX AD3双声道卡侬/3.5mm/6.35mm(乐器 用)相机手机专用音频前置放大混音器/转接器/连接座。 此产品可搭配手机、相机进行音频录制。它设计有双卡侬头 /6.35mm/3.5mm多接口音频转换;手机、相机通用;MIC/手机 双向监听;底部腰带夹及魔术贴固定设计;支持48V幻象电输 出等功能,功能十分强大,能带给您更好的音质效果。 使用前请认真阅读此使用说明书,本产品在出厂时已进行精密 校准,请勿自行组装拆卸零部件,否则不予保修! 产品主要功能 . 支持双声道输入; . 卡侬/3.5mm/6.35mm(吉他等乐器专用)多接口音频转换; . 手机/相机通用; . 支持48V幻象电输出; . 前置放大增益可调; . MIC/手机双向监听; . 底部腰带夹及魔术贴固定位设计; 48V幻象 多功能 多接口 手机/相机 双增益 MIC/手机 双路混音 音频转换 通用 电源输出 调节旋钮 双向监听...
- Page 18 注意事项 用 于 L i g h t n i n g 音 频 接 口 的 i P h o n e 手 机 时 需 搭 配 原 装 Lightning音频转换线使用; 配合Android(安卓)系统的手机使用时,录音模式下均可 正常工作,视频模式下部分手机会出现不兼容情况(此时建 议使用第三方视频软件, 如:抖音,快手等); 配合iOS系统手机使用时,在所有录音模式、视频模式以及 第三方视频软件下均可正常使用; 本品属于高精密仪器类产品,请勿使用时掉落、碰撞或撞 击; 请勿将本设备放置在热源或干扰源附近使用,如散热器、烤...
- Page 19 部件介绍及说明 右声道增益调节旋钮 电源/幻象电源开关 左声道增益调节旋钮 手机/相机音频输出切换开关 幻象电源指示灯 单声道/立体声切换开关 电源指示灯 3.5mm音频输出接头 左声道3.5mm音频输入接口 3.5mm监听输出接口 左声道卡侬音频输入接口 手机/麦克风监听切换开关 左声道6.35mm音频输入接口 腰带夹 右声道6.35mm音频输入接口 魔术贴固定槽 右声道卡侬音频输入接口 电池盖 右声道3.5mm音频输入接口...
- Page 20 安装与使用 1.电池安装 按下电池盖并朝箭头方向打开,按对应的正负极安装9V电池 第一步:向内压下 第二步:朝箭头方向推开...
- Page 21 负极 9V电池 正极 第三步:装入电池 请注意电池的正负极要对应产品正负极...
- Page 22 2.使用方式 通过腰带夹挂在腰带上使用; 使用魔术贴穿过魔术贴 固定槽,绑在固定物 上使用;...
- Page 23 3.左/右声道音频输入 本产品支持XLR、6.35mm和3.5mm音频接口,使用时请将麦克 风插头插入对应的接口即可 3.5音频插头 3.5音频插头 XLR音频插头 XLR音频插头 右声道音频输入 左声道音频输入 6.35音频插头 6.35音频插头 6.35mm与XLR同在一个座子上,因此不能同时使用...
- Page 24 4.安装方式:(以XLR音频插头为例) 第一步: 安装左右声道麦克风 1.安装录音设备后请根据设备 调整输出模式 :手机模式 :相机模式 2.安装监听耳机后请根据需要 调整监听模式 第二步: :手机回放监听模式 安装监听耳机 :麦克风实时监听模式 第三步: 安装录音设备(手机或相机)...
- Page 25 5.左/ 右声道增益调节旋钮 旋转对应音频增益调节旋钮即可调整对应的音频输入声道的 增益 左声道音频输入 右声道音频输入 右声道音频增益调节 (调整“右声道音频输入”的增益) 左声道音频增益调节 (调整“左声道音频输入”的增益) 6. 手机/麦克风监听切换开关 :为手机回放监听模式; :为麦克风实时监听模式 手机回放监听 麦克风实时监听 在相机输出模式下该切换开关不起作用, 只能麦克风实时监听...
- Page 26 7.单声道/立体声输出切换 S为立体声模式;M为单声道模式 立体声 单声道 当只接入一路麦克风时,请 选择在单声道模式下进行工 作,否则只有一个声道有声 音 8.手机/相机输出模式切换 为手机输出模式; 为相机输出模式 手机模式 相机模式 如不切换正确的输出模式, 将会导致录音不成功 9.电源开关与幻象电源模式 OFF为关机;ON为开机;PH为幻象电源模式 开机 关机 幻象电源 如果您的麦克风需要幻象电源供电才能工作, 请将此开关拨到“PH”档...
- Page 27 技术参数 输入 XLR x 2(L/R), 6.35mm x 2(L/R), 3.5mm x 2(L/R) 输出 3.5mm接头输出,3.5mm耳机输出 频响 20Hz~20kHz, ±1dB 增益 最大增加20dB 总谐波失真+噪声 <0.02%, RL=2kΩ, f=20Hz~20kHz, Vo=1Vrms 电池 9V 6LR61/6F22 x 1 尺寸 70x53x102mm 净重 159g 工作温度 0℃ ~ +50℃ 存储温度 -20℃ ~ +60℃...
- Page 28 Email: support@comica-audio.com...
Need help?
Do you have a question about the LinkFlex AD3 and is the answer not in the manual?
Questions and answers