Table of Contents
Advertisement
Quick Links
Advertisement
Table of Contents

Related Manuals for Robaux LL8


Summary of Contents for Robaux LL8
- Page 1 User Manual User Manual...
-
Page 2: Installation
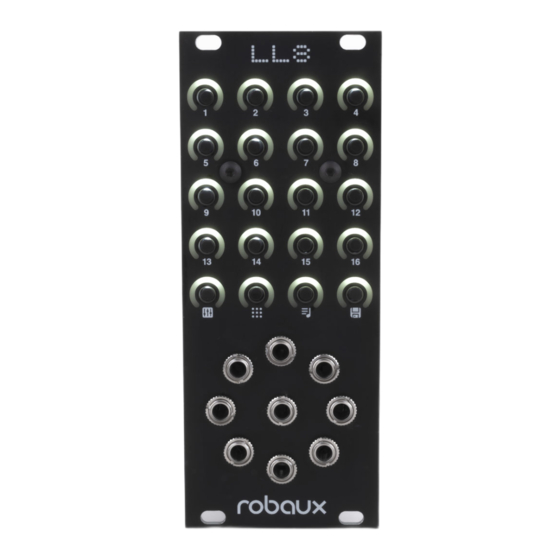
16 different patterns with up to 16 Steps. Installation The LL8 requires a ±12V power supply (2x5- pin connector). The red strip of the ribbon cable (-12V side) must be oriented on the same side as the «Red Stripe» mark on the board. - Page 3 Connect the circular- ly arranged outputs through to the gate inputs of your drum modules, LFOs or other modulation sources. Now you‘re ready to go! The control panel with its 20 switches is divided into two parts. The first four rows are step buttons of the sequencer.
- Page 4 Edit In edit mode, you can program, modify or delete the current pattern. Press the switch. Switches 13-16 provide various functions which are described below. Step Switch 13 calls up the step mode where you can program the sequencer like a TR machi- ne.
- Page 5 Random Switch 15 calls up the random mode. Pressing switches 1-8 overwrites the track content with a random pattern. Try it a few times until you get a random pattern that you like. Delete Switch 16 calls up the delete mode. Pressing switches 1-8 deletes the track.
- Page 6 Mute & Fill In Mute & Fill mode you can mute and unmute the eight tracks. You can also add continuous triggers. Press the switch. With the switches 1-8 you can mute and un- mute the individual tracks. Switches 9-16 let you add continuous triggers to individual tracks, perfect for drum rolls.
- Page 7 Pattern In Pattern mode, you can switch between the 16 different patterns. Press the switch. Select the pattern with keys 1-16. You can combine two or more patterns: Press and hold the pattern you want to play first, then press and hold the next pattern, and so on.
- Page 8 Save Whenever you make a change, such as modifying a pattern or selecting a pattern sequence, the lights up. Use this button to save the changes so that they are retained even after the module is switched off. The saving process is finished when the key no longer lights up.
-
Page 9: Debug Mode
Debug Mode During startup, press and hold the switch to enter debug mode. In this mode you can check the individual buttons and lights. The current firmware version is also displayed at device startup. Each button lights up when pressed. Buttons 1-8 also send out a trigger via the respective jacks. -
Page 10: Midi Settings
MIDI Settings With the optional MIDI adapter you can output the tracks via MIDI. The channel and note can be set individually for each track. During startup, press the key for MIDI settings. You can access the MIDI settings by pressing the buttons simultaneously in sequencer mode. - Page 11 MIDI Note Press the switch to set the MIDI note to be output. First select the track with the keys 1-8. Then you can select the note with the keys 1-12. Key 1 represents the note C, Key 2 represents the note C#, Key 3 represents the note D, and so on.
Need help?
Do you have a question about the LL8 and is the answer not in the manual?
Questions and answers