Table of Contents
Advertisement
Quick Links
Advertisement
Table of Contents

Subscribe to Our Youtube Channel
Related Manuals for SMAR FI303


Summary of Contents for SMAR FI303
- Page 2 Specifications and information are subject to change without notice. Up-to-date address information is available on our website. web: www.smar.com/contactus.asp...
- Page 3 In order too be user friendly the function block concept was introduced. The FI303, like the rest of the 303 family, has some Function Blocks built in, like Analog Output and Transducer and Display Blocks. The need for implementation of Fieldbus in small as well as large systems was considered when developing the entire 303 line of Profibus-PA devices.
- Page 4 Smar provides specific training to instruct and qualify such professionals. However, each country must comply with the local safety procedures,...
-
Page 5: Table Of Contents
REASSEMBLY PROCEDURE ...............................4.3 INTERCHANGEABILITY................................4.3 ACCESSORIES ..................................4.3 SPARE PARTS LIST ................................4.4 SECTION 5 - TECHNICAL CHARACTERISTICS ..................5.1 ORDERING CODE ................................5.2 APPENDIX A – SRF – SERVICE REQUEST FORM................. A.1 RETURNING MATERIALS ..............................A.2 APPENDIX B – SMAR WARRANTY CERTIFICATE ................B.1... - Page 6 FI303 - Operation and Maintenance Instruction Manual...
- Page 7 4 a 20 mA output current. Power-up the converter properly. Is the indication correct? FI303 needs a external power supply for supply the 4 - 20 mA equipment . See section 4 - Maintenance...
- Page 8 FI303 - Operation and Maintenance Instruction Manual VIII...
-
Page 9: Section 1 - Installation
Procedures). Output Wiring The output is in fact a current link. An external power source is therefore necessary. The FI303 controls the current in the loop. (See Figure 1.4 - Output Connections). The three channels have a common ground for the external power supply. - Page 10 FI303 - Operation and Maintenance Instruction Manual Cable access to wiring connections is obtained by one of the two conduit outlets. Conduit threads should be sealed by means of code-approved sealing methods. The unused outlet connection should be plugged accordingly.
-
Page 11: Topology And Network Configuration
Figure 1.4 - Output Connections Avoid routing signal wiring close to power cables or switching equipment. FI303 is protected against reverse polarity, and can withstand ±35 V DC without damage, but it will not operate when in reverse polarity. - Page 12 FI303 - Operation and Maintenance Instruction Manual Bus topology (See Figure 1.5 – Bus Topology) and tree topology (See Figure 1.6 – Tree Topology) are supported. Both types have a trunk cable with two terminations. The devices are connected to the trunk via spurs.
-
Page 13: Intrinsic Safety Barrier
DF47 Use of is recommended. Jumper Configuration FI303 In order to work properly, the jumpers J1 and W1 located in the main board must be correctly configured (See Table 1.1 - Description of the Jumpers). This jumper enables the simulation mode parameter in the AO block. - Page 14 FI303 - Operation and Maintenance Instruction Manual...
-
Page 15: Functional Description - Electronics Refer To The Block Diagram
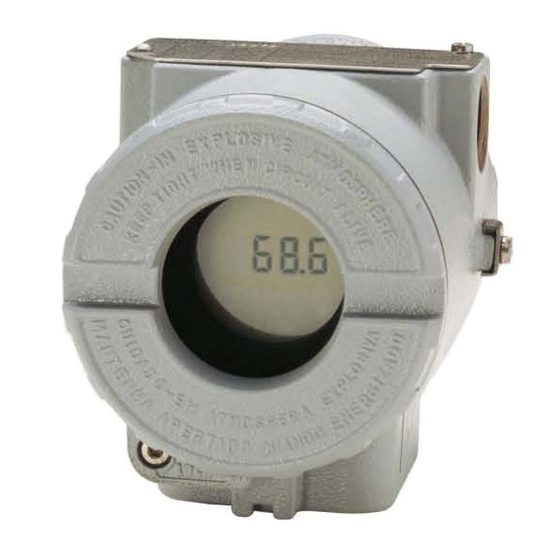
OPERATION Functional Description - Electronics Refer to the block diagram Figure 2.1 - FI303 Block Diagram The function of each block is described below: Receives the signal from the CPU and converts it to an analog voltage, used by the current control. - Page 16 FI303 - Operation and Maintenance Instruction Manual Local Adjustment Two switches that are magnetically activated. They can be activated by the magnetic tool without mechanical or electrical contact. Figure 2.2 - LCD Indicator...
-
Page 17: Section 3 - Configuration
One of the many advantages of Fieldbus is that device configuration is almost indepen-dent of the configurator. The FI303 may be configured by a third party terminal or operator console. The FI303 contains three output transducer blocks, one physical block, one display transducer block , three analog output function blocks. -
Page 18: Functional Diagram Of The Profibus Pa To Current Transducer Block
FI303 - Operation and Maintenance Instruction Manual It starts at one channel (1) for transducer number one until channel three (3) for transducer number three. The channel number of the AO block is related to the transducer’s terminal number. Channel number 1, 2, 3 corresponds bi-univocally to the terminal block with the same number. - Page 19 Configuration PARAMETERS DESCRIPTION Contains the actual numbers of entries in the table. It shall be calculated after the TAB_ACTUAL_NUMBER transmission of the table is finished. The index parameter identifies which element of the table is in the X_VALUE and TAB_ENTRY Y_VALUE parameter currently TAB_MAX_NUMBER is the maximum size (number of X_VALUE and Y_VALUE TAB_MAX_NUMBER...
-
Page 20: Profibus To Current Converter Transducer Block - Parameters Table
FI303 - Operation and Maintenance Instruction Manual PARAMETERS DESCRIPTION transducer block. The setpoint low limit is the lowhest setpoint operator entry that can be used for the SP_LO_LIM transducer block. This parameter allows to save and to restore data according to factory and user calibration procedures. -
Page 21: Cyclic Configuration
The FI303 has 3 functional blocks with analog output (AOs) that the class 1 master uses to execute the cyclic services and the user must choose what configuration best suits their application. If the slave AO master is in AUTO, it will receive the value and the status of the class 1 master setpoint. - Page 22 The watchdog condition may be activated, prompting the equipment to enter a fail-safe mode when detecting a communication loss between the slave and the master equipment. Since the FI303 will be on a final element, it is recommended that a fail-safe value be configured.
- Page 23 20.0mA (100%), 4.0mA (0%), not initialized or None. Figure 3.3 – FI303 Simatic PDM Transducer Block – Offline Configuration Table handling There is the possibility to load and re-load tables in the devices. This table is used for linearisation mostly. For this procedure the following parameters are necessary:...
- Page 24 The characterization curve is used to give a determined profile to the output. This is useful, for example, when the FI303 is controlling a valve with a non-linear characteristic. Characterization curve, when used, is applied to the input signal, before it is converted by the transducer to analog current.
-
Page 25: How To Configure The Analog Output Block
Figure 3.5 - FI303 Simatic PDM - Transducer OffLineConfiguration - User Table Screen How to configure the Analog Output Block The AO block provides a value to an output transducer block. It provides value, scaling conversion, fail safe mechanism and other features. - Page 26 Closing fot the actuator action. Figure 3.6 - FI303 Simatic PDM - Analog Output Block - Basic Settings - Offline Configuration Selecting the page Scale/Units, the user has the option to configure the scale and unit for the input and output: Figure 3.7 - FI303 Simatic PDM - Analog Output Block - Scale/Units - Offline Configuration...
- Page 27 Figure 3.8 - FI303 Simatic PDM - Analog Output Block - Advanced Settings - Offline Configuration In terms of Online configuration, the user can select at the device menu the Online Configuration for...
-
Page 28: Current Trim
Check back and alarm condition. Figure 3.10 - FI303 Simatic PDM - OnLine Configuration feedback for AO. Current Trim FI303 provides the capability of making a trim in the output channels, if necessary. A trim is necessary if the indicator reading of the transducer block output differs from the actual physical output. - Page 29 Figure 3.11 - FI303 - Simatic PDM Calibration Lower/Upper After pressing “ Lower Calibration”, we get a warning. When the user press "OK", we have a new window that allows him to enter the desired value for the new calibrated point for the lower current.
- Page 30 After user confirmation, the converter comes to the normal operation. The upper calibration procedure is similar than the lower: The user can select Lower or Upper calibration. Pressing this key, the user starts the upper calibration method. Figure 3.12 - FI303 - Simatic PDM Calibration Lower/Upper 3.14...
- Page 31 Configuration When the user press "OK", we have a new window that allows him to enter the desired value for the new calibrated point for the upper current. Write for example 20.0mA in new value: After entering the desired valve, the generated current is corrected according to the desired value and the user can make the correction until the right current is reached.
-
Page 32: Via Local Adjustment
BACKUP_RESTORE, using option "Last Cal Backup" Via Local Adjustment The FI303 has 3 output transducers and its device leaves SMAR with factory settings. The factory setting establishes only the transducer #1 as default for local adjustment. In order to configure the others via local adjustment, the user should configure them in the display transducer via Configuration Tool, according specific instructions for this transducer block. -
Page 33: Transducer Display - Configuration
Configuration For example, it is possible to enter 20.0 mA or the upper value. When the magnetic tool is removed from “S”, the output will be adjusted to a value close to the desired value. The user should then browse the tree up to parameter FEED (FEEDBACK_CAL) and actuate this parameter by placing the magnetic tool in “S”... -
Page 34: Display Transducer Block
Series 303 field devices from SMAR has the same methodology to handle with it. So, since the user has learned once, he is capable to handle all kind of field devices from SMAR. All function block and transducers defined according Profibus PA have a description of their features written by the Device Description Language. - Page 35 Configuration In option mnemonic, the display may show the data in the numeric field and the mnemonic in the alphanumeric field. For devices where the software version is higher or equal to 1.10, please see the configuration of local adjustment using the local adjustment, in the Installation, operation and maintenance procedures manual.
- Page 36 FI303 - Operation and Maintenance Instruction Manual Always on the LCD interface will be shown two parameters at the same time, switching between the configured parameter at the LCD-II and the last monitoring parameter. If the user does not want to show two parameters at the same time, it is only necessary to opt for "none"...
-
Page 37: Local Adjust Tree - Quick Guide
Configuration Local Adjust Tree – Quick Guide 3.21... -
Page 38: Programming Using Local Adjustment
"Programming Using Local Adjustment". It is significantly the resources on this transducer display, also all the Series 303 field devices from SMAR has the same methodology to handle with it. So, since the user has learned once, he is capable to handle all kind of field devices from SMAR. -
Page 39: W1 Jumper Connections
In order to start the Place the local adjustment, magnetic tool in place the magnetic orifice S and wait tool in orifice Z and during 5 wait until letters MD seconds. are displayed Figure 3.20 - Step 1 - FI303 3.23... - Page 40 FI303 - Operation and Maintenance Instruction Manual Remove the magnetic Insert the magnetic tool from orifice S. tool in orifice S once more and LOC ADJ should be displayed. Figure 3.21 - Step 2 - FI303 This parameter is used to...
- Page 41 An arrow pointed upward increases the current value. Figure 3.24 - Step 5 - FI303 Place the magnetic tool on orifice S to change the arrow position downward and decrease the calibration current.
- Page 42 FI303 - Operation and Maintenance Instruction Manual 3.26...
-
Page 43: Section 4 - Maintenance Procedures
Output Terminals Connection Check wiring polarity and continuity. Power Supply Check power supply output. The voltage at the output terminals of FI303 must be between 3 and 45 VDC. INCORRECT OUTPUTS Load Resistance Load resistance must be between 0 and 2000Ω. Note that the maximum value depends on output power supply voltage. -
Page 44: Disassembly Procedure
Caution: this operation must be carried out by an authorized technician, with the process offline, as the process will be configured with factory standard data. Disassembly Procedure Refer to Figure 4.1 - FI303 Exploded View Make sure to disconnect power supply before disassembling the converter. Figure 4.1 - FI303 Exploded View... -
Page 45: Reassembly Procedure
Maintenance Procedures Electronic Circuit The main plate (5) and the outlet plate (7) are factory match pairs and must be replaced together, as one should not be changed separately. To remove the electronic plates (5 and 7) and the display (4), release the lid lock (8) on the carcass side not bearing the words “Field Terminals”... -
Page 46: Spare Parts List
FI303 - Operation and Maintenance Manual Spare Parts List SPARE PARTS LIST CATEGORY DESCRIPTION OF PARTS POSITION CODE (NOTE 1) Aluminum 1 and 15 204-0102 Cover Without Window (Includes O-Ring) 316 SS 1 and 15 204-0105 Cover With Window for Indicator (Includes O-... -
Page 47: Section 5 - Technical Characteristics
Section 5 TECHNICAL CHARACTERISTICS Functional Specifications Output Signal Three 4-20 mA current links, external supply, common ground. Input Signal Digital only, Fieldbus, 31.25 Kbit/s voltage mode with bus power. External Output Supply Voltage Output Load Limitation 3-45 Vdc. Bus power 9-32 Vdc. Current consumption quiescent 12 mA. -
Page 48: Ordering Code
FI303 - Operation and Maintenance Manual Ordering Code MODELO FIELDBUS TO CURRENT CONVERTER Local Indicator CÓD. Without Indicator With Digital Indicator Mounting Bracket for 2" Pipe Mounting CÓD. Without Bracket Carbon Steel Bracket 316 SST Bracket Electrical Connections CÓD. 1/2-14 NPT M20 x 1.5... - Page 49 Technical Characteristics...
- Page 50 FI303 - Operation and Maintenance Manual...
-
Page 51: Appendix A - Srf - Service Request Form
Company: ____________________________________________________________________________________________________ Contact: ______________________________________________________________________________________________________ Title: _________________________________________________________________________________________________________ Section: ______________________________________________________________________________________________________ Phone: _________ _________________________ _________ _________________________ Extension: ___________________ E-mail: ________________________________________________________________________ Date: ______/ ______/ __________ For warranty or non-warranty repair, please contact your representative. Further information about address and contacts can be found on www.smar.com/contactus.asp. -
Page 52: Returning Materials
FI303 - Operation and Maintenance Manual Returning Materials Should it be necessary to return the converter to Smar, simply contact your local Smar office informing the defective equipment serial number and dispatch it to our factory. For easier analysis and faster solution of the problem, the returned material should include the documentation with a description of the failure observed in the field and the circumstances that caused it. -
Page 53: Appendix B - Smar Warranty Certificate
Appendix B SMAR WARRANTY CERTIFICATE SMAR guarantees its products for a period of 24 (twenty four) months, starting on the day of issuance of the invoice. The guarantee is valid regardless of the day that the product was installed. SMAR products are guaranteed against any defect originating from manufacturing, mounting,... - Page 54 13. It is the customer’s responsibility to clean and decontaminate products and accessories prior to shipping them for repair, and SMAR and its dealer reserve themselves the right to refuse the service in cases not compliant to those conditions. It is the customer’s responsibility to tell SMAR and its dealer when the product was utilized in applications that contaminate the equipment with harmful products during its handling and repair.
Need help?
Do you have a question about the FI303 and is the answer not in the manual?
Questions and answers