Table of Contents
Advertisement
Quick Links
Advertisement
Table of Contents

Subscribe to Our Youtube Channel
Related Manuals for GF Hycleen Automation System

Summary of Contents for GF Hycleen Automation System
- Page 1 GF Piping Systems Hycleen Automation System User Guide Version 2.0...
-
Page 3: Table Of Contents
Contents 1 About this document 1.1 Follow the instruction manual 1.2 Symbols used in this manual 2 System Overview 2.1 Sample system 2.2 Operating principle 3 Installation 3.1 Mounting master on the wall 3.2 Cabling master with valves 3.3 Installing other components 4 Working with the master 4.1 Commissioning 4.2 Home/main menu... - Page 4 5.2 Error messages 6 Compliance 6.1 FCC 6.2 ISED 7 CE Declaration...
-
Page 5: About This Document
1 About this document 1 About this document 1.1 Follow the instruction manual The instruction manual is part of the product and an important element within the safety concept. Read and observe instruction manual. Always have instruction manual available by the product. Give instruction manual to all subsequent users of the product. -
Page 7: System Overview
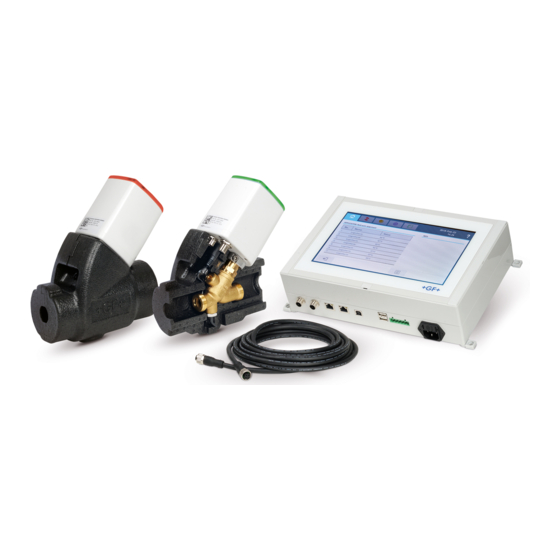
2 System Overview 2 System Overview 2.1 Sample system The sample system shows water supply with 3 cold water pipes and 5 hot water circulations. 1 Valve LegioTherm K Sensor cable 2 Cold water pipe Flow sensor 3 Water heater 10 Return line (hot water) 4 Temperature Sensor 11 Power supply and communication cable... -
Page 8: Operating Principle
2 System Overview 2.2 Operating principle The hot water and cold water circulations contain valves of the types LegioTherm K and LegioTherm 2T. The latter serves hydraulic alignment (circulation system). Both circulations can be rinsed. The rinse water runs into a drain. The LegioTherm valves are equipped with a temperature sensor. -
Page 9: Installation
3 Installation 3 Installation The insulation of the valves must be removed for cabling the valves. To remove the insulation, carefully pull apart both parts (1, 2). Make sure that the tem- perature sensor cable is not detached or damaged. Put the insulation aside for later assembly. -
Page 10: Mounting Master On The Wall
3 Installation 3.1 Mounting master on the wall The housing of the master is attached to the wall using 4 eyelets (1). Drill 4 dowel holes with a diameter of 6 mm into the wall according to dimensional draw- ing and insert the supplied dowels (2). Use a Phillips screwdriver to screw on the master with the 4 screws provided (3). - Page 11 3 Installation Sub-standard assembly can cause malfunctions! If the cabling is carried out with the power supply switched on, this could cause damage to the electronic components! Make sure that neither the master nor powerbox(es) are supplied with voltage while cabling! Connecting master Connect one of the plugs of the connecting cable to the left M12 connection (1) of the...
- Page 12 3 Installation Sub-standard assembly can cause malfunctions! If no component is connected to the left connection (1), the master will ignore the right connection (2) during the booting procedure after switching on. When switching on the components, start with the left line (1)! Connect power supply cable to the connection (7) of the master.
- Page 13 3 Installation Where required: Connect sensor(s) to the valve Sub-standard assembly can cause malfunctions! If the cabling is carried out with the power supply switched on, this could cause dam- age to the electronic components! Make sure that the master is not supplied with power while cabling! Sub-standard assembly can cause malfunctions! If the connection is carried out with the power switched on it can result in damage to the electric components! Make sure that the master is not supplied with power during the connection! Connect plug (5) of the...
-
Page 14: Installing Other Components
3 Installation 3.3 Installing other components Extending the connecting cable Use the connector (6) for connecting two connecting cables in series. Installing the Powerbox In the case of cable lengths longer than 300 m, switch a powerbox between two con- necting cables. This way, the cable length can be extended by another 200 m to 500 m maximum. - Page 15 3 Installation Sub-standard assembly can cause malfunctions! If the knurled screw is not tightened correctly, the connection can work loose over time. This causes the system to malfunction! Make sure that all knurled screws of the connecting cables are tightened! Sub-standard assembly can cause malfunctions! If powerboxes are installed, these components provide voltage even when the master is switched off.
- Page 16 3 Installation Installing the temperature sensor The external temperature sensor (3, 9952.000, PT1000) is delivered with a converter (2, output 4 - 20 mA) and connecting cable (1). Screw the temperature sensor (3) with its screw-in thread AG ¼" to the desired point of the installation.
- Page 17 3 Installation The external temperature sensor is connected to the controller of a valve (flushing or cal- ibration valve), for this, connect the connection valve (1) to the M8 connection (8). Using the above-shown extension cables (9, 9943.005) the connection of several exten- sion cables of 5m each in series can bridge a distance of max.
- Page 18 3 Installation Installing the flow sensor The external flow sensor (1) measures the flow through the pipe section. It is connected to the controller of a valve (flushing or calibration valve), for this, connect the connection valve (1) to the M8 connection (8). Using the above-shown extension cables (9, 9943.005) the connection of several exten- sion cables of 5m each in series can bridge a distance of max.
-
Page 19: Working With The Master
4 Working with the master 4 Working with the master The master allows the control and steering of all connected components. It is protected from unauthorized access by a password: 137. The available functions depend on the current configuration. A sample configuration is described here. - Page 20 4 Working with the master If some of the components were not recorded correctly, press button (1) to close the dia- log, switch the master off, check that all components are connected correctly and then switch the master on again. If all valves were recorded correctly, confirm dialog positively with button (2). The master overview appears.
-
Page 21: Home/Main Menu
4 Working with the master The master is ready. The active applications are marked with a green circle. The applications currently running are marked with an animated blue circle. In area (1), all configured applications can be opened and parameterized. 4.2 Home/main menu Section (1) includes icons for all active applications. -
Page 22: Hydraulic Alignment
4 Working with the master 4.3 Hydraulic alignment The hydraulic alignment requires a circulation line. The corresponding valves do not close completely but only up to a adjustable leakage rate (minimum flow, Kvmin). The maximum opening angle (maximum flow Kvmax) of each valve can also be adjusted. Selecting the application icon for hydraulic alignment opens this dialog, which first dis- plays the recorded components: Select valve entry in the area (1) in order to adapt the name, leakage rate, and... -
Page 23: General Procedure
4 Working with the master The light fields display parameters, which cannot be adjusted. The number of a component is continuously assigned automatically, beginning with the line at the left socket of the master. Button x (2) closes the respective dialog without making any changes. Leakage rate (Kvmin, default setting 15%) and maximum opening angle (Kvmax, default set- ting 70%) can be adjusted. -
Page 24: Title
4 Working with the master 4.3.2 Title Enter meta data for the protocol in the area (1) (virtual keyboards): title, short title (labeling of App icon), date, author. Activate data using button (3) or abort dialog using button (2). 4.3.3 Process Process type in the area (1) is temperature The other fields change depending on this selection. -
Page 25: Type = Temperature
4 Working with the master 4.3.4 Type = Temperature The process is started upon reaching a specific temperature. Process sequence for hot water (area = hot) If the hot water becomes colder than the temperature (here: 57 °C, still thermally safe against legionella), then the process starts and opens the valve. - Page 26 4 Working with the master Risk of injury from hot water and components! Danger of burning and scalding during thermal disinfection! Make sure not to touch the components of the hot water circulation and the drain water during thermal disinfection. Please note that the components and the drained water require some time to cool down after the rinsing pro- cess.
- Page 27 4 Working with the master Process sequence for cold water (area = cold) If the cold water becomes warmer than the temperature (here: 25 °C), then the process starts and opens the valve. The resulting cold water circulation lowers the temperature. T behavior cold water If the temperature is fallen below again, the valve closes again (leakage rate).
-
Page 28: Type = Temperature Static
4 Working with the master 4.3.5 Type = Temperature static The process is started daily at a specific start-up time. The starting time must be selected so that the process of static hydraulic alignment takes place at a time when no water is withdrawn, i.e. - Page 29 4 Working with the master Process sequence for hot water (area = hot) At the set start-up time the first valve regulates its flow to the set temperature, in the shown example to 57 °C. Then the second valve regulates its flow, followed by the other valves, and finally the pro- cess is repeated until all valves reach the set temperature or the 4 hours have passed.
-
Page 30: Type = Flow
4 Working with the master 4.3.6 Type = Flow The process is based on the hydraulic alignment related to the flow. For this purpose, a flow sensor is installed in each circulation line with a hydraulic alignment valve and con- nected to the controller, see Installing a flow sensor. -
Page 31: Type = Constant
4 Working with the master Process sequence At the set start-up time the first valve regulates its flow to the set flow rate, in the shown example to 200l/h. Then the second valve regulates its flow, followed by the other valves, and finally the pro- cess is repeated until all valves reach the set flow rate or the 4 hours have passed. -
Page 32: Flushing
4 Working with the master 4.4 Flushing The flushing of a line requires a valve that flows outwardly into a drain. The cor- responding valves close completely. The recorded components are first displayed. Select valve entry in area (1) in order to adapt the name of the valve - a virtual keyboard appears for this purpose. -
Page 33: General Procedure
4 Working with the master 4.4.1 General procedure Define title, process and protocol successively: Pressing the fields in area (1) opens the corresponding dialogue. Activate data using button (2). 4.4.2 Enhanced settings Allows alteration of the blocking time after a valve adjustment. The valve carries out the next adjustment at the earliest after the expiration of the blocking time. -
Page 34: Title
4 Working with the master 4.4.3 Title The light-colored fields indicate parameters that cannot be adjusted, such as the type. The number of a component is assigned automatically, for example, beginning with the line at the left socket of the master, see Installation. Enter meta data for the protocol in the area (1): title etc.: Enter the required text via the virtual keyboard (1). -
Page 35: Process
4 Working with the master 4.4.4 Process Select trigger in the area (1): time or temperature. Once everything has been defined, activate data using button (3) Abort dialog using button (2) if necessary. The selection options in the area (1) adapt to the selection of the trigger. Here for temperature: Define the other parameters in the area (1). -
Page 36: Trigger = Temperature
4 Working with the master 4.4.5 Trigger = Temperature The process is started for each individual valve depending on the temperature. Process sequence for cold water (area = cold) Parameter hydraulic align- ment, cold water The process is started if the water temperature exceeds the temperature (default setting: 20 °C). - Page 37 4 Working with the master Process sequence for hot water (area = hot) Parameter HA, T static, warm water The process is started if the water temperature falls below the temperature (default setting: 50 °C). The lines are now flushed with hot water. The stop criterion (1) for the flushing process is selectable: Either a defined duration (default setting: 1 min), a temperature to be exceeded (default setting: 55 °C), or a specific volume for each flush valve.
-
Page 38: Trigger = Time
4 Working with the master 4.4.6 Trigger = Time The flush process is started time-dependent and then implemented for all flush valves in sequence, starting with the first flush valve. The process is started when the set start time (default setting: 00:00 o'clock) is reached. -
Page 39: Protocols
4 Working with the master In the case of weekly execution, e.g. Mondays and Wednesdays every week, set the desired weekday, in the example here on weekday Monday and Wednesday: Under every x weeks, set whether execution should take place weekly (x = 1, default settings) or less frequently (x >... -
Page 40: Automatic Maintenance Process
4 Working with the master 4.5 Automatic Maintenance Process Once a week, the Maintenance application is actuated. It ensures long-term reliable operation of the valves during hydraulic alignment. A basic problem of hydraulic regulator valves is the fact that during operation they are never shut fully or only during maintenance measures. -
Page 41: Manual Operation
4 Working with the master 4.6 Manual operation Area (1) contains applications for all components that can be set manually. The manual movements are password-protected. After selecting the application, a virtual key- board appears for entering the password. The password is 42. 4.6.1 Valves The dialog allows the service technician to adjust the valve position using the slider (3). -
Page 42: Settings
4 Working with the master 4.7 Settings Area (1) contains functional elements for all configured adjustment options. Next to that, the current software version (2) is displayed. 4.7.1 Country settings The following settings can be adjusted in the area (1): Date: Current date, selection dialog Time: Current time, selection dialog plus 24h or am/pm Date format: dd-MM-yyyy or yyyy-MM-dd... -
Page 43: Property
4 Working with the master 4.7.2 Property Data to the current property or building can be customized in area (1). View the entries of the building concerned in the area (1) and adjust them if necessary (virtual keyboard). For this purpose, move the list in the area up or down as required. Button (2) closes the dialog without making any changes. - Page 44 4 Working with the master Dialog for changing valve data Area (1) normally displays the parameters that can be adjusted. Adjust the name of the valve and the pipe volume as required. In the case of valves for hydraulic balancing, the maximum opening angle and the leakage rate can additionally be adjusted.
- Page 45 4 Working with the master Dialog for exporting the system overview (commissioning) protocol Select the desired export format (PDF or XML). If a USB stick is detected, button (3) is active and starts the export. Otherwise, no USB stick is detected. In this case make sure that the USB stick is correctly inserted and, if required, use a USB stick of another make.
-
Page 46: Alarms Messages
4 Working with the master 4.7.4 Alarms Messages The list in the area (1) displays the last messages. For a system analysis, button (3) can be used to create a DMP file and import it onto a USB stick. The file contains the commands carried out in the master and can provide information in case of an unexpected event. -
Page 47: Network
4 Working with the master 4.7.6 Network In area (1) you can adjust the network parameters of the master: IP config on Automatic makes sure that the IP address of the master is automatically retrieved. Otherwise (Manual) the entered IP address applies. As information (4), the MAC address of the master is displayed. -
Page 48: Bluetooth
These are adjusted in line with the network parameters. 4.7.7 Bluetooth The Hycleen Automation System app is available as an Android and Apple version in the respective app stores. It allows status monitoring via a smartphone. The con- nection is via the Bluetooth access of a valve controller (max. distance 10 m). The valve through which the connection is set up maintains its function and continues to operate normally. -
Page 49: Modules
4 Working with the master 4.7.8 Modules By importing the associated license file(s) here, chargeable modules can be activated, such as the REST API interface (1) or the BACnet interface (2). Importing a license file The required license file is expected on a USB stick. The parameterization of the BACnet interface takes place via Settings ->... -
Page 50: Protocols
4 Working with the master 4.8 Protocols The list of available protocols is displayed in area (1). Button (2) exports all protocols at once via USB (choice of: PDF or XML). Selecting an entry in the area (1) displays details of the selected protocol in a new dia- log: Area (1) displays the meta data of the selected protocol. - Page 51 4 Working with the master Exceedance of limit temperatures (4) The table in the area (1) provides a clear summary of the temperature messages. Each time a limit temperature is exceeded, it is displayed in a separate line with details of the valve con- cerned.
-
Page 53: Troubleshooting
Below you can find the most important error notifications and information for resolving the error. Address any questions to your contact person at GF Piping Systems or our technical cus- tomer service, tel.+ 41 61 975 23 77, e-mail: tkd.jrg.ps@georgfischer.com. - Page 54 5 Troubleshooting 5.2 Error messages 10004: Power supply < 28V Measures: Check: cable length in line with the specification. 10005: TCP/IP error Measures: Check the cable connections. Check the IP addresses. 10013: PT 1000 Temperature sensor defective Measures: Replace PT 1000 temperature sensor. 10014: PT 1000 temperature sensor not connected Measures: Check the cable connection of the temperature sensor.
- Page 55 6 Compliance 6 Compliance 6.1 FCC Changes or modifications not expressly approved by the party responsible for compliance could void the user's authority to operate the equipment. This device complies with Part 15 of the FCC Rules. Operation is subject to the following two conditions: 1.
- Page 56 6 Compliance 6.2 ISED This device contains licence-exempt transmitter(s)/receiver(s) that comply with Innovation, Science and Economic Development Canada’s licence-exempt RSS(s). Operation is subject to the following two conditions: 1. This device may not cause interference. 2. This device must accept any interference, including interference that may cause undesired operation of the device.
Need help?
Do you have a question about the Hycleen Automation System and is the answer not in the manual?
Questions and answers