Table of Contents
Advertisement
Quick Links
Advertisement
Table of Contents

Related Manuals for Halma Wagtech Palintest Potatest Go

Summary of Contents for Halma Wagtech Palintest Potatest Go
- Page 1 Potatest ™ Rapid Response Portable Water Quality Laboratory ZI PTW 10005...
- Page 2 Who We Are Over the last 20 years the Wagtech ™ name has become synonymous with water testing in the most extreme circumstances and remote locations. Developed for a range of applications, from long term surveillance to rapid response testing in an emergency, the Wagtech ™...
-
Page 3: Table Of Contents
Contents Chapter Page Kit Layout Introduction Preparation Taking a Sample Sample Processing - Membrane Filtration Incubation and Incubator Operation Microbiological Results Water Safety Kit (WSK) Appendix 1 - Field Testing Checklist - Hints Appendix 2 - Troubleshooting Appendix 3 - Technical Specifications Appendix 4 - Reagents and Consumables Appendix 5 - Microbiological Quick Start Guide... -
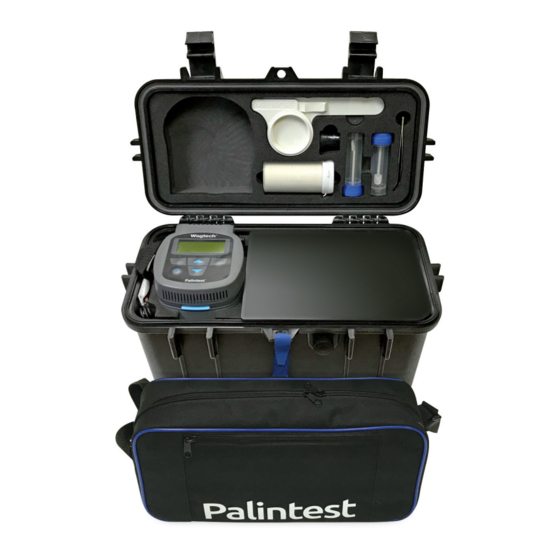
Page 4: Kit Layout
Kit Layout Potatest ™ Water Test Kit, Including Water Safety Kit Fig 1. Potatest ™ Water test kit with water safety kit removed from lid and opened to show contents. Coloured circles indicate the chapter colour in which their use is explained. - Page 5 Kit Layout Function Equipment Preparing the Membrane Lauryl Sulphate Broth (MLSB) Media/Petri Dishes Media Measuring Device (MMD) Absorbent Pads Pad Dispenser Petri Dishes (in incubator) Petri Dish Rack Membrane Filtration Membrane Filtration Unit Hand Vacuum Pump Pasteur Pipettes 1mL, 5 pack Forceps 47mm Membrane Filters Incubation and...
-
Page 6: Introduction
Introduction 2.0 Introduction The Wagtech Potatest is a portable water quality test kit. It has been designed primarily to test the microbiological quality of drinking water; assessing whether or not there has been faecal contamination of a water source. It allows the end user to test directly for Total or Faecal Coliforms as well as the critical indicators of microbiological quality: Turbidity, pH and Free and Total Chlorine. - Page 7 Introduction Total Coliforms refers to a large group of In simple terms the process is as follows: Gram-negative, rod-shaped bacteria that share A known volume of sample water (100ml several characteristics. The group includes or less for highly contaminated samples) is Thermotolerant Coliforms and bacteria of filtered using a specific piece of apparatus faecal origin, as well as some bacteria that...
- Page 8 Introduction A vacuum hand pump attached to the MFU Useful to Know creates suction that pulls the sample water through a sterile membrane filter that sits • Always wash your hands before in place in the MFU. carrying out your microbiological analysis, and again after handling This membrane filter has small pores in it potentially contaminated materials...
-
Page 9: Preparation
Preparation 3.0 Preparation Every effort should be made to keep the kit and all its components clean and free from contamination. At all times you should work in a manner that limits the chance of cross contamination of your samples. 3.1 Aseptic Procedure Useful to Know There are specific techniques and methods... - Page 10 Preparation 3.2 Sterilisation of the for sterilisation (see below), which will Membrane Filtration Unit leave a small gap between the bottom of the filter funnel and the silicone base. Upon receipt of your water test kit the Membrane Filtration Unit (MFU) must be washed thoroughly and then dried with a clean cloth or paper towel.
- Page 11 Preparation 3.3 Sterilisation of the 3 Remove the lid Aluminium Petri Dishes of the petri dish and dispense a Your Wagtech test kit is supplied as standard pad into the dish with a set of aluminium petri dishes. These by sliding back are used during the microbiological analysis.
- Page 12 Preparation 3.6 Preparing Culture Media 6 Remove the MMD, allow to cool. in the Field using the Media 7 Once cool, unscrew the blue lid/spoon of Measuring Device (MMD) the MMD. Take ten level spoonfuls of media Items Required: from the 38.1g container of the MLSB and add to the MMD.
- Page 13 Preparation 3.7 Tyndallisation of MMDs 3.8 Storage of Liquid Media In the event an autoclave or pressure cooker The sterile MLSB should be stable for up is not available then the sterilisation of the to 6 months if stored in a refrigerator. If no MMD containing the liquid MLSB media can refrigerator is available the media can be be carried out using a pan of boiling water.
- Page 14 Preparation Useful to Know • Growth or culture media is a substance designed to support the growth of microorganisms (bacteria). The media is a vital part of the microbiological water quality test • There are different types of media for growing different types of bacteria.
-
Page 15: Taking A Sample
Taking a Sample 4.0 Taking A Sample The optimum volume of sample is that which will allow the most accurate enumeration of bacteria. The technique of membrane filtration is unsuitable for natural waters containing very high levels of suspended material, sludges and sediments, all of which could block the filter before an adequate volume of water has been filtered. -
Page 16: Sample Processing - Membrane Filtration
Sample Processing - Membrane Filtration 5.0 Membrane Filtration of the Sample Items Required: • Membrane Filtration Unit • MMD containing Liquid MLSB Media • Pistol Grip Hand Vacuum Pump • Petri Dishes containing Absorbent Pad • Forceps/Tweezers • Methanol (not supplied) •... - Page 17 Sample Processing - Membrane Filtration 6 Lock the membrane filter in place by 9 Discard the excess water from the sampling pushing the filter funnel firmly into cup then insert the filter funnel/base position in the blue rubber base. Take assembly into position in the sampling cup.
- Page 18 Sample Processing - Membrane Filtration 12 When all of the sample has been filtered, 16 Lift the petri dish containing the detach the vacuum pump and remove absorbent pad and hold between the filter funnel from the rubber base. thumb and forefinger. The membrane filter is now ready to be removed and placed in the petri dish containing the absorbent pad and...
- Page 19 Sample Processing - Membrane Filtration 19 Use the sterile forceps to remove the Environmental exposure can cause coliforms membrane filter from the filtration unit. to become physiologically stressed. The resuscitation period allows coliforms to recover before culturing. With this in mind it is essential to plan testing throughout the day, particularly if visiting multiple sample sites.
-
Page 20: Incubation And Incubator Operation
Incubation and Incubator Operation 6.0 Operation of Incubator The Potatest incubator is a high performance field incubator designed to deliver reliable Total and Thermotolerant Coliform results in even the most extreme circumstances. Providing up to 5 cycles of incubation under standard conditions when battery powered, the incubator is simple to operate and provides performance data throughout the incubation cycle. - Page 21 Incubation and Incubator Operation 6.1.3 Powering the Incubator via 3. Remove DC cable from the left-hand side an External 12V DC Source/Battery of the incubator. • The incubator can also be powered via external supplies such as a vehicle/ motorcycle battery or via the cigarette lighter socket of a vehicle •...
- Page 22 Incubation and Incubator Operation 8. Using the lifting straps lift the upper 5. Plug in the battery cable into the right- foam tray out of the case to access hand side of the incubator. lower kit items. 6. Unplug the Power Supply Unit, Car Charger Cable or independent Battery Lead.
- Page 23 Incubation and Incubator Operation 6.3 Recharging the 12V DC Battery • A red LED in the right hand corner of the incubator lid indicates that power is supplied Note: For optimal recharging, and the incubator is on. The backlight will switch off the incubator.
- Page 24 Incubation and Incubator Operation 6.4.2 Setup Menu • When the correct character is shown, release the key. The cursor moves to the • The Setup menu allows the user to set next character automatically, up to a the incubator preferences and validate maximum of 12 characters performance •...
- Page 25 Incubation and Incubator Operation Set Date To set the Date: • Highlight ‘Set Date’ and press ‘OK’ • Use the UP/DOWN keys to set the day. When correct press ‘OK’ • Use the UP/DOWN keys to set the month. When correct press ‘OK’ The Check Calibration function provides a •...
- Page 26 Incubation and Incubator Operation 6.4.3 Incubation Menu There are five standard prompt cards with corresponding audio, both indexed by letter The ‘Incubation’ menu is accessed from and number. the ‘MODE’ screen, confirms the incubator settings and starts the incubation cycle. The Prompt Cards are grouped as follows: •...
- Page 27 Incubation and Incubator Operation 6.5 Incubating Samples • The incubator has a default warm-up period of 30 minutes at the start of the The incubation of samples can begin once incubation process. During this phase the the correct resuscitation period has been incubator will display ‘warming up’...
- Page 28 Incubation and Incubator Operation 6. Pota Pal Incubator App 6. .1 Firmware Update The Wagtech ® incubator is The currently installed incubator software provided with version is shown on start-up and can also a micro-USB be found in Setup>Version (see section connection to 6.3.2).
- Page 29 Incubation and Incubator Operation 6. .2 Language Update New prompts in local languages and dialects can be uploaded using the Pota Pal app and To update languages: Audacity software functionality. The Android • Start the Pota Pal app app also has the ability to record prompts. •...
- Page 30 Incubation and Incubator Operation 6. .5 Download Incubation Data Error 107: Validation Water quality reports can be enhanced with The internal validation of thermistor downloaded data from the incubator detailing temperature monitoring has exceeded the temperature profile and power consumption. tolerance of the device.
-
Page 31: Microbiological Results
Microbiological Results 7.0 Microbiological Results Bacteria in water are generally not present individually but as clumps or in association with particulate matter. When enumerating bacteria in water it is not the number of individual bacteria present which are counted but the number of clumps of bacteria or the particles and their associated bacteria. -
Page 32: Water Safety Kit (Wsk)
Water Safety Kit (WSK) 8.0 Water Safety Kit Included in the Potatest is the Water Safety Kit (WSK). Lightweight, with a shoulder strap, it is removable from the main kit and can be carried easily to the field. It can be used to conduct quick and accurate analysis on-site of the critical indicators of microbiological quality. - Page 33 Water Safety Kit (WSK) 8.1 Jackson Turbidity Tubes 8.2.1 Taking pH Measurements The two-part Turbidity Tube provides a Remove the protective cap and press simple and intuitive method of determining ON/OFF to switch the meter on. turbidity using a visual approach. Higher Dip the electrode into 2-3cm of sample, rotate values of turbidity can be determined using gently and wait for the reading to stabilise.
- Page 34 Water Safety Kit (WSK) 8.2.3 Calibrating Temperature 8.3.1 Before You Begin ON/OFF to switch the meter on. Remove the electrode’s protective cap. Soak the electrode for a few minutes in alcohol Press HOLD/ENT to remove any oil stains on the electrodes. Press and hold CAL for 3 seconds to Rinse thoroughly with de-ionised water enter temperature calibration mode.
- Page 35 Water Safety Kit (WSK) 3 The upper display shows the conductivity 8.3.6 Temperature Calibration reading and the lower display sequentially Temperature calibration need not be performed shows calibration standard values 84µS, every time, unless the temperature reading 1413µS & 12.88mS if the measuring differs from that of an accurate thermometer.
- Page 36 Water Safety Kit (WSK) 8.4 Contour Comparator Chlorine Testing Procedures for Free and Total Chlorine 8.4.1 Free Chlorine The Contour Comparator is a compact and easy-to-use platform for the visual Select the Chlorine disk with the desired testing of a wide range of drinking water range and place in the Contour body.
-
Page 37: Appendix 1 - Field Testing Checklist - Hints
Appendix 1 - Field Testing Check List - Hints Note: Field testing requires careful planning Ensure you have considered the following When you are in the field: additional items that may be required in • Find a flat area! Always place kit on a addition to the Potatest contents: firm surface where it is easy to work... -
Page 38: Appendix 2 - Troubleshooting
Appendix 2 - Troubleshooting Incubator Fault Codes: Select ‘Back’ to stop incubation until more reliable supply is available. The message Error 100: Temperature will remind at 1 minute intervals until a The temperature of the incubator is outside the new power supply is attached. acceptable limit for reliable operation. -
Page 39: Appendix 3 - Technical Specifications
Appendix 3 - Technical Specifications Potatest Kit Contents • Wagtech Incubator • 5 Pasteur pipettes Removable Water Safety Kit including: • High performance • Pen Lead Acid battery • Hand lens • Contour Comparator • Mains charger with • Forceps •... -
Page 40: Appendix 4 - Reagents And Consumables
Appendix 4 - Reagents and Consumables Membrane Filtration Consumables Membrane Filtration Spares Part Number Description Kit Layout Reference PTW 10400 Membrane Filtration Unit MFU, Complete PTW 10464 Absorbent Pad Dispenser PTW 10404-20 Aluminium Petri Dishes, 20 pack PTW 10401 Pistol Grip Hand Vacuum Pump PTW 10402 Bronze Disk PTW 10403... - Page 41 Appendix 4 - Reagents and Consumables Reagents Part Number Description Kit Layout Reference AKW 011 Free Chlorine (DPD 1), 250 tests, Polypropylene Carton AKW 031/1 Total Chlorine (DPD 3), 250 tests, Polypropylene Carton AKW 031 Free and Total Chlorine (DPD 1 & 3), Polypropylene Carton –...
-
Page 42: Appendix 5 - Microbiological Quick Start Guide
Boil water for 10 minutes, allow to cool. Add 10 spoonfuls of culture media into measuring tube using the integral spatula. Fill the Media Measuring Device with the Close the lid, and then shake to cooled sterilised water to the bottom lip. dissolve all the powder. - Page 43 Add 1ml of methanol into the sampling Push the filter funnel into the blue rubber cup, swirling to coat internal surfaces base leaving sterilisation symbol visible When flame is nearly extinguished, invert Hold the sampling cup to face away from funnel and rubber insert into the cup you.
- Page 44 Remove the lid from the tube of absorbent Remove lid of sterile petri dish taking pads and attach to the pad dispenser. care only to handle the lid by the sides. Carefully pour the media from the MMD Dispense absorbent pad into petri dish by on to the absorbent pad in the petri dish.
- Page 45 Pull filter funnel from rubber base support. Sterilise forceps tips by passing Invert filter funnel, place on clean them through flame from a lighter. work-surface. Allow them to cool. Peel back clear membrane filter outer Place the membrane filter directly onto the wrapper.
- Page 46 After incubation remove petri dishes. Note Place petri dishes on a flat surface in incubation temperature and period. good natural light. Avoid direct sunlight. DO NOT count colonies that are CLEAR, Remove lids. Count yellow colonies more RED or ANY OTHER COLOUR. than 1mm diameter.
- Page 47 Global Head Offices Palintest (HQ) Palintest Australia Pacific T: +44 (0)191 491 0808 T: +61 1300 13 15 16 E: sales@palintest.com E: palintest@palintest.com.au A: Palintest House A: 1/53 Lorraine Street Kingsway Peakhurst Business Centre Team Valley Peakhurst Gateshead NSW 2210 Tyne &...
- Page 48 www.palintest.com...
Need help?
Do you have a question about the Wagtech Palintest Potatest Go and is the answer not in the manual?
Questions and answers