Advertisement
Quick Links
Using the mcHF transciever – brief overview:
NOTE:
If you are unfamiliar with the mcHF, please refer to the section: "Before you get on the air -
Initial set-up of the mcHF transceiver" in the "Operator's Manual".
To turn on the transceiver, press the POWER button briefly and the display should light up, go through its attribution
and boot-up screen and display the frequency and spectrum scope or waterfall display.
Receive:
Adjust volume using the ENC1 control.
•
Tune the frequency using FREQ ENC knob. Select the step size using the STEP- and STEP+ buttons.
•
Pressing-and-holding the STEP- or STEP+ button will temporarily decrease/increase the step size
•
while tuning, the step size display changing colour while this is in effect.
Pressing-and-holding both the STEP- and STEP+ buttons at the same time will enable/disable the
•
"Frequency Lock" mode. The main frequency display will turn grey when "Frequency Lock" is
enabled. The RIT is still enabled when the frequency is locked.
Change the band using the BND- and BND+ buttons.
•
Press-and-hold the BND- and BND+ buttons simultaneously for >2 seconds to toggle between Spectrum
•
Scope and waterfall display modes
Change the mode (USB, LSB, CW, etc.) using button G1.
•
Button G4 selects the receiver bandwidth. In FM transmit, pressing-and-holding will generate a tone burst.
•
Pressing button G2 will select the mode of DSP noise reduction - Not available in FM mode.
•
Pressing and holding button G2 will turn DSP off, saving the current settings while pressing and
•
holding again will restore the last-used mode. The available DSP modes are:
•
•
•
If RIT is desired, use ENC3 to shift the receive frequency: The small frequency display will show actual
•
receive frequency display when RIT is set to non-zero, but the large display will show the transmit
frequency.
Important note: It is strongly recommended that "Frequency Translation" (menu item "RX/TX Freq Xlate") be
activated for best receiver performance – see the complete manual for more information on this setting.
For f/w Ver. 0.0.219.26
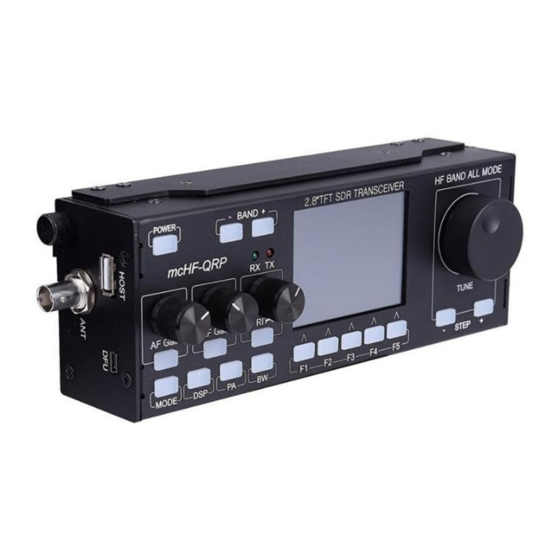
Front panel controls of the mcHF transceiver
NR = Noise reduction only
NOTCH = Automatic notch (tone) filter only
NR+NOT = Both Noise reduction and Automatic notch filter.
Advertisement

Related Manuals for Monka mcHF

Summary of Contents for Monka mcHF
- Page 1 Front panel controls of the mcHF transceiver NOTE: If you are unfamiliar with the mcHF, please refer to the section: “Before you get on the air - Initial set-up of the mcHF transceiver” in the “Operator's Manual”. To turn on the transceiver, press the POWER button briefly and the display should light up, go through its attribution and boot-up screen and display the frequency and spectrum scope or waterfall display.
- Page 2 In a quiet room with an antenna or dummy load connected to the mcHF, set the METER mode to ALC and key the microphone/transmitter without talking and note if ALC meter jumps at the instant that you key the transmitter and goes down again.
- Page 3 “wider” digital modes! In the vast majority of cases the 2.3kHz filter will be adequate. Connect the Line-Input jack (J2) of the mcHF to the audio output of the device you are using to generate the audio and connect the Line-Output jack (J1) of the mcHF to the audio input of that same device.
-
Page 4: Tune Mode
• the amount of the setting of the “CW Side/Off Freq” (e.g. sidetone frequency). When set to SSB mode, when TUNE is activated the mcHF will produce a carrier that is offset from the dial • frequency by 750 Hz – the same as the audible sidetone. This carrier will be below the dial frequency in LSB mode and above it in USB mode. - Page 5 Press button M1 to highlight the STG parameter: ENC1 is used to adjust this parameter. • Press the paddle/key to cause the mcHF to transmit: Use ENC1 to adjust the volume of the sidetone. Note • that the volume control (“AFG”) setting has no effect on the level of the sidetone.
- Page 6 For a more thorough explanation of the many features of the mcHF transceiver – particularly the items in the menu – refer to the “mcHF Operators Manual” that is found on the mcHF Yahoo Group in the KA7OEI folder of the FILES section.
- Page 7 Key function matrix Button(s) Brief press Press-and-hold >1 second Power Change display brightness Power on and power off/save settings to memory Select AFG and CMP or STG Select RFG and DSP or NB Switch between DSP and NB Select RIT and MIC or LIN...
Need help?
Do you have a question about the mcHF and is the answer not in the manual?
Questions and answers