
Related Manuals for König Gaming GAME-WHEEL11

Summary of Contents for König Gaming GAME-WHEEL11
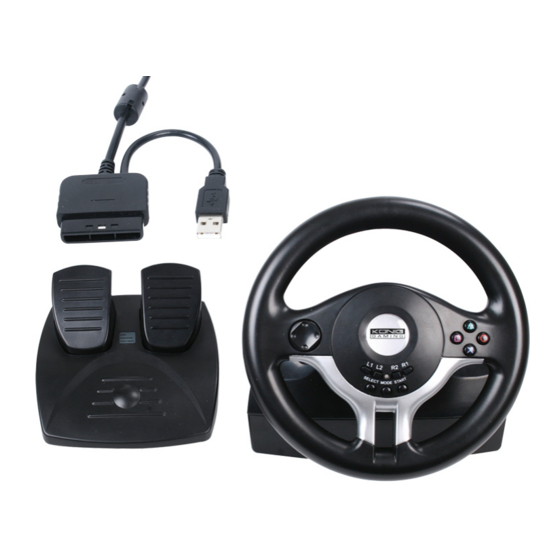
- Page 1 GAME-WHEEL11 MANUAL (p. 2) KÄYTTÖOHJE (s. 6) PS2™, PS3™ & PC wheel PS2™, PS3™ & PC -rattiohjain...
-
Page 2: Connection And Installation
ENGLISH 1. Connection & Installation 1) Set the switch (PC/PS) according to the console, select PC when used with a PS3™. 2) Connect the foot pedal to wheel. 3) Connect the wheel to the PS3™, PS2™ or PC. When a single player plays a PS2 game, make sure the wheel plug is connected to the first jack from the left. - Page 3 3) Foot Pedal functions layout Brake Accelerator 3. Button functions table (PS—PC) PS2/Digital PS2/Analogue PS2/Neg RY(0-255) ○ ○ □ □ LX(0-255) ∆ ∆ LY(0-255) ─ LY(0-255) ─ START START START SELECT SELECT ─ ─ D-PAD X/Y axis D-PAD D-PAD Brake □...
-
Page 4: System Requirements (Pc)
D. KeyMap method: a. Press and hold the SELECT+START buttons for 3 seconds, the green LED will come on. b. Press the programmable button, the green LED will flash. c. Press the program sourcing button, the green LED will turn off and PROGRAM setup is complete. E. PROGRAM clear up method: a. Press the SELECT+START buttons for 3 seconds, the green LED will come on. b. Press the KeyMapped button, the green LED will flash. c. Press the KeyMapped button once more, green LED will be off, KeyMap is cleared up. 3) Directional sensitivity setup function with 3 modes a. Press the SELECT+START buttons for 3 seconds, the green LED will come on. b. Then press the SELECT button, the current sensitivity status will be displayed. c. - Page 5 2) Enter “Calibration Function” for to make adjustments The calibration is only used in Analogue Mode (LED Indicator is on) while the “+” cursor is not in the centere position. Please press “Default” first, then “Set” to calibrate. 3) Enter the “Effect Page” to test the vibration of motor: In digital mode, press the right and left directions on the directional button, the corresponding right motor will vibrate. Press the up and down directions on the directional button, the corresponding right motor will vibrate.
-
Page 6: Safety Precautions
Safety precautions: T o reduce risk of electric shock, this product should ONLY be opened by an CAUTION authorized technician when service is required. Disconnect the product from RISK OF ELECTRIC SHOCK mains and other equipment if a problem should occur. Do not expose the product DO NOT OPEN to water or moisture. Maintenance: Clean only with a dry cloth. Do not use cleaning solvents or abrasives. Warranty: No guarantee or liability can be accepted for any changes and modifications of the product or damage caused due to incorrect use of this product. General: Designs and specifications are subject to change without notice. - Page 7 2) PC/PS-kytkin PC/PS-kytkin 3) Poljinten toiminnot Jarru Kaasu 3. Taulukko: Painikkeiden toiminnot (PS/PC) PS2/ NRO. PS2/Neg. Digitaalinen Analoginen RY(0-255) ○ ○ □ □ LX(0-255) ∆ ∆ LY(0-255) ─ LY(0-255) ─ START START START SELECT SELECT ─ ─ D-PAD X/Y -akseli D-PAD D-PAD Jarru...
- Page 8 PS2/ NRO. PS2/Neg. Digitaalinen Analoginen Kaasu RY(0-255) LX(←) LX(←) LX(127-0) LX(127-0) RX(127-0) LX(127-0) LX(→) LX(→) LX(127-255) LX(127-255) RX(127-255) LX(127-255) MODE MODE MODE MODE MODE MODE 4. Erityistoimintojen kuvaus: 1) Tilan-asetuksen kiertojärjestys a. D igitaalinen → Analoginen → Neg. (LED-valo pois päältä) (Punainen LED-valo päällä) (Punainen LED-valo vilkkuu) b. Kun konsoli on lukittu tiettyyn tilaan, Mode-painike ei ole käytössä. Tilan LED-valo ilmaisee käytössä olevaa tilaa.
- Page 9 6. Ohjelmiston asennus (PC): Ohjelmiston asennus Windows98/Me/2000/XP -käyttöjärjestelmissä 1) Käynnistä Widows → Syötä levyke → Kaksoisnapsauta “SETUP”-tiedostoa ja noudata ruudulla näkyviä ohjeita asentaaksesi ohjelmiston. 2) Käynnistä → Ohjauspaneeli → Peliohjain. 3) Asenna rattiohjaimen USB-johto tietokoneesi USB-liittimeen → noudata ruudulla näkyviä ohjeita asentaaksesi ohjelmiston → tietokoneesi löytää “LS-USBMX1/2/3 Steering Wheel w/vibration” -laitteen automaattisesti → laite on käyttövalmis. 7. Rattiohjaimen testaaminen: 1) Siirry “Test Page” -kohtaan A. Rattiohjaimen ohjauksen testaaminen: a. Käännä rattia vasemmalle ja oikealle, jolloin X-akseli liikkuu vastaavasti vasemmalle ja oikealle. b. Mikäli “+”-osoitin ei ole X/Y-akselipalkin keskellä, kalibroi ohjain “Calibration Function” -toiminnon avulla. B. Painikkeiden 1-10 testaaminen: Paina mitä tahansa painiketta 1-10 rattiohjaimessa, jolloin vastaavan painikkeen tulisi muuttua punaiseksi testisivulla. C. Nuolipainikkeiden testaaminen: Digitaalinen tila: Paina kahdeksaa suuntapainiketta (ylös, alas, vasemmalle, oikealle sekä neljään viistosuuntaan), jolloin vastaavaan suuntaan osoittavat nuolet ilmestyvät X/ Y-akselipalkkiin.
- Page 10 Värinätoiminnon alue Dead Zone Värinätoiminnon alue Akseli Akseli 5) Oikeanpuoleinen värinämoottori värisee jatkuvasti pelin aikana. Siirry “Force Feedback” -tilaan sammuttaaksesi tai pienentääksesi moottorin käyntiä. Moottori 6) Moottorin värinä heikkenee pelin aikana. Siirry Force Feedback -tilaan ja lisää “STICK VOLUME”, “ROAD EFFECTS”, sekä muiden kohteiden tasoa. 7) Ohjaimen kalibrointi tuottaa vaikeuksia testauskohdassa. Paina ensin “Default” ja sitten “Set”. 8) Moottori ei värise testattaessa. DirectX-versio on liian vanha, laite vaatii version 7.0 tai uudemman. 9) Ohjain ei löydy liittämisen jälkeen Kun ajuria asennettiin edellisen kerran ja Windows kehotti osoittamaan tiedostopolun, asennusohjelma hyppäsi tiedoston yli tai asensi väärät tiedostot. Poista “!”-merkinnällä varustetut laitteet “man-machine port” -kohdasta, “Somatological Input Equipment”, “Hidclass” tai “Sound, Video and Game Controller” -valikosta. Asenna...
- Page 11 Declaration of conformity / Yhdenmukaisuusvakuutus We, / Me Nedis B.V., De Tweeling 28, 5215MC, ’s-Hertogenbosch The Netherlands / Alankomaat Tel. / Puh: 0031 73 5991055 Email / Sähköposti: info@nedis.coms Declare that product: / Vakuutamme, että: Brand: / Merkki: KÖNIG GAMING Model: / Malli: GAME-WHEEL11 Description: PS2™, PS3™ & PC wheel Kuvaus: PS2™, PS3™ & PC -rattiohjain Is in conformity with the following standards: / Täyttää seuraavat standardit: EN50081-1/1992: EN55014, EN61000-3-2/-3 EN50082-1/1997: EN55104-2 EU Directive(s) / EU Toimintaohje(et) 89/336/EEC (EMC) ‘s-Hertogenbosch, January 2008 Mrs. J. Gilad Purchase Director / Toimitusjohtaja...
Need help?
Do you have a question about the GAME-WHEEL11 and is the answer not in the manual?
Questions and answers