Table of Contents
Advertisement
Available languages
Available languages
Advertisement
Table of Contents

Subscribe to Our Youtube Channel
Related Manuals for Steren CCTV-2100


Summary of Contents for Steren CCTV-2100
- Page 1 V0.2/1218V Sistema de seguridad Wi-Fi Manual de instrucciones...
- Page 2 ÍNDICE CONTENIDO........................3 DESCRIPCIÓN GENERAL....................4 COLOCACIÓN DE BATERÍAS..................5 PREPARATIVOS......................6 OPCIONES DE CONFIGURACIÓN.................7 Configuración inalámbrica (Wi-Fi)................7 Configuración alámbrica (con cable de red)............12 MONITOREO........................14 VINCULAR LOS SENSORES Y EL CONTROL REMOTO..........16 ACTIVAR ALERTAS.......................18 INSTALACIÓN........................20 Cámara........................20 Sensores magnéticos....................21 Sensores de movimiento..................23...
- Page 3 CONTENIDO Cámaras Sensores PIR Sensores magnéticos Controles...
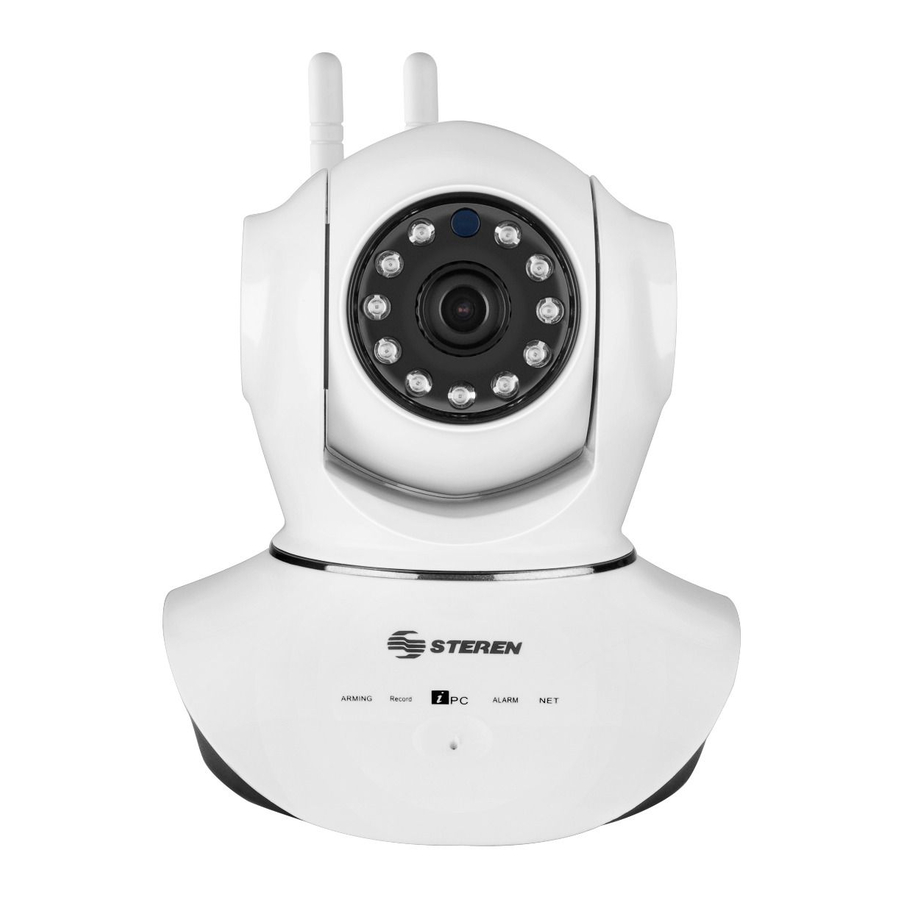
- Page 4 DESCRIPCIÓN GENERAL Antenas Lente Infrarrojos (visión nocturna) Alarma por detección de Grabación en tarjeta movimiento activada micro SD Alarma activada Conexión de red Micrófono Botón de reinicio Entrada de alimentación Entrada RJ45 Ranura para tarjeta micro SD...
- Page 5 COLOCACIÓN DE BATERÍAS Sensores magnéticos Deslice la tapa, e inserte una batería “AA” en el compartimento. Vuelva a colocar la cubierta. Sensores de movimiento Remueva el tornillo inferior del sensor Saque el conector tipo broche. Conecte para retirar la cubierta. una batería de 9 V y acomódela dentro del compartimento.
- Page 6 IEye o iEye-camera. ZJinChang Esta aplicación no es propiedad de Steren; la empresa no se hace responsable por su funcionamiento ni actualizaciones. » Abra la aplicación. Seleccione la opción Registro rápido para crear una cuenta de...
- Page 7 OPCIONES DE CONFIGURACIÓN Antes de configurar las cámaras, verifique cuál es la banda de su red Wi-Fi, si es 2.4G puede elegir cualquiera de las opciones de configuración descritas en este instructivo. Sin embargo, si la frecuencia es 5G, diríjase directamente a la sección “Configuración alámbrica”.
- Page 8 1. En su dispositivo móvil, ingrese a la aplicación i-Eye*. Presione + Las imágenes presentadas corresponden a un dispositivo con sistema operativo Android 7.0 y aplicación iEye-camera (03.24.00.24). Los iconos, la configuración de la interfaz y las funciones pueden variar según la versión de la aplicación y el sistema operativo utilizados.
- Page 9 4. Introduzca la contraseña de la red 5. Mientras la cámara sigue en modo de Wi-Fi en la que está conectado su dispo- espera de conexión, es decir, si está emi- sitivo móvil. Presione Siguiente. tiendo tonos continuamente, seleccione esta opción en la aplicación. En caso de que no pueda escuchar los tonos, presione el botón “RESET”...
- Page 10 6. Acerque el dispositivo a la cámara y presione Siguiente. Nota: Si durante la espera de conexión, la cámara deja de emitir los tonos por un momento y luego los reanuda, o si la conexión es fallida, verifique haber introducido correctamente la contraseña de la red Wi-Fi y que la frecuencia sea de banda 2.4 G.
- Page 11 8. Presione la pantalla para comenzar a visualizar en tiempo real. Diríjase a la sección “Monitoreo” de este manual para conocer las funciones principales de la aplicación. Repita el mismo procedimiento para agregar la segunda cámara.
- Page 12 Configuración alámbrica (con cable de red) » Utilice el convertidor de voltaje para conectar una de las cámaras a un contacto eléctrico. Luego, conéctela a un módem por medio de un cable de red. 1. Ingrese a la aplicación iEye-camera. Después de unos segundos aparecerá el mensaje: Buscar nuevo dispositivo;...
- Page 13 2. Cuando aparezca el número de 3. Introduzca un nombre para la cámara y identificación de la cámara encontrada, la contraseña 123456; presione Guardar. presione + 4. Una vez establecida la conexión, 5. Presione la pantalla para comenzar aparecerá la siguiente leyenda: a visualizar en tiempo real.
- Page 14 MONITOREO Una vez sincronizadas ambas cámaras, podrá verlas en la lista de dispositivos como se muestra en la siguiente imagen. La leyenda En línea indica que la cámara está lista para utilizarse Editar nombre de cámara o borrarla Monitorear (Toque sobre la imagen para comenzar) Menú...
- Page 15 A continuación, podrá monitorear en tiempo real y controlar los movimientos de la cámara. Configuraciones Regresar Programación de posi- ciones (5 posiciones) Pantalla completa Resolución Grabar en la me- moria del teléfono Desactivar audio (Es independiente a la grabación en la Recortar (Toque para tomar tarjeta microSD) una captura de la imagen...
- Page 16 VINCULAR LOS SENSORES Y EL CONTROL REMOTO 1. Ingrese al menú de configuración de la cámara a la que desea agregar sensores. 2. Presione + para seleccionar el tipo de dispositivo (sensor o control remoto). Sensores magnéticos y de movimiento Control remoto...
- Page 17 3. Cuando aparezca el siguiente mensaje, encienda el dispositivo seleccionado. Presio- ne Confirmar en la aplicación, y dispare el dispositivo en repetidas ocasiones hasta que aparezca el mensaje: Adición correcta El sensor agregado se mostrará bajo el tipo de dispositivo agregado 4.
- Page 18 ACTIVAR ALERTAS 1. Ingrese al menú de configuración de la cámara en la que activará las alertas y seleccione Ajuste de alarma. 2. Active o desactive las opciones de su preferencia. Activar notificación en el dispositivo Cuentas a las que la cámara envía la notificación No disponible para México Ajuste de tiempo de alarma sonora...
- Page 19 Si ha activado las notificaciones en el dispositivo móvil, recibirá alertas de acuerdo con la configuración seleccionada...
- Page 20 INSTALACIÓN Cámara...
- Page 21 Sensores magnéticos Opción 1 (con las placas adhesivas) Adhiera el sensor y el elemento magnético sobre las placas. Retire la cubierta protectora de la placa y pegue el detector (A) en el marco de la puerta; repita el proceso para el elemento magnético (B) y colóquelo en la puerta. Asegúrese de que las marcas triangulares coincidan.
- Page 22 Opción 2 (con los tornillos) Retire la tapa del detector y atorníllela Vuelva a ensamblar el detector (A). en el marco de la puerta. Atornille el elemento magnético (B) en la puerta. Asegúrese de que las marcas triangulares coincidan. Recuerde: ¡La distancia entre ambas partes del sensor no debe exceder los 15 mm!
- Page 23 Sensores de movimiento...
- Page 24 La información presentada sirve únicamente como referencia sobre el producto. Debido actualizaciones pueden existir diferencias. Consulte nuestra página web www.steren.com para obtener la versión más reciente de este manual. PRECAUCIONES • Este aparato no se destina para utilizarse por personas (incluyendo niños) cuyas capacidades físicas, sensoriales o mentales sean diferentes o estén reducidas, o...
- Page 25 especificaciones Cámaras Entrada: 5 V - - - 2 A Iluminación mínima: 0,5 lux Compresión de video: H.264 720 p Formato de audio: G.726 Protocolo: TCP/IP Red inalámbrica: 802.11b/g/n Capacidad máxima de tarjeta micro SD: 64 GB (FAT32) Sensores para puerta Alimentación: 1,5 V - - - (1 x AA) Corriente en reposo: <...
- Page 26 1.- Para hacer efectiva la garantía, presente esta póliza, o factura, o comprobante de compra y el producto, en donde fue adquirido o en Electrónica Steren S.A. de C.V. 2.- Electrónica Steren S.A de C.V. se compromete a reparar el producto en caso de estar defectuoso sin ningún cargo al consumidor.
- Page 27 V0.2/1218V Wi-Fi security system User Manual...
- Page 29 INDEX CONTENT ......................29 GENERAL DESCRIPTION................30 BATTERIES PLACEMENT................31 BEFORE TO USE..................32 SETTINGS OPTIONS..................33 Wireless configuration (Wi-Fi)..............33 Wired configuration (with network cable)..........38 MONITORING....................40 PAIRING THE SENSORS AND THE REMOTE CONTROL......42 ACTIVATE ALERTS..................44 INSTALLATION....................46 Magnetic sensors..................47 Motion sensors...................49...
- Page 30 CONTENt Cameras Motion sensors Magnetic sensors Controls...
- Page 31 GENERAL description Antennas Lens Infrarress (nightshot) Alarm by move detection Recording in activated micro SD card Alarm activated Network connection Microphone Reset button Power input RJ45 port Micro SD card slot...
- Page 32 batteries placement Magnetic sensors Slide the cover and insert an “AA” battery into the compartment. Place the cover again. Motion sensors Remove the screw from the sensor to can Take out the brooch connector. Connect remove the cover. a 9V battery and place it inside. Place the cover again.
- Page 33 » Enter to the app store of your smartphone for download and IEye-camera install IEye o iEye-camera app. ZJinChang This app is not Steren’s property, the company is not responsible by their working and updates. » Open the app. Select Quick Register to create an user account.
- Page 34 SETTINGS OPTIONS Before to configure the cameras, verify which is the band of your WiFi network, if is 2.4G you can choose any options of configuration. However, if the frequency is 5G, refear the “Wired configuration”. Wireless configuration (Wi-Fi) Use the AC adapter to connect the camera into an outlet. After a few seconds, the camera will enter in standby mode and will emit tones (beeps) continuously.
- Page 35 1. In your mobile enter to i-Eye* app. Press + The showed pictures corresponding to an 7.0 Android device and iEye-camera (03.24.00.24) app. The icons, the interface configuration and the functions may vary according with the app version and the OS used. 2.
- Page 36 4. Enter the password of the Wi-Fi 5. While the camera still in standby network where your mobile is connected. mode, that is to say, if it is emits tones Press Next. continuously, select this option. If you can’t listen the tones, press the “RESET”...
- Page 37 6. Bring the mobile closer to the camera and press Next. Note: If during the standby connection, the camera not emits the tones by a moment and then restart it, or if the connection is failed, verify what the password that you enter is right and the frequency is 2.4 G.
- Page 38 8. Press the screen to start to visualizing in real time. Go to the “Monitoring” section of this manual to know the main functions of the app. Repeat the same process in the another camera.
- Page 39 Wired configuration (with network cable) » Use the AC adapter to connect the camera into an outlet. Then, connect it into a modem with a network cable. 1. Enter to iEye-camera app. After for a few seconds will appear this message: Search a new device;...
- Page 40 2. When the ID number appears press + 3. Enter a name for the camera and the password 123456; press Save. 4. Once established the connection, will 5. Press the screen to start to visualizing in real time. Go to the “Monitoring” appear the next message: section of this manual to know the main functions of the app.
- Page 41 MONITORing Once synchronized both cameras, you can see it in the device list as shown below. The message OnLine indicates that the camera is ready to using. Edit the camera name or delete it Monitoring (Touch the image to start) Defense activated Settings menu Activate /...
- Page 42 Next, you will monitoring in real time and control the camera movements. Settings Back Programming positions (5 postions) Full screen Resolution Recording in the mobile memory (Its Deactivate audio independent to the recording in the Cut (Touch for take a micro SD card) screenshot) Activate the microphone (press...
- Page 43 pairing the sensors and the remote control 1. Enter the settings menu of the camera to you want add the sensors. 2. Press + to select the device type (sensor or remote control). Magnetic and movement sensors Remote control...
- Page 44 3. When the next message appear, turn on the selected device. Press Confirmed in the app, and shot the device repeatedly until appear the next message: Addition ok The added sensor is will show under the added device type 4. Make the same process to add each sensor.
- Page 45 ACTIVATE ALERTS 1. Enter to settings menu of the camera where you will activate the alerts and selec Alarm settings. 2. Activate or deactivate the options of your preference. Activate notificatin in the mobile Accounts with notifications Disable for Mexico Sound alarm timer Activate/ deactivate sensor Sensitivity adjust...
- Page 46 If you has activated the notifications in your mobile, you will receive alerts according with the selected config...
- Page 47 INSTALlation Camera...
- Page 48 Magnetic sensors Option 1 (with the adhesive plates) Paste the sensor and the magnetic element over the plates. Remove the protector cover from the plate and paste the detector (A) in the door frame; repeat the same process for the magnetic element (B) and place it into the door.
- Page 49 Option 2 (with screws) Remove the cover from the detector Assamble the detector again (A). and screw it in the door frame. Screw the magnetic element (B) in the door. Ensure that the triangle marks match. Remember: The maximum distance between both parts don’t must exceed 15 mm!
- Page 50 Motion sensors...
- Page 51 The info in this manual is shown as reference. Consult our website www.steren.com to obtain the current version of this manual. cautions • The children should be supervised to ensure that don’t use it like a toy.
- Page 52 specifications Cameras Input: 5 V - - - 2 A Minimum light: 0.5 lux Video compression: H.264 720p Audio format: G.726 Protocol: TCP/IP Wireless network: 802.11b/g/n Maximum capacity of micro SD card: 64 GB (FAT32) Door sensor Input: 1.5 V - - - (1 x AA) Stand-by current: <...
- Page 53 3. The repairing time will not exceed 30 natural days, from the day the claim was received. 4. Steren sell parts, components, consumables and accessories to customer, as well as warranty service, at any of the addresses mentioned later. THIS WARRANTY IS VOID IN THE NEXT CASES:...
Need help?
Do you have a question about the CCTV-2100 and is the answer not in the manual?
Questions and answers