Table of Contents
Advertisement
Quick Links
Advertisement
Table of Contents

Related Manuals for Bematech I-3200


Summary of Contents for Bematech I-3200
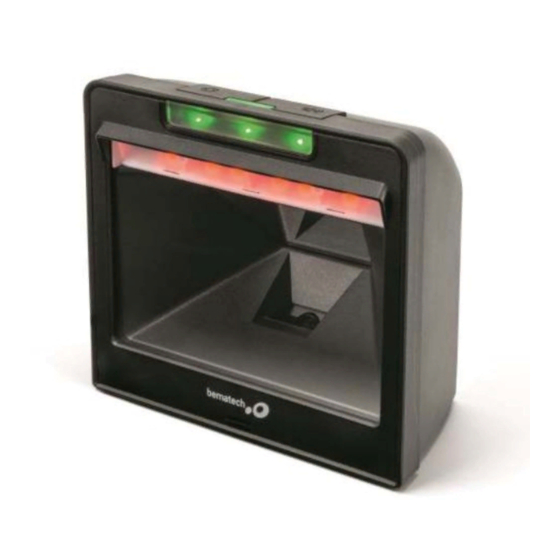
- Page 1 Model: I-3200 USB Interface Tabletop Scanner 1D / 2D USER MANUAL...
- Page 2 NOTICE The manufacturer of the POS pole display makes no representations or warranties, either expressed or implied, by or with respect to anything in this manual, and shall not be liable for any implied warranties of fitness for a particular purpose or for any indirect, special or consequential damages.
- Page 3 ATTENTION: This document contains confidential information regarding this project, not being allowed the copy of this document as well as the spreading to people not authorized by Logic Controls. 1 Revision History Table Doc. Rev Comments Date Revised by V1.0 First Issue 10/31/2019 Peter Li...
-
Page 4: Table Of Contents
Table of Contents TECHNICAL PRESENTATION ................1 ....................1 ACKAGE CONTENT ....................1 RODUCT VERVIEW ....................1 EEPS INDICATION INSTALLATION ....................2 HOW TO MAKE SETTINGS ................................. 3 ETTING ARNINGS ..........3 ETTING CANNER WITH ACTORY EFAULT CODE SETTINGS USED FREQUENTLY ..............4 .................. - Page 5 11.3 (ID) ..................20 DENTIFICATION 11.3.1 M (ID) ..............20 ODIFY DENTIFICATION 11.3.2 S ID ................. 21 ETTING CODES FOR ODIFY 11.3.3 S ..............22 TANDARD DENTIFICATION ODES 11.4 RF M ) ..............23 ESSAGE NCORRECT CANNING 11.4.1 M RF M ) ..........
-
Page 6: Technical Presentation
This product is a desktop barcode scanner that scans 1D and 2D codes. With its high read speed and code recognition, the I-3200 is ideal for your business. Note: The scanner comes with the American keyboard as the factory default. Use Settings section to change to other keyboard standards. -
Page 7: Installation
Installation To install the product, first remove the bottom cover by squeezing and pulling it out, and then insert the RJ45 plug of the USB cable. And plug the cable into a host or computer through a USB port (two USB-A plugs must be used to make the scanner work correctly). -
Page 8: How To Make Settings
How to make settings Setting Warnings Scanning any barcodes in this manual may affect the setting and programming of the scanner. Each barcode specified below is for its application to match the end user's needs. All settings made on the scanner are saved in nonvolatile memory and are retained even after the scanner is turned off. -
Page 9: Settings Used Frequently
Settings Used Frequently The settings will only be deleted if the “Reset to Factory Default” code is scanned. You may need to hide the codes adjacent to the code you choose so that they will not be scanned. The factory default settings are with the gray background. Get version Set to Factory Default Scanning Setting codes... -
Page 10: Setting Keyboard Language
Setting Keyboard Language English (USA) Brazilian Portuguese (ABNT2) French German Hungarian Italian Japanese Spanish... -
Page 11: Message Terminators
Message Terminators Enter <CRLF> None Enter <CR>... -
Page 12: Communication Interface And Usb Mode Time
7 Communication interface and USB mode time USB PC keyboard Virtual USB PC USB mode time 1 ms 3 ms 5 ms 10 ms... -
Page 13: Interval Time And Other Settings
Interval time and other settings Interval between scanning same code To prevent the same barcode from being read several times in a row, an interval time for scanning the same bar code can be set. Interval between same codes Remove 8.1.1 Interval time Infinity Interval (will not scan the same code twice in a row) -
Page 14: Standby Mode
Standby mode When the standby mode disabled, the scanner will never have its LEDs off. Standby Mode Enable Disable 8.2.1 Adjust time to enter standby mode 30 seconds 1 minute 5 minutes 15 minutes... -
Page 15: Inverted Bar Code
Inverted Bar Code In some special situations, bar's black and white detection can be reversed so that inverted barcodes are recognized. Note: When activating the scanning of inverted codes, common codes will not be scanned until it is deactivated. Scan inverted codes Enable Disable FEBRABAN... -
Page 16: Beep Settings
Beep Settings Good scanning beep good scanning beep Turn on Turn off Good scanning beep length Very short Short Medium Long... -
Page 17: Barcode Settings
10 Barcode Settings In order to set your scanner to specific defaults, scanning the codes below as needed. These setting codes can be used to enable or disable scanning all supported barcode types. After disable scanning all bar code types, only scanning setting codes is allowed. All barcodes Enable Disable... - Page 18 Conversion UPC-E to EAN13 Enable Disable Conversion UPC-E to UPC-A Enable Disable UPC-E - Transmits first “0” character Enable Disable Conversion EAN to ISBN Enable Disable EAN - Excludes first 3 digits of the scanned codes Enable Disable Code 128 Enable Disable...
- Page 19 Code 39 Enable Disable Code 93 Enable Disable Codebar Enable Disable Code QR Enable Disable ITF 2 of 5 Enable Disable Industrial 2 of 5 Enable Disable...
- Page 20 Matrix 2 of 5 Enable Disable Code 11 Enable Disable Enable Disable Transmits check digit Enable Disable GS1 - Databar Enable Disable Enable Disable...
- Page 21 PDF417 Enable Disable Code 32 Enable Disable Aztec Enable Disable Han Xin Enable Disable Micro PDF Enable Disable Tri-Optic Enable Disable...
- Page 22 Codeblock_F Enable Disable Telepen Enable Disable MaxiCode Enable Disable...
-
Page 23: Data Editing
11 Data Editing In practical applications, it is sometimes useful to edit the data scanned before sending it to the computer to facilitate data differentiation and processing. This data edition includes: • Prefix • Suffix • Identification Code (ID) • RF message (Incorrect reading) The default output order of the processed data is as follows: [Prefix] [Identification Code] [Code Data] [Suffix] [Tail] 11.1 Prefix... -
Page 24: Suffix
c) Scan the "Modify Prefix" setting code. d) Scan the data definition code "4", "4", "4", "1", "5", "4", "4", "1" from Appendix C. e) Scan the "Save" setting code at the end of Appendix D. 11.2 Suffix The suffix is a user-customized string to be presented after the code scanned. You can add scanned setting code “Add suffix”. -
Page 25: Identification Code (Id)
11.3 Identification Code (ID) Users can use identification code (ID) to identify different types of barcodes. The character table can be found in Appendix A. However, the user can modify the character ID (ID) corresponding to each type of barcode. Active ID code Inactive ID code 11.3.1... -
Page 26: Setting Codes For Modify Id
11.3.2 Setting codes for “Modify ID” From EAN-13 From EAN-8 From UPC-A From UPC-E0 From UPC-E1 From Code 128 From Code 39 From Code 93 From Codabar From ITF 2 of 5 From Industrial 2 of 5 From Matrix 2 of 5... -
Page 27: Standard Identification Codes
From Code 11 From MSI From MSI-Send check digit From RSS From extended RSS From Code QR Data Matrix From PDF417 11.3.3 Standard Identification Codes Scan the following code so that the ID code values return to the factory default found in Appendix A. -
Page 28: Rf Message (Incorrect Scanning)
11.4 RF Message (Incorrect Scanning) The RF (Incorrect scanning) message is user-defined information that the scanner sends when the scanning is unsuccessful. Send RF Message Not send RF Message 11.4.1 Modify RF Message (Incorrect scanning) Scan the "Modify RF Message" setting code to change the incorrect scanning message. The user can modify the RF information content, it can be up to 15 characters. -
Page 29: Scanner Maintenance
12 Scanner Maintenance The scanner is designed for long term flawless operation and rarely requires any maintenance. An occasional cleaning of the scanning window is enough to remove any dirt or fingerprints. When cleaning the scanning window, wipe it with a soft cloth and a non-abrasive cleaner to avoid scratching and damaging the window. -
Page 30: Problem Solving
13 Problem Solving Before calling our Customer Service (SAC) or technical support, please refer to the troubleshooting table and check if it can be resolved by yourself, otherwise contact the SAC at 01 516 248 0400 or one of our Authorized Service Centers. Problem Possible cause Procedure... -
Page 31: Product Specifications
14 Product Specifications Specification Description Operational Light source 650nm LED Lighting Scanning Depth 0 - 60 mm (Code 39.5 mil), 0 - 200 mm (QR Code, 15 mil) Scan Rate 2500 scans per second Color Product color: Black and Graphite Cable color: Black Minimum bar width 0.13 mm (PCS = 90%) -
Page 32: Appendix A: Identification Code (Id)
Appendix A: Identification Code (ID) Code Type Matching character EAN-13 EAN-8 UPC-A UPC-E0 UPC-E1 Code 128 Code 39 Code 93 Codabar Interleaved 2 of 5 Industrial 2 of 5 Matrix 2 of 5 Code 11 MSI-Plessey GS1 Databar(RSS-14) GS1 Databar Limited (RSS) GS1 Databar Expanded (RSS) QR Code Data Matrix... -
Page 33: Appendix B: Ascii Table
Appendix B: ASCII Table Hexadecimal Decimal Character " &... - Page 34 Hexadecimal Decimal Character < >...
- Page 35 Hexadecimal Decimal Character...
-
Page 36: Appendix C: Alphanumeric Codes
Appendix C: Alphanumeric Codes 0 ~ 9 A ~ F... -
Page 38: Appendix D: Save Or Cancel
Appendix D: Save or Cancel After scanning the data code, scan the "Save" setting code to save the scanned data. If you make a mistake while scanning the data code, you can cancel the setting. Save In the case of a setting, it is also possible to cancel the last hexadecimal scanned. For example, hexadecimal “A”, “B”, “C”...
Need help?
Do you have a question about the I-3200 and is the answer not in the manual?
Questions and answers