Table of Contents

Related Manuals for Miele KFN 15842 D ed/cs


Summary of Contents for Miele KFN 15842 D ed/cs
- Page 1 Operating and installation instructions Fridge-freezer To prevent the risk of accidents or damage to the appliance, it is essential to read these instructions before it is installed and used for the first time. en - AU, NZ M.-Nr. 10 738 440...
-
Page 2: Table Of Contents
Contents Warning and Safety instructions................ 5 Caring for the environment ................ 13 How to save energy..................... 14 Guide to the appliance .................. 16 Control panel ......................16 Display LEDs and symbols in the display ............. 17 Accessories ...................... 19 Accessories supplied .................... 19 Optional accessories..................... - Page 3 Contents Switching the safety lock on/off ................34 Using the refrigerator efficiently ................ 35 Different storage zones ..................35 Food which is not suitable for storage in the refrigerator section ......36 What to be aware of when shopping for food............36 Storing food correctly....................
- Page 4 Contents Installation...................... 64 Side-by-side installation..................64 Location......................... 64 Climate range .................... 65 Ventilation ......................65 Door opening angle limiter ..................65 Fitting the supplied wall spacers................66 Installation ......................66 Aligning the appliance .................. 67 Installing the appliance in existing kitchen units ........... 68 Appliance dimensions ...................
-
Page 5: Warning And Safety Instructions
The appliance is not suitable for use in areas where there is a risk of explosion. Miele cannot be held liable for damage resulting from improper or incorrect use of the appliance. - Page 6 Warning and Safety instructions This appliance is not intended for use by persons (including children) with reduced physical, sensory or mental capabilities, or lack of experience and knowledge, unless they have been given supervision or instruction concerning its use by a person responsible for their safety, and are able to recognise the dangers of misuse.
- Page 7 – disconnect the appliance from the mains electricity supply, – ventilate the room where the appliance is located for several minutes, and – call Miele. The more coolant there is in a refrigeration appliance, the larger the room should be in which it is installed. In the event of a leakage, if the appliance is in a small room, there is a danger of combustible gases building up.
- Page 8 Repairs and other work by unqualified persons could be dangerous. Installation, maintenance work and repairs to electrical appliances must only be carried out by a Miele approved service technician.
- Page 9 The manufacturer's warranty will be invalidated if the appliance is not repaired by a Miele approved service technician. Faulty components must only be replaced by genuine Miele spare parts. The manufacturer can only guarantee the safety of the appliance when Miele replacement parts are used.
- Page 10 Follow the instructions given on the food manufacturer's packaging regarding storage conditions and use-by dates. Use only genuine original Miele spare parts. If spare parts or accessories from other manufacturers are used, the warranty will be invalidated, and Miele cannot accept liability.
- Page 11 Warning and Safety instructions The surface is susceptible to scratching. Even magnets can cause scratches. Cleaning and care Do not use any oils or grease on the door seals, as these will cause the seals to deteriorate and become porous with time. ...
- Page 12 Warning and Safety instructions Splashes of coolant can damage the eyes. Be careful not to damage any part of the pipework whilst awaiting disposal, e.g. by – puncturing the refrigerant channels in the condenser, – bending any pipework, or –...
-
Page 13: Caring For The Environment
Please dispose of it at your local community waste collection / recycling centre for electrical and electronic appliances, or contact Miele. You are also responsible for deleting any personal data that may be stored on the appliance being disposed of. -
Page 14: How To Save Energy
How to save energy Normal energy Increased energy consumption consumption Installation/ In a ventilated room. In an enclosed, unventilated Maintenance room. Protected from direct In direct sunlight. sunlight. Not situated near a heat Situated near a heat source source (radiator, oven). (radiator, oven). - Page 15 How to save energy Normal energy Increased energy consumption consumption Operation Drawers and shelves arranged as they were when the appliance was delivered. Only open the door when Frequent opening of the necessary and for as short a door for long periods will time as possible.
-
Page 16: Guide To The Appliance
Guide to the appliance Control panel f Display LEDs (see "Display LEDs" ta- Sensors for the refrigerator section settings area ble for explanation) a For switching the DynaCool function g Display with temperatures and on and off symbols (symbols only visible during use;... -
Page 17: Display Leds And Symbols In The Display
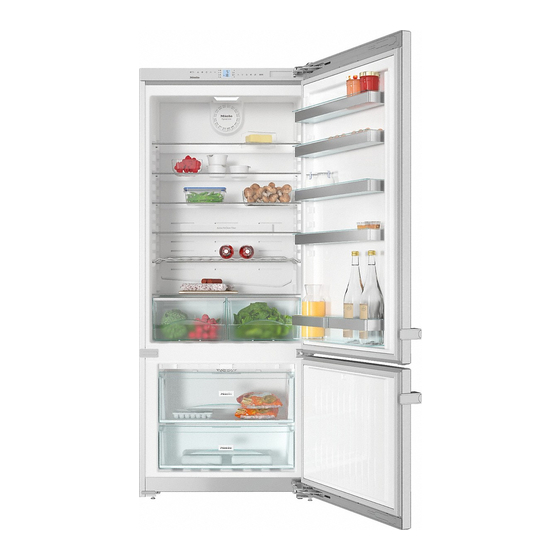
Guide to the appliance Display LEDs and symbols in the display Display LED Meaning SuperCool (on the left)/ Function can be selected depending on SuperFrost (on the right) section (see "Using SuperCool, SuperFreeze and DynaCool"). Power cut flashes in the event of a power cut ... - Page 18 Guide to the appliance a Control panel with display b Interior lighting c Fan d Bottle rack e Egg tray/door shelf f Holder with active charcoal filter (Active AirClean) g Adjustable shelf h Fruit and vegetable drawers i Bottle shelf with bottle holder j NoFrost module k Freezer drawers For easier installation there are...
-
Page 19: Accessories
Accessories Bottle holder Accessories supplied Egg tray Butter dish Attach the bottle holder to the front edge of the bottle shelf. The bottle holder can be moved to the Bottle rack left or right. This way the bottles will be more secure when the door is opened and closed. -
Page 20: Optional Accessories
Accessories Ice cube tray Optional accessories A range of useful Miele accessories and care products are available for your appliance. Care of stainless steel Each application of the Miele Care product for stainless steel (in the Cool pack bottle) forms a durable protective film that is stain and water resistant. - Page 21 The charcoal filter holder clips onto the protective strip at the back of the shelf and can be moved as necessary. Accessories are available to order via the Miele online shop or from Miele directly (see back cover for contact details).
-
Page 22: Before Using For The First Time
Removing packaging material instructions in "Cleaning and care". Remove all packaging material from the inside of the appliance. Important: Each time the Miele Care product for stainless steel is used, it Protective foil forms a protective film against dirt and The stainless steel strips of the shelves water. -
Page 23: Switching On And Off
Switching on and off The temperature display for the Operating the appliance refrigerator section shows the current A light touch of the finger on the temperature in the refrigerator section. sensors is all that is required to operate – If the temperature in the freezer this appliance. -
Page 24: Switching The Appliance Off
Switching on and off Switching the refrigerator section on Switching the appliance off separately (if previously switched off) Touch the right-hand On/Off To switch the refrigerator section on, sensor until all of the indicators go press the left-hand On/Off sensor out. -
Page 25: The Correct Temperature
The correct temperature It is very important to set the correct . . . in the refrigerator section temperature for storing food in the We recommend a temperature of 4 °C appliance. Micro-organisms will cause in the refrigerator section. food which is not stored at the correct temperature to deteriorate rapidly. -
Page 26: Temperature Display
The correct temperature Temperature display Setting the temperature Use the two and sensors of the In normal operation the upper relevant section to set the temperature display shows the temperature higher or lower. average, current temperature in the refrigerator section and the lower The following information appears in the temperature display shows the display when the sensors are touched:... -
Page 27: Temperature Range
The correct temperature Temperature range – The temperature in the refrigerator section can be set from 2 °C to 7 °C. – The temperature in the freezer section can be set from -14 °C and -26 °C. Useful tip: If you have adjusted the temperature, wait for approx. -
Page 28: Using Supercool, Superfreeze And Dynacool
Using SuperCool, SuperFreeze and DynaCool The following functions are available Useful tip: To save energy, you can depending on the section: manually switch off the SuperFreeze function once the freezer reaches a – Refrigerator section constant temperature of -18 °C or SuperCool ... -
Page 29: Dynacool Function
Using SuperCool, SuperFreeze and DynaCool DynaCool function Switching a function on or off Touch the sensor for the function you When the dynamic cooling function (DynaCool) is not switched on, the want. natural circulation of air will cause – The display LED next to the different temperature zones in the corresponding symbol will light up refrigerator as the cold, heavy air will... -
Page 30: Temperature And Door Alarm
Temperature and door alarm The appliance has been fitted with a If the temperature in the freezer warning system which ensures that the remains above -18 °C for a long temperature in the freezer section time, check that the frozen food has cannot rise unnoticed and to avoid not started to defrost. -
Page 31: Further Settings
Further settings Settings overview Further settings In Settings mode you can adjust certain Switching Sabbath mode on/off settings and select functions, allowing Setting the display brightness you to customise the appliance to suit your requirements. Changing the temperature unit (°C/°F) See the following pages for more information on these settings. - Page 32 Further settings Switching Sabbath mode on/off Danger of food poisoning! Touch the SuperFreeze sensor to Any power cut during Sabbath mode the right-hand side of the display for is not shown in the display. After a approx. 5 seconds. power cut, the appliance restarts in Sabbath mode.
-
Page 33: Changing The Temperature Unit (°C/°F)
Further settings Setting the display brightness Changing the temperature unit (°C/°F) You can adjust the brightness of the display to suit the light conditions in the The temperature can be displayed in room. either Fahrenheit (°F) or Celsius (°C). The display brightness can be adjusted ... -
Page 34: Switching The Safety Lock On/Off
Further settings Switching the safety lock on/ The safety lock can be activated to prevent the appliance from being switched off by mistake. Touch the SuperFreeze sensor to the right-hand side of the display for approx. 5 seconds. MENU lights up in the display and flashes. -
Page 35: Using The Refrigerator Efficiently
Using the refrigerator efficiently This appliance has dynamic cooling, Danger of explosion! which helps to keep an even Do not store explosive materials in temperature when the fan is running. the appliance or any products When DynaCool is switched on, the containing flammable propellants difference between the various zones (e.g. -
Page 36: Food Which Is Not Suitable For Storage In The Refrigerator Section
Using the refrigerator efficiently Food which is not suitable for Storing food correctly storage in the refrigerator Ensure that food stored in the section refrigerator section is in packaging or covered properly. This will prevent Not all food is suitable for refrigeration food smells from affecting other foods, at temperatures below 5 °C because it food from drying out, and also any... -
Page 37: Adjusting The Interior Fittings (Refrigerator Section)
Adjusting the interior fittings (refrigerator section) Moving the adjustable shelves Adjusting the bottle rack The shelves can be adjusted according to the height of the food. The bottle rack can be placed on different levels in the appliance. Raise the rack and pull it forwards slightly until the notch at the side is in ... -
Page 38: Removing The Fruit And Vegetable Drawers
Adjusting the interior fittings (refrigerator section) Removing the fruit and vegetable drawers The fruit and vegetable drawers sit on rollers and can be fully pulled out for loading and unloading. Some stainless steel frames are easier to remove and replace when you take hold of them together with the bar at the back and remove by pulling upward. -
Page 39: Adjusting The Bottle Holder
Adjusting the interior fittings (refrigerator section) Adjusting the bottle holder Moving the charcoal filters The bottle holder can be moved to the When you are storing very strong left or right. This way the bottles will be smelling food (e.g. very ripe cheese): more secure when the door is opened –... -
Page 40: Freezing And Storing Food
Freezing and storing food Freezing fresh food Storing frozen food Fresh food should be frozen as quickly When buying frozen food to store in as possible. This way the nutritional your freezer section, check value of the food, its vitamin content, –... -
Page 41: Home Freezing
Freezing and storing food – Allow hot foods and drinks to cool Home freezing down before placing them in the Only freeze food which is fresh and freezer. Placing hot foods or drinks in in good condition. the freezer causes food that is already frozen to partially thaw and Tips on home freezing increases energy consumption. - Page 42 Freezing and storing food Before placing food in the freezer - Freezing the maximum amount of food When freezing more than 2 kg of fresh food, switch on the SuperFreeze Ensure that the ventilation slots at function for some time before placing the back of the freezer section are the food in the freezer (see "Using always free from obstruction.
- Page 43 Freezing and storing food Storage time for frozen food Defrosting The storage life of food is very variable, Frozen food can be defrosted in even at a constant temperature of different ways: -18 °C. Decomposition processes also – in a microwave oven, take place in frozen food, albeit at a very reduced speed.
-
Page 44: Adjusting The Interior Fittings
Freezing and storing food Cooling drinks quickly Using accessories To cool drinks quickly, place them in the Cool pack refrigerator section and switch on the The cool pack prevents the temperature SuperCool function. in the freezer section from rising too When chilling drinks in the freezer quickly in the event of a power cut. - Page 45 Freezing and storing food Making ice cubes Fill the ice cube tray three quarters full of water and place it on the bottom of one of the freezer drawers. Once frozen, use a blunt instrument, for example a spoon handle, to remove the ice tray from the freezer if it is stuck.
-
Page 46: Defrosting
Defrosting Refrigerator section Freezer section The refrigerator section defrosts The appliance is equipped with a automatically. "NoFrost" system. The freezer defrosts automatically. Condensate and frost can build up on the back wall of the refrigerator section The moisture generated by defrosting while the compressor is running. -
Page 47: Cleaning Agents
Cleaning water must not get into the To clean the stainless steel surfaces drain hole. on the appliance we recommend using the original Miele Care product The data plate located inside the for stainless steel (see "Optional appliance must not be removed. It accessories"). -
Page 48: Cleaning And Care
Cleaning and care Dismantling an adjustable shelf Preparing the appliance for cleaning Before cleaning the adjustable shelves, remove the white protective strip at the Switch the appliance off. back. Proceed as follows: appears in the display and cooling is ... -
Page 49: Cleaning The Interior And Accessories
Miele Care product for stainless steel. – the protective strips at the back of the adjustable shelves Useful tip: The Miele Care product for stainless steel is also recommended for – all drawers and drawer lids (supplied maintenance, as it will protect the... -
Page 50: Cleaning The Front Of The Appliance And The Side Panels
They will damage the coating. Therefore it is best to remove soiling from the appliance doors and side Do not use the Miele Care product panels immediately. for stainless steel on these surfaces. It will cause noticeable All surfaces are susceptible to smearing. -
Page 51: Cleaning The Door Seals
Cleaning and care Cleaning the door seals Starting up the appliance after cleaning If a door seal is damaged or if it Refit all shelves and accessories in has come out of the groove, the door the appliance. will not close properly and cooling performance will be reduced. -
Page 52: Replacing The Charcoal Filters
Replacing the charcoal filters Replace the charcoal filters in the holder every 6 months. Replacement KKF-RF charcoal filters are available from Miele or via the internet at shop.miele.com. Useful tip: The holder for the charcoal Remove both charcoal filters and filters is dishwasher-safe. -
Page 53: Problem Solving Guide
With the help of the following guide, minor faults in the performance of the appliance, some of which may result from incorrect operation, can be remedied without contacting Miele. This will save you time and money because you won't need a service call. - Page 54 Problem solving guide Problem Possible cause and remedy The doors have been opened too frequently, or a large amount of fresh food has been put in at once for refrigerating or freezing. Only open the doors when necessary and for as short a time as possible.
- Page 55 The door seal is No tools are required to change the door seal. damaged and needs to Replace the door seal. It is available from Miele. be replaced. Ice or condensation has The door seal has come out of its groove.
- Page 56 Do not activate this setting the machine controls for domestic use. are working. Call Miele. The temperature display Sabbath mode is switched on: The interior lighting is is dark and is shown switched off but the appliance is cooling.
- Page 57 Problem solving guide Message Possible cause and remedy The display LED is lit The temperature alarm has been activated (see up and an alarm is "Temperature and door alarm"). The temperature in sounding. the freezer section has risen higher or fallen lower than the temperature set.
- Page 58 F0 to F9 appears in the There is a fault. display. Call Miele. There is an appliance fault: This display will override any settings which have just been selected. An appliance fault has priority over any current door...
- Page 59 Danger of electric shock! There are live electrical components under the lighting cover. The LED lighting must only be repaired or replaced by a Miele authorised service technician. Danger of injury from LED lighting! Light intensity corresponds to laser beam class 1/1M.
- Page 60 Problem solving guide Other problems Problem Possible cause and remedy Food has frozen The food packaging was not dry when loaded in the together. freezer. Use a blunt instrument, e.g. a spoon handle or plastic scraper, to prise it apart carefully. The external walls of This is not a fault.
-
Page 61: Noises
Noises Normal What causes them noises Brrrrr ... A humming noise is made by the motor (compressor). This noise can get louder for brief periods when the motor switches on. Blubb, A gurgling noise can be heard when coolant is circulating blubb ... -
Page 62: After Sales Service
Contact in case of fault In the event of any faults which you cannot remedy yourself, please contact Miele. Contact information for Miele can be found at the end of this document. Please quote the model and serial number of your appliance when contacting Miele. -
Page 63: Electrical Connection
Electrical connection The appliance is supplied with a mains Do not connect the appliance to the cable and moulded plug ready for mains electricity supply by an extension connection to an AC single phase 220 – lead. Extension leads do not guarantee 240 V 50 Hz supply. -
Page 64: Installation
Please contact Miele for information on appliance is installed in accordance which combinations are suitable for with these instructions. -
Page 65: Climate Range
Climate range Ambient room temperature The door opening angle limiter is available from Miele. +10 to +32 °C +16 to +32 °C +16 to +38 °C +16 to +43 °C Operating in a room which is too cold... -
Page 66: Fitting The Supplied Wall Spacers
Installation Fitting the supplied wall Installation spacers Two people are required for installing the appliance. The wall spacers supplied must be used in order to achieve the stated energy consumption values and to The appliance must be empty to prevent the build-up of condensation be installed. -
Page 67: Aligning The Appliance
Installation Aligning the appliance Supporting the appliance door To align the appliance, adjust the front feet using the spanner supplied. Ensure that you unscrew the adjustable foot from the lower hinge plate until it sits on the floor. Then unscrew the foot by a further ¼ turn. -
Page 68: Installing The Appliance In Existing Kitchen Units
Installation Installing the appliance in * The appliance depth is increased by existing kitchen units approx. 35 mm for appliances with wall spacers fitted. If the required ventilation gaps The appliance can be built into a run of are not adhered to the compressor kitchen units and installed directly next will switch on more often and run for to a kitchen furniture housing unit. -
Page 69: Appliance Dimensions
Installation Appliance dimensions * Dimensions without wall spacers fitted. Appliance depth is increased by 35 mm with the wall spacers supplied fitted. - Page 70 Installation * Dimensions without wall spacers fitted. Appliance depth is increased by 35 mm with the wall spacers supplied fitted. [mm] [mm] [mm] KFN 15842 D edt/cs 1840 1852 1860 KFN 15943 D edt/cs 2000 2012 2020...
-
Page 71: Changing The Door Hinging
Changing the door hinging The appliance is supplied with right- Removing the door handles hand hinging. If left-hand hinging is required, the hinges must be changed. Always change the door hinging with the assistance of another person. If a door seal is damaged the door will not close properly and cooling performance will be reduced. - Page 72 Changing the door hinging Removing the upper soft-close mechanism Open the upper appliance door. If a door seal is damaged the door will not close properly and cooling performance will be reduced. Condensate will build up in the interior and this can cause a build-up of ice.
- Page 73 Changing the door hinging Push the pin up and out from Push the soft-close mechanism below using a flat-headed bracket as far as it will go toward screwdriver. the handle side. Remove the cover . Loosen the screw in the soft-close mechanism and spacer.
- Page 74 Changing the door hinging Removing the upper door Danger of injury when removing the upper door! As soon as the hinge pin is located in the upper door rather than in the middle hinge plate, the lower door is not secured and could fall off.
- Page 75 Changing the door hinging Removing the lower soft-close mechanism: Open the lower door. If a door seal is damaged the door will not close properly and cooling performance will be reduced. Condensate will build up in the interior and this can cause a build-up of ice.
- Page 76 Changing the door hinging With the help of another person, tip the appliance back slightly. Push the soft-close mechanism bracket as far as it will go toward the handle side. Push the pin up and out from ...
- Page 77 Changing the door hinging Removing the lower door Close the lower door. Danger of injury when removing the lower door! As soon as the hinge pin is removed from the lower door, the door will no longer be secured. The door must be held by a second person.
- Page 78 Changing the door hinging Reinsert the hinge pin complete Refitting the lower door with washer and adjustable foot . Important: The lug on the hinge pin must point to the back again. Place the lower door on the hinge pin ...
- Page 79 Changing the door hinging Replacing the lower soft-close mechanism Use the screw to secure the spacer and the soft-close mechanism in place. Remove the cover from the panel , turn it 180°, and reinsert it on the other side. ...
- Page 80 Changing the door hinging Refitting the upper door Fit the upper door onto the hinge pin in the middle of the appliance. Close the upper door. Replace the panel onto the soft- close mechanism from above, clicking it back into place first at the bottom and then at the top.
- Page 81 Changing the door hinging Replacing the upper soft-close mechanism Use the screw to secure the spacer and the soft-close mechanism in place. Remove the cover from the panel , turn it 180°, and reinsert it on the other side. ...
- Page 82 Changing the door hinging Refitting the handle Risk of damage! If the handle is fitted incorrectly, the door seal might get damaged. Please make sure you follow the instructions below carefully when you refit the handle. Replace the panel onto the soft- close mechanism from above, clicking it back into place first at the bottom and then at the top.
-
Page 83: Aligning The Appliance Doors
Aligning the appliance doors The appliance doors can be aligned To align the upper door, use the outer with the appliance housing after they slots in the middle hinge plate: have been fitted. In the following illustration the door is not shown in the closed position to make it easier to see what you have to To align the lower door use the long... - Page 87 Miele Experience Centre South Melbourne: Freemans Bay, Auckland 1011 206-210 Coventry Street South Melbourne, VIC 3205 Miele Experience Centre Auckland: Miele Experience Centre and Office Sydney: 8 College Hill 3 Skyline Place Freemans Bay, Auckland 1011 Frenchs Forest, NSW 2086 Telephone:...
- Page 88 KFN 15842 D ed/cs, KFN 15943 D ed/cs en - AU, NZ M.-Nr. 10 738 440 / 00...
Need help?
Do you have a question about the KFN 15842 D ed/cs and is the answer not in the manual?
Questions and answers