Advertisement
Quick Links
1.
Take the leg frame with the handlebar (Part A), and lay it flat on the ground.
2.
Determine which direction you want the seat to face in your bathtub. The leg
frame with the handlebar (Part A) will be the side that goes inside the bathtub.
3.
There are two sliding rails (Part C): one rail has 4 brass push buttons (front rail),
and the other rail has 2 brass push buttons (rear rail).
4.
If you prefer to sit facing left (if looking at the tub from
outside), take the rail with 4 push buttons (front rail), and
insert it into tube X (or insert it into tube Y if you want to sit
facing right). The push buttons should be facing outwards.
(NOTE: the smaller push buttons are for the sliding rail
locking mechanisms). Make sure the larger button snaps
firmly into the leg frame.
5.
Insert the other sliding rail (rear) into the other side
of the leg frame (Part A), making sure the button snaps
firmly into place.
6.
8.
10.
Y
X
11.
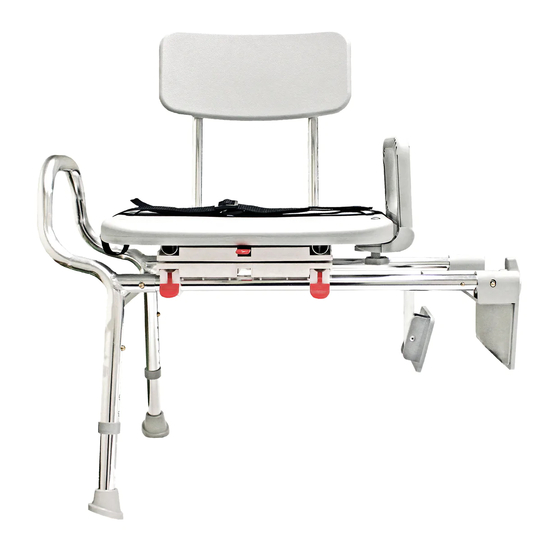
Take the seat with the attached
sliding rings (Part D), and align
the sliding rings with the rails,
so that the locking side of the seat
(the side with the red tabs) is on
the same rail as
the 4 brass
push buttons
(front rail).
Insert both
sliding rails into
the sliding rings
under the seat.
Push in the
push buttons
to slide the
seat easily onto
the rails.
Take the 2 legs (Part E), and insert
them into the leg frames (Part A).
Set the bench height by using
the same button-hole location for
each leg. Make sure the buttons
snap firmly into place. For your
safety, adjust the rubber tips on
the legs by turning them outward
for maximum floor contact.
Set the bench into your bathtub, placing
the leg frame with the handlebar inside
the bathtub and the tub clamp on
the bathtub side-wall. Attach the tub
clamp to the bathtub side-wall and
securely fasten the tub clamp to
the side-wall using the turn-knob.
Make sure the sliding rails and seat are
level by adjusting the legs (using the
same button-hole location for each leg).
7.
Take the tub clamp (Part B), and
insert the sliding rails into it. Make
sure the brass buttons snap firmly
into place.
9.
Take the backrest (Part F), and press
the two brass push buttons on
the frame of the backrest. Insert
the backrest into the tubes
underneath the seat, and push it in
until
the brass
push
buttons
snap
firmly
into
place.
Advertisement

Related Manuals for Eagle Health Supplies 77761

Summary of Contents for Eagle Health Supplies 77761
- Page 1 Take the seat with the attached Take the tub clamp (Part B), and sliding rings (Part D), and align insert the sliding rails into it. Make the sliding rings with the rails, sure the brass buttons snap firmly so that the locking side of the seat into place.
- Page 2 Thank you for purchasing an Eagle Health Supplies product! Helpful instructional assembly videos available at www.EagleHealth.com. If any push button/pin does not completely snap into place while assembling, or if you feel the bench is not secure, please do not use the bench, and notify your Authorized Dealer immediately.
Need help?
Do you have a question about the 77761 and is the answer not in the manual?
Questions and answers