
Subscribe to Our Youtube Channel
Related Manuals for Weems & Plath 4002

Summary of Contents for Weems & Plath 4002
- Page 1 & eather nstruments Electronic Marine Barometer Two (2) Year Warranty #4002...
-
Page 2: Table Of Contents
Instruction Manual Weems & Plath Company Story............1 Getting Started..................2 Box Contents................ 2 Care Instructions..............2-3 Technical Specifications............3 Operating Instructions..............4 Power Methods..............4 Navigation Button Overview..........5 Initial Setup................6 Language Settings............6-7 Time & Date Settings..........7 Measurement Units............7 Pressure............7 Altitude............7-8 Temperature...........8 Upper Screen Icon Description..........8-9 Lower Screen Description.............9 Advanced Functions Configuration........10 Mode Button.............10... -
Page 3: Weems & Plath Company Story
WEEMS & PLATH COMPANY STORY In May of 1919, eight years before Lindbergh’s famous solo flight, three small planes set out from Naval Air Station Rockaway, NY headed for Plymouth, England in an attempt to make the first trans-Atlantic flight. Only one of them made it. -
Page 4: Getting Started
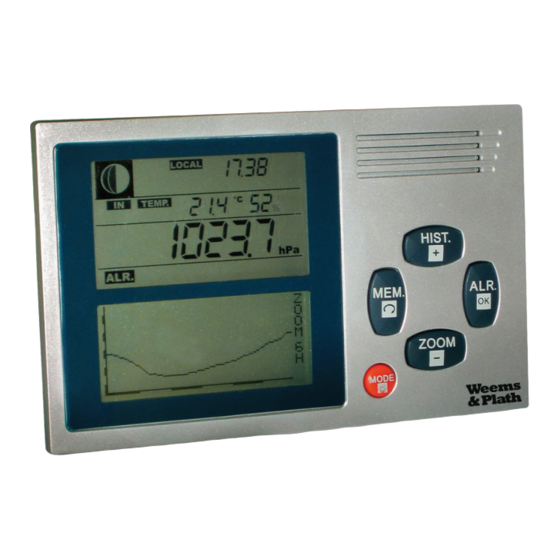
GETTING STARTED Thank you for purchasing the Electronic Marine Barometer #4002. This instrument is designed specifically for the mariner. It is a professional quality air pressure detector that not only shows current pressure on the large display, but also displays historical information on an expanded scale giving the viewer the capability to see pressure changes that have occurred over the last 48 hours in 30 minute increments. -
Page 5: Technical Specifications
• Avoid sudden temperature changes. Use and keep your electronic barometer at normal temperatures (between 14°F and +122°F). Rapid temperature changes (which can occur when you enter or exit a heated area on a cold day), may result in the creation of condensation inside the device. -
Page 6: Operating Instructions
OPERATING INSTRUCTIONS Ports: 1. Top - Speaker out Non functioning 2. Mini USB - For power only 3. DC 12V 0.3A External Power 4. ON/OFF Switch POWER METHODS There are three ways to power the Electronic Barometer. 1. Mini USB Connection - for power only 2. -
Page 7: Navigation Button Overview
NAVIGATION BUTTON OVERVIEW MODE (orange) Button Backlighting – one brief touch of any button Hour - hold 1 second Alarm – hold 1 sec Timer – hold 1 sec Buzzer – hold 1 sec Set – re-entry to initial unit setup MEM (Return)Button Used for data entry into system’s memory Return or step backwards... -
Page 8: Initial Setup
INITIAL SETUP Upper LCD screen Navigation buttons ON/OFF Switch Lower LCD screen 1.Loosen 2 screws on back and remove mounting bracket to expose battery compartment. 2. Remove battery compartment cover and install the 4 provided AA batteries (as indicated in housing cutouts.) Replace battery cover. 3. -
Page 9: Time & Date Settings
Time and Date Settings: The arrow is now blinking at “hour.” Press “OK”. You will see the choice of setting time for “am/pm” or “24h.” Pick the time method you prefer by using the “+” or “–” buttons. Then press “OK” when the arrow cursor is pointing at the correct choice. -
Page 10: Temperature
NOTE: An easy way to find your altitude is to search Google Earth on the internet. Type your address and put cursor on your location, read the elevation in the status bar at the bottom of the page. Temperature: Select C (Celsius) or F (Fahrenheit) with the “+” and “-” button. Press “OK.” Select Pressure: The pressure value can be displayed either in actual adjusted pressure or in pressure at sea level. -
Page 11: Lower Screen Description
Local or Dual icon – When Local icon is displayed, the screen shifts back and forth between time and date every few seconds. The Dual Icon is displayed when you have set the clock to monitor two time zones. The display will shift between local time and the second time that you set. -
Page 12: Advanced Functions Configuration
ADVANCED FUNCTIONS CONFIGURATION MODE button: Backlighting – Screen backlighting can be adjusted with one brief touch of the Mode button. Choose one of 3 levels of light intensity. The lower screen will display BACKLIGHT and the cursor points to “Level.” Each time you press the “+“... - Page 13 Match Race Timer – select “Match R” in menu. The screen will now display: MATCH TIMER Min before start 10 min 5 min The cursor is pointing at 10 min. Press “OK” if this is correct or select 5 min with “+”...
- Page 14 Alerts For each alert, the buzzer will beep once for each minute remaining before the start. During the last minute, the buzzer will emit two short beeps every 10 seconds. During the final 10 seconds, the buzzer will emit a short beep every second –...
-
Page 15: Memory Function
Silence alarm: When the alarm sounds a message is displayed in the dialogue box showing the current alarm setting. The buzzer goes off for 3 seconds and then stops; the message continues to display. Press any button to silence the alarm. MEMORY FUNCTION: This function allows you to memorize and recall air pressure data.
Need help?
Do you have a question about the 4002 and is the answer not in the manual?
Questions and answers