Advertisement
Available languages
Available languages
Quick Links
Advertisement

Subscribe to Our Youtube Channel
Related Manuals for Panacom LP-8800


Summary of Contents for Panacom LP-8800
- Page 3 LP-8800 - USER MANUAL ENGLISH Thanks for purchasing Panacom Suitcase Turntable .Please read this manual carefully before using this Turntable. Important SafetyInformation - When using electrical appliances, basic safety precautions should always be followed. - Check that the voltage indicated on the data plate corresponds with that of the local network before connecting to the mains supply.
- Page 4 - Do not pull the mains cord, close the door on it or run it over sharp edges. - Do not use if unit has been dropped or damaged in any way. - Repairs to electrical equipment should only be performed by a qualified electrician.
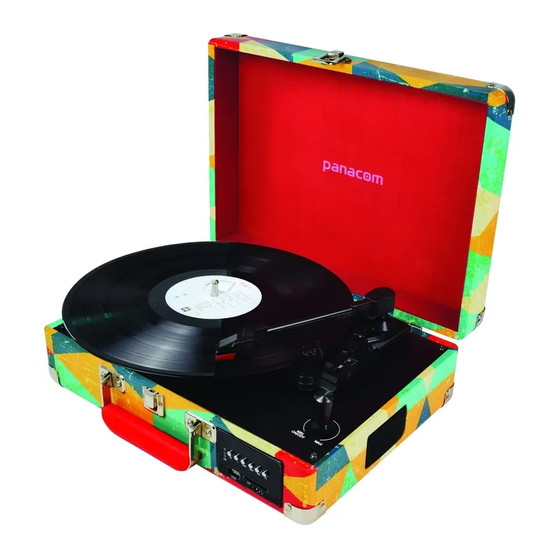
- Page 5 Features Two-built-in stereo anti-magnetic speakers; Built-in battery 3 speeds belt-driven turntable fit for 33 1/3, 45, 78; USB host link to PC for playing&recording; USB/SD slot for MP3 playback; Wireless BT Conection AUX Input Earphone Output FM radio frequency adjustment; Plays and records Audio files to a USB flash drive Converts LPs to Audio files without the need of a computer;...
- Page 6 Pg. 6...
-
Page 7: Functions And Controls
FUNCTIONS AND CONTROLS 1.Tone arm 2.Play/Pause lift lever 3.Auto stop on/off switch 4.Speed selector 5. Power Switch & Volume Control 6.Cartridge/Stylus 7. Turntable 8.45 Single adaptor 9. Function Main Menu 10. Play/PAUSE/FM TUNING 11. Earphone output 12. SD CARD interface 13. - Page 8 short press “Button Previous” to play Previous song and short press “Button Next” to play Next song. Long press “Button De- lete” to delete single song which implement this function need to insert the USB - DISK/SD. 4.FMRadio Playing Press “M” key to choose FM function,then press “Button Play” to scan FM frequences.
-
Page 9: How To Replace The Needle
It can be charged by DV 5V power adapter. When charging, the LED light is green. When finish charging, the LED light is off. HOW TO REPLACE THE NEEDLE To replace the needle, please refer to the instructions below. Removing the needle form the cartridge. 1. - Page 10 wards then pull clear. - Fitting a new stylus is the reverse of removal - NOTE: Never play records with a worn or damaged Stylus. Do’s and don’ts - Do not place unit on top of or near loudspeakers as acoustic feedback will occur.
- Page 11 - Click ‘Next’ - Select ‘I accept’ option then click ‘Next’: Pg. 11...
- Page 12 - Click ‘Next’: - Here either select another location or click ‘Next’ to continue (recommended): Pg. 12...
- Page 13 - Click ‘Next’ to continue: - Click ‘Install’ to continue:...
- Page 14 - The software will start to install: - Click on ‘Finish’ to complete the installation:...
- Page 15 - Audacity should automatically start up, if not follow the next sequence: - The Audacity icon will now be seen on the desktop, double click on it to start Audacity running, if an icon does not appear, go to the ‘C’ drive under ‘My Computer’ , click on ‘Program files’ and then ‘Audacity’...
- Page 16 Playing a record - This suitcase turntable player operates by DC power supply. - Raise the lid and push it back far enough until it stays upright. - Switch on the unit by switching the power switch - Release the Security latch from the tone arm by moving it to the right.
- Page 17 Recording to computer using Audacity - Start the record playing as described above, and press Record at the top of the Audacity window to start recording to the computer. - Once recorded use the Transport controls at the top of the screen to, Go to start, Play, Record, Pause, Stop and Go to end of Wave form as below: - Use the file, Edit, View, Project, Generate, Effect and Analyse...
- Page 18 - NOTE: the blue wave form should sit in the Audacity window such that the peaks of it stop short of the top and bottom - Before editing your music, the recorded waveform will need to be highlighted. - To highlight your wave form, click with the left mouse button on the left hand side of the waveform (under the L+R controls) and the waveform will go darker.
- Page 19 Exporting your music files (.Mp3) - Once you have recorded and edited your music, you will need to save your files to the computer. To do this click on file and move down to Export as Mp3 tab. - Click on this and you will promptly be asked for the file name of the music recorded which will be saved in the location shown.
- Page 20 LP-8800 - MANUAL DE USUARIO ESPAÑOL Gracias por comprar la Bandeja giradiscos BT de Panacom. Lea este manual cuidadosamente antes de usarla. Informacion de Seguridad Importante - Cuando se utilizan aparatos eléctricos, se deben seguir siempre las precauciones básicas de seguridad.
- Page 21 - Las reparaciones a equipos eléctricos sólo deben ser realiza- das por un electricista cualificado. Las reparaciones incorrectas pueden poner al usuario en riesgo grave - Coloque la unidad sobre una superficie plana, libre de vibra- ciones y alejada de fuentes de calor. - No deje la unidad enchufada por períodos prolongados.
-
Page 22: Funciones Y Controles
Caracteristicas - Dos parlantes estéreo incorporados; - Batería integrada - 3 velocidades accionamiento de la correa giratoria para 33 1/3, 45, 78; - Conexión del anfitrión del USB a la PC para la reproducción y la grabación; - Ranura USB / SD para la reproducción MP3; - Conexión inalámbrica BT - Entrada AUX - Salida de auriculares... - Page 23 Pg. 23...
- Page 24 Operación 1.Inicio Encendido, las luces indicadoras de encendido son de color rojo, por defecto es el modo LP por primera vez. Presione el botón selector de funciones a LP, USB, SD, FM, BT, función de reproduc- ción AUX. Ahora su sistema está listo para reproducir la música. 2.
-
Page 25: Cómo Cargar
5. Conexión inalámbrica BT Presione la tecla “M” para elegir la función de reproducción de conexión inalámbrica BT, LED screendisplays. Antes de conectar el dispositivo con éxito, pulse “Boton de Play”, presione “Boton Anterior” para reproducir canción anterior y presione “Boton Siguente”... - Page 26 Extracción de la aguja del cartucho 1. Mantenga la punta del casquillo de la cabeza de la aguja e introdúzcala pulsando en la dirección ilustrada por “B” 2. Empuje el casquillo de la cabeza de la aguja hacia arriba en la dirección ilustrada por “C”...
- Page 27 - Utilice un limpiador de discos de buena calidad para optimizar los resultados. Configuración de la maleta giratoria - Retire todos los embalajes de la unidad. - Asegúrese de que el pestillo de seguridad esté cerrado de modo que el brazo de tono no pueda moverse libremente. - Asegúrese de que la unidad esté...
- Page 28 - Seleccione la opción “Acepto” y haga clic en “Siguiente”: - Haga clic en Siguiente’: Pg. 28...
- Page 29 - Aquí seleccione otra ubicación o haga clic en ‘Siguiente’ para continuar (recomendado): - Haga clic en Siguiente para continuar: Pg. 29...
- Page 30 - Haga clic en ‘Instalar’ para continuar: - El software comenzará a instalarse: Pg. 30...
- Page 31 - Haga clic en ‘Finalizar’ para completar la instalación: - Audacity debería iniciarse automáticamente, si no haga la siguiente secuencia: - El icono de AUDACITY se verá ahora en el escritorio, haga doble clic en él para iniciar AUDACITY en ejecución, si un icono no aparece, vaya a la unidad “C”...
- Page 32 - Antes de grabar, haga clic en Editar en la parte superior de la página principal; Seleccione Preferencias en la parte inferior del menú que abrirá Preferencias. - En la parte de grabación de la ventana, abra el menú Disposi- tivo usando la flecha hacia abajo en el lado derecho.
- Page 33 quede erguida. - Encienda el aparato encendiendo el interruptor - Suelte el pestillo de seguridad del brazo de tono moviéndolo hacia la derecha. - Coloque el disco que se reproducirá en la mesa giratoria. - Seleccione la velocidad de reproducción correcta para el regis- tro (33, 45 o 78 rpm) - Interruptor de control de velocidad en la parte superior dere- cha de la unidad.
- Page 34 - Utilice los menús Archivo, Editar, Ver, Proyectar, Generar, Efecto y Analizar para guardar, exportar y manipular su música. - Si el nivel de grabación requiere ajuste, haga clic en ‘START’ , ‘SETTINGS’ y seleccione el panel de control. En Panel de control seleccione ‘SOUNDS AND AUDIO DEVICES’...
- Page 35 superior izquierda y luego haga clic en SELECT y luego elija entre: Todos (forma de onda completa), Inicio a Cursor o Cursor para finalizar. NOTA: después de grabar en el ordenador, es posible que tenga que quitar el cable USB del puerto USB para poder reproducirlo más adelante desde el ordenador.
- Page 36 - Puede ser una existente o una nueva carpeta. NOTA: Para activar la función Exportar a Mp3, será necesario copiar un archivo llamado lame_enc.dll del CD de instalación y pegarlo en la carpeta AUDACITY que contiene el software en el disco duro que se copió anteriormente del DISCOS COM- PACTOS.
- Page 37 SERVICIO POST VENTA 0810-888-7262...
- Page 38 Pg. 38...
- Page 39 Pg. 39...
- Page 40 Pg. 40...
- Page 42 www.panacom.com...
Need help?
Do you have a question about the LP-8800 and is the answer not in the manual?
Questions and answers