
Summary of Contents for Lloyd's LCR340
- Page 1 LCR340 Instruction Book THIS INSTRUCTION BOOK MAY CONTAIN ERRORS AND OMISSIONS. DESIGN AND SPECIFICATION ARE SUBJECT TO CHANGE WITHOUT NOTICE.
-
Page 2: Important Safety Instructions
IMPORTANT SAFETY INSTRUCTIONS READ INSTRUCTIONS- All the safety and operating instructions should be read before the product is operated. RETAIN INSTRUCTIONS- The safety and operating instructions should be retained for future reference. HEED WARNINGS- All warnings on the product and in the operating instructions should be adhered to. 4. - Page 3 POWER SOURCE- This product should be operated from the type of power source indicated on the marking label. If you are not sure of the type of power supply to your home, consult your product dealer or local power company. For product intended to operate from batter power, or other sources, refer to operating instruction.
-
Page 4: Damage Requiring Service
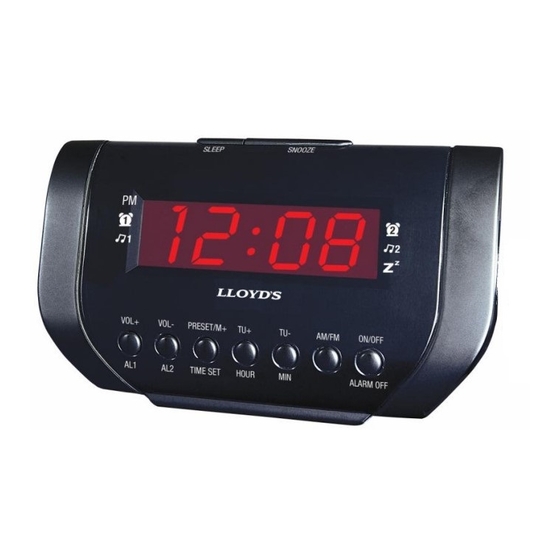
19. OBJECT AND LIQUID ENTRY- Never push objects of any kind into this product through openings as they may touch dangerous voltage points or short-out parts that could result in a fire or electrical shock. Never spill liquid of any kind on the product SERVICING- Do not Attempt to service this product yourself as opening or removing covers may expose you to dangerous... - Page 5 1. PM Indicator 2. 1 Alarm Indicator Buzzer 3. 1 Alarm Indicator Music 4. Volume Increase/Alarm 1 Set 5. Volume Decrease/Alarm 2 Set 6. Preset Memory Selection/Time Set 7. Tuning + Button/Hour Button 8. Tuning – Button/Minute Button 9. AM/FM Button 10.
-
Page 6: Setting The Alarm
PLL Operating instruction Radio 1. Press the “ON/OFF” button to turn the clock radio on or off. 2. Press the “AM/FM” button to select radio band. 3. Adjust the “TU+” or “TU-“ to select the desired station. 4. Press the “VOL +” or “VOL -“ button to adjust the volume. 5. -
Page 7: Usb Charging
USB Charging Use the USB Charging port to charge your Smart Phone (Compatible with most Smart Phones, not included). Use a USB cable (not included) to connect your Smart Phone to the USB Connector of the Unit. Your Smart Phone should start Charging. ** Before Charging your Smart Phone , please ensure the Clock Radio is connected to the supplied adapter and that is is plugged into the power supply.**... -
Page 8: Limited Warranty
LIMITED WARRANTY We at Cosmo believe you will be pleased with your new Product. Please read this Warranty carefully. Cosmo warrants this product to be free from manufacturing defects including original parts and workmanship for a period of one year from the date of original purchase in and if used in Canada. - Page 9 EXPRESSED WARRANTY AS PROVIDED HEREIN BEGINNING WITH THE DATE OF THE ORIGINAL PURCHASE AT RETAIL AND NO WARRANTIES, WHETHER EXPRESSED OR IMPLIED SHALL APPLY TO THE PRODUCT THEREAFTER. COSMO MAKES NO WARRANTY AS TO THE FITNESS OF THE PRODUCT FOR ANY PARTICULAR PURPOSE OR USE.
-
Page 10: Instructions De Sécurité Importantes
INSTRUCTIONS DE SÉCURITÉ IMPORTANTES LISEZ LES INSTRUCTIONS- Toutes les instructions de sécurité et de fonctionnement doivent être lues avant d’utiliser l’appareil. 2. CONSERVEZ LES INSTRUCTIONS- Les instructions de sécurité et de fonctionnement doivent être conservées pour pouvoir vous référer par la suite. 3. - Page 11 VENTILATION - Les fentes et les ouvertures dans le coffret sont prévues pour la ventilation et permettent d’assurer un fonctionnement fiable de l’appareil et de le protéger contre la surchauffe. Ces ouvertures ne devraient être ni bouchées ni couvertes. Les ouvertures ne devraient jamais être bouchées en plaçant l’appareil sur un lit, un divan, un tapis ou une autre surface similaire.
-
Page 12: Entretien
16. ECLAIR- Pour une protection supplémentaire de l’appareil durant un orage électrique, ou lorsque vous le laissez sans surveillance et vous ne l’utilisez pas sur une longue période, débrancher-le de la prise murale et déconnectez l'antenne ou le system de câble. De cette façon, vous éviterez tout dommage à l’appareil qui pourrait être causé par un éclair et par les surcharges sur la ligne de courant. - Page 13 1. Indicateur de P.M. 2. 1 Sonnerie d'Indicateur d'Alarme 3. 1 Musique d'Indicateur d'Alarme 4. Augmentation de Volume/Positionnement de l'Alarme 1 5. Diminution de Volume/Positionnement de l'Alarme 2 6. Sélection de Mémoire de Préréglage/Positionnement de Temps 7. Accord + Bouton/Bouton d'Heure 8.
-
Page 14: Régler L'horloge
Consigne d'utilisation de PLL Radio 1. Appuyez Sur le bouton « "MARCHE/ARRÊT" » pour tourner le radio-réveil "Marche/Arrêt". 2. Appuyez Sur le bouton de « AM/FM » pour choisir la bande par radio. 3. Ajustez le « TU+ » ou le « TU « pour choisir la station désirée. 4. - Page 15 s'allumera quand l'heure est placée dans le P.M. Appuyez Sur le bouton RÉGLÉ « par TEMPS » pour épargner le temps Établissement du Temps de Sommeil 1. Vous devez couper la radio avant que vous placiez le temps de sommeil. 2.
-
Page 16: Garantie Limitée
GARANTIE LIMITÉE Chez COSMO, nous sommes persuadés que vous serez satisfait de votre nouvel appareil COSMO. Veuillez lire attentivement cette garantie. COSMO garantit que ce produit, y compris ses pièces d’origine, sont exempts de défauts de matières premières et de fabrication, pendant une période de 1 an suivant la date d’achat par le premier acheteur, et à condition qu’il a été... - Page 17 G) Les dommages aux produits utilisés hors du Canada. CETTE GARANTIE EST NON TRANSFÉRABLE ET NE COUVRE QUE LE PREMIER ACHETEUR DE L’APPAREIL, ET NE S’APPLIQUE PAS AUX PROPRIÉTAIRES SUBSÉQUENTS DE L’APPAREIL. TOUTE AUTRE GARANTIE TACITE, Y COMPRIS LA GARANTIE DE VENDABILITÉ EST LIMITÉE À LA PÉRIODE DE LA GARANTIE EXPRIMÉE CI-DESSUS, COMMENÇANT À...
Need help?
Do you have a question about the LCR340 and is the answer not in the manual?
Questions and answers