
Subscribe to Our Youtube Channel
Related Manuals for Gemini GWSF12


Summary of Contents for Gemini GWSF12
- Page 1 Before using your product for first time,please read this instruction manual. 在使用本產品前,請仔細閱讀本說明書並保存好。...
-
Page 2: Safety Precautions
Safety Precautions Thank you for choosing our products. For your consumer rights and interests, please carefully read the warranty card and keep it properly. Items related to the product warranty are specified as follows: This appliance is not intended for the use by person (including children under 8 years old), with reduced physical, sensory or mental capabilities or lack of experiences and knowledge unless they have been given initial supervision or instruction concerning use of the appliance by a person responsible for their safety. - Page 3 twisting of hair by the blades and get injury. Do not place the appliance near curtain, clothes to avoid being inhaled and damage the appliance. Never put your fingers and other objects into the front and rear guard, or any moving parts of the appliance to avoid injury.
- Page 4 damages and accident. -Before cleaning, assembling or disassembling, make sure the appliance is turned off and unplug from power supply socket, and it is completely cool down. -Clean the appliance regularly to avoid too many dust on blades, rear and front guard.
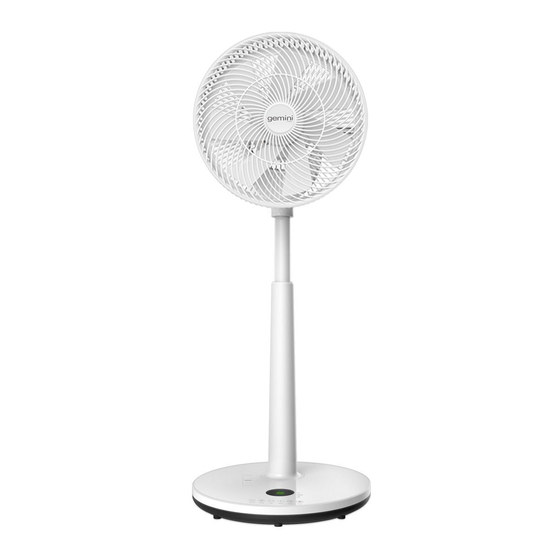
- Page 5 The structure of the product Bottom View (1)Rear Grille (2)Front Grille (3)Blade (4)Back Cover (5)Extension Tube (6)Extended Tube (7)Control Display (8)Remote Control Switch Placement (9)Infrared Receiving (10)Pedestal (11)AC Connector (12)Base Fixed Knob Point Accessories Fan *1 User Manual *1 Warranty Card *1 Power Line *1 Remote Controller *1...
-
Page 6: Product Introduction
Product Introduction 1.Introduction of Control Panel NATURAL SLEEP WiFi ON/OFF SPEED SWIMG TIMER MODE 1.LED Display 2.ECO Wind 3.Natural Wind 4.Sleep Wind Indicator Indicator Indicator 5.WiFi Function 6.Timer Key 7.Model 8.Up-Down Swing Key Indicator Conversion Key 9.Left-Right Oscillation 10.Wind Speed 11.On/Off Key ON/OFF Key :After connect the main power plug to wall socket,press the... - Page 7 Mode, the fan will work at the system setting gear speed.The fan will be quite operation in Sleep Wind Mode which is soft wind for sleeping. 2.Function Key of Remote Controller (1) ON/OFF (2) TIMER (3) SPEED+ (4) SPEED- (5) OSC:Left-right direction (6) SWING:Up-down direction (7)MODE:ECO/NATURAL/SLEEP Note:...
-
Page 8: Signal Receiver
Signal Receiver 3. Swing & Oscillation Press the OSC & SWING key to turn on the automatic oscillation mode. Left-right oscillation in 100° by automatically Up-down swing in 90° by automatically Note:It is forbidden to twist the fan head at up-down or left-right oscillation direction over 90°... -
Page 9: Installation
4.Installation 1.Take out the fan's assemble parts Take out the fan's assemble parts from the packaging and disassemble the fan parts from the rear head grille.Rotate the front grille at clockwise direction,remove the front grille and take out the blade. 2.Install the fan Pedestal PVC Casing Screw... -
Page 10: Cleaning And Maintenance
Put the position of the fan rear grille on the motor head(STEP1), and tighten the knob clockwise to fix the rear grille cover to motor head(STEP2). 4.Install the Fan Blade Put fan blade to the motor shaft, and tighten the knob in clockwise direction(STEP1). Then use the screw to fix the front grille. - Page 11 See below Images: Fixed Screw -Cleaning of external non detachable parts Use the soft cloth in warm water below 40°,then wipe off the fan surface stains. -Storage If product is not used for a long time, clean it and dry it, then put it into the original packing box and store in a dry place.
- Page 12 2.Tuya App Connection Instruction 1.Dowload TUYA 2.Create a new user APP from APP account. store. 3.Register an 4.Enter the account to get verification code. verification code. 5.Set your 6.Tap the "+" icon password. on the right corner of "Home" page to enter into "Select Device Type"...
- Page 13 8.Choose the local WiFi routers 7.Select the "Fan" (Only supports option in 2.4GHz) and enter “Small Home the correct Appliances”. password,then click next to complete. 9.In shutdown mode of the fan after connect the 10.Select the mainpower,press corresponding the fan's ON/OFF option according to key and MODE the WiFi indicator...
- Page 14 11. Please ensure 12.Add device the device is successfully,then powerd on when click finish. connecting. 14.Press the "Switch" key to turn 13.The fan can be on the fan.The fan controlled after wind speed is connecting the setted to "8" level device.
- Page 15 17.Press "Settings" key to control Up- and-Down Swing and Left-and- Right Swing;Press"Timer off setting"to select 1-9h timing (The timing function can only be used when shutdown). 3.Retrieve Password Operation Instruction 2.Click "Forget 1.Click to log in Password". with an existing account.
-
Page 16: Product Specification
The actual APP interface is subjected to the final download version and won't notice to user in advance. Product Specification Model: GWSF12 Voltage: 100-240V~ DC Brushless Motor: DC15V 30W Timer Off:1-9hours Noise: <53db... - Page 17 安全注意事項 感謝您選擇我們的產品。為了您的消費者權益,請仔細閱讀保養卡並妥善保管。與產品保修 相關的專案如下所示: 一般電器產品並不是為體質、感覺或智力有障礙人士(包括八歲以下兒童)、或缺乏經驗及 知識者使用, 除非他們曾經接受負責安全人士的監督或指示, 大人應指導小孩不可把玩電 器。 使用前請細閱及了解所有說明書內容,以免誤用產品。請保存好說明書作日後參閱。 不可對風扇使用說明書上記載以外的方法及用途,以免發生意外。 在任何情況下包括使用前、使用中、使用後及存放時,不可讓八歲以下兒童接觸、使用、 當玩具把玩、清洗及靠近本風扇、電源線及所有配件,以免發生意外。 請勿將包装袋置於幼兒拿得到的地方。 若套穿在頭上等, 可能會堵塞口鼻導致窒息死亡。 未完全安裝好扇葉、前 / 後網,切勿把電插頭連接電源插座啟動風扇,避免發生意外。 風扇運作時必須有人看管,不要讓小童靠近接觸。 在沒有任何人看管的情況下,切勿啟動風扇,以免發生意外。 如使用時或放置時不慎把風扇傾倒, 請即時先把電插頭拔離電源插座把風扇馬上關掉, 把 風扇放置好, 檢查風扇沒問題才可再次使用。 如有任何不確定或疑問請先交往維修中心檢 查。 本風扇並不防水,切勿把風扇整機、遙控器、電源線和電插頭浸在水中或任何液體裏,也 不可將其放在水龍頭下沖洗和被濺水,以免發生意外。機身外殼只能以乾軟布清潔。 風扇不防水,切勿把風扇放置在浴室、花灑、洗滌地方、泳池邊附近及室外使用及存放。 切勿將風扇放置/靠近明火或發熱體/產品旁邊使用及存放。同樣切勿放置在可被水濺到 的地方使用及存放,以免破壞風扇及引起短路等意外。 切勿把易燃及爆炸性物品如石油、油漆或其他易燃物品放置在風扇附近位置 ; 切勿在充 滿易燃氣體的地方使用及存放風扇 ; 切勿在風扇附近使用任何噴霧劑或殺蟲劑等,以免 發生意外或破壞風扇。 切勿將手指或其他物品伸入前網和後網內或轉動部位, 否則會造成重大傷害。 特別注意兒 童,防止他們做出此動作。...
- Page 18 使用風扇期間不要移動風扇,移動風扇前必須先關掉風扇,把電插頭拔離電源插座,用機 身背後的手挽提起風扇,切勿拖拉本風扇,以免破壞風扇及刮傷地面表面。 重要事項 : 連接電源之前,請檢查本地的電源電壓是否與產品所標示的電壓相符。 當插頭、電源線、風扇本身出現任何受損時,請即停止使用。盡快交往維修中心檢查,切 勿自行改裝、拆卸或維修,以免發生意外。 不要擠壓、扭曲、拉扯電源線,以免電源線和插頭受損及鬆脫。電源線應遠離高溫表面。 電源線如有受損請立即停止使用。切勿把電源線翹在風扇上,以免損壞電源線。 不要把電源線放在地毯底下或用任何物件覆蓋電源線,以免損傷電源線或引起火警。 電源線不可被任何物品踏過、重壓或被寵物咬破,以免損壞或折斷電源線,發生意外。 不要使用外接定時器連接本風扇。本風扇並非以外置時間設定的裝置操作。 使用風扇時切勿與其他電器共用同一電源座, 以免電力過負發生意外。 同時亦不要使用延 長線及延長拖板連接風扇使用。 把風扇放置離開電視機、收音機或其他影音器材最少 1 米以外的地方使用,否則可能會 對以上器材造成干擾。 請勿用濕手接觸電插頭、電源插座及使用風扇,以免發生觸電意外。 拆卸或安裝前網時如不慎把螺絲掉進風扇內, 請把風扇交往維修中心處理, 切勿自行拆卸 處理。 使用風扇時需注意保持室內空氣流通,以免影響進風效果。 請勿長時間直接對着人體吹風,特別是長者、幼兒、病人和不能自行調節體溫人士等,否 則對健康有影響問題。 不要在潮濕、 多塵的環境及表面下使用此風扇, 及不要把風扇放置在陽光直射的地方使用 和存放。 不要對風扇進行任何沖擊及摔落, 亦不要按壓前網後網, 以免造成風扇破壞及發生意外。 用戶應定期清潔機身、扇葉、前網及後網,以免積聚過多塵埃影響吹風效果。 進行風扇清潔、拆卸或安裝前,必須先把電源插頭拔離電源插座。 此風扇只供室內家庭使用及存放,不能作其他如商業用途及存放於室外。 如產品出現異常現象,如異味、冒煙、不正常聲響、過度發熱等情況,請立即把產品停止 運作,拔掉電源插頭,停止使用。 遙控器使用電池,如使用時發現遙控距離變短或控制不良,可能是電池開始耗盡,需要更...
- Page 19 警告 1. 請不要濕手拔電源線插頭,以免產生觸電危險。 2. 請保持平穩狀態使用。 3. 不得隨意分解機體,機器內部為帶電體,請勿水洗或沖水。 4. 電源線不得割傷、損壞、拉扯、扭轉、打結也不要壓上重物。 5. 請勿將手指或者其他物體塞入到風扇網框中。 6. 清潔和維護本產品時,必須電源插頭脫離連接。 7. 請勿讓兒童操作機器。 8. 由於此款循環扇上下和左右擺頭都是電動自動控制,故不能用手動大力搬動。 產品結構圖 底座展示 (1)後網罩 (2)前網罩 (3)風葉 (4)後殼 (5)伸縮管 (6)伸縮管調校鍵 (7)顯示屏 (8)遙控器放置處 (9)紅外線接收點 (10)底座 (11)AC 插座 (12)底座固定旋鈕 備註:產品圖片僅供參考,具體以實物為準。...
- Page 20 產品配件 風扇*1 說明書*1 保養卡*1 電源線*1 遙控器*1 使用指南 1.操作面板介紹及整機使用操作說明 NATURAL SLEEP WiFi ON/OFF SPEED SWIMG TIMER MODE 1.LED 顯示屏 2.智能模式指示燈 3.自然風指示燈 4.睡眠風指示燈 5.WiFi 無線網絡功能 6.定時功能按鍵 7.模式轉換按鍵 8.上下搖頭按鍵 指示燈 9.左右搖頭按鍵 10.風速調節按鍵 11.開/關按鍵 開/關鍵 風扇接駁電源後,按動此鍵機器開機,風速檔位預設默認為 8 檔,再次按動此 鍵,關閉本機。 定時關機鍵 按定時器關閉鍵設置關閉時間,風扇將在 1h-9h 之間切換。5 秒後不操作 風扇,顯示屏顯示風速和定時開關交替切換。...
- Page 21 上下擺頭鍵 按上下擺頭鍵第 1 次,上下擺頭步進電機啟動;按上下擺頭鍵第 2 次,上 下擺頭電機關閉。 左右擺頭鍵 按左右擺頭鍵第 1 次,左右擺頭步進電機啟動;按左右擺頭鍵第 2 次,左 右擺頭電機關閉。 模式鍵 按模式鍵後,可調校智能風、自然風、睡眠風 三種功能模式 ,每按 1 次會選 定 1 種模式,對應的指示燈會點亮,智能風模式,風扇顯示屏會顯示當前的環境溫度,根據 室內溫度自動調節風速的快慢控制檔位切換。切換到自然風模式,風扇會按系统設定好的檔 位風速進行工作。選定睡眠風模式時風扇進入靜音模式,達到人適合睡眠的要求。 2.遙控器功能說明 (1)開關 (2)定時 (3)風速+ (4)風速- (5)左右搖頭 (6)上下搖頭 (7)模式(ECO/自然風/睡眠風) 溫馨提示: 1. 遙控器在產品正面 6 米內,偏離角度在 45°範圍內正常使用。 2. 將 CR2025 電池放在支架上,確保“+”面朝上,背面朝下。 3.
- Page 22 信號接收器 2. 搖頭功能設定 點擊 OSC 或 SWING 按鍵可開啟自動擺頭模式。 左 及 右 自 動 擺 頭 100 度 上 及 下 自 動 擺 頭 90 度 注意:切勿強行擺動風扇機頭的水平或垂直角度超過 90 度,否則會損壞電風扇機械結構。...
- Page 23 安裝説明 1. 打開風扇組件 如圖示, 取出風扇組件,逆時針旋轉風扇前網至鬆動, 按方向向外卸下風扇前網, 取出風葉。 2.安裝底座 PVC 套管 旋鈕 (2) 將螺旋固定件插入底座 底部的孔位 支柱 底座 (1) 首先取下 PVC 套管,按圖示方向將 (3) 將螺旋固定件順時針擰緊, 並將其 電機+支柱與底座插口對位,將支柱 固定 下端插入底座插口...
- Page 24 3.安裝風扇後網在主電機頭部 將風扇後罩對位點装上電機頭部(步骤一) ,順時針旋緊風扇罩旋鈕,使風扇後罩與電機頭 部固定(步骤二) 。 4.安裝風葉 將風機葉片置於電機軸上(步骤一) ,順時針擰緊旋鈕,然後用螺絲固定前網(步骤二) 。 注意:請確保風扇葉緊固件將風扇葉緊固,否則會存在危險。...
- Page 25 清潔舆維護説明 * 警告:清洗前,請務必關閉電源開關,拔下插頭。不能直接對電風扇噴水或噴霧。 * 可清洗的部件:用梅螺絲刀(十字螺絲刀)取掉前殼與中網之間的固定螺絲,便可用中性 清潔劑通過軟布或者海綿毛刷等清洗上圖所示配件,清洗完後必須擦乾全部配件。 * 電風扇底部不可拆卸部件的清洗:將軟布在低於 40 度以下溫水的軟布後,擦去機器表面 污漬。 * 储藏:電風扇長期不使用時,清洗乾凈,晾乾後裝入原包裝盒中,並存放在乾燥處。 手機上塗鴉智能程式的連接指南 註意:用戶需要正確安裝塗鴉智能 APP,才能確保成功連接本產品的 WiFi 無線網絡功能! 1. 下載塗鴉智能 APP 請用手機掃描右邊二維碼 下載並安裝 Tuya Smart App. 更多功能,請參考 APP 介面提示。...
- Page 26 2. Tuya App 連接說明 1.從 APP 商城下 2.創建新賬戶。 載塗鴉軟件。 3.註冊賬戶, 獲取 4.輸入驗證碼。 驗證碼。 5.設置密碼。 6.點擊主頁右上 角的 “+” 號圖標, 進入選擇設備類 型界面。...
- Page 27 7.選擇小家電中的 8.請連接室內 WiFi “風扇”選項。 路由器並輸入正確 的密碼,點擊下一 步完成操作(僅支 持 2.4GHz) 。 9.連接電源在關機 10.請打開設備, 確 模式下同時按住風 認 指 示 燈 快 速 閃 扇的開關鍵和模式 爍, 然後單擊 “下一 鍵, 直到 WiFi 指示 步” 。 燈由慢閃到快閃松 手,然後按指示操 作 APP 界面。 11. 連 接 設 備時 請 12.添加設備成功,...
- Page 28 14.按下“開關” 鍵,打開風扇,風 13.連接設備後可 扇風速默認為“8” 控制風扇。 檔,可隨意在橫線 上調整 1-12 檔的 風速。 16.打開“工作模 式” , 可選擇 “正常 風” 、 “睡眠風” 、 “自然風” 、 “智能 15.再次按下“開 模式”4 種模式選 關” 鍵, 關閉風扇, 擇,若不選擇,則 再次開機恢復上次 默認為“正常風” , 關機時的檔位。 選 擇 工 作 模 式 開 機後,再重新啟動...
- Page 29 3.找回密碼操作說明 1.點擊使用已有賬 2. 點 擊 “ 忘 記 密 戶登錄。 碼” 。 3. 請 輸 入 手 機 號 4.輸入驗證碼。 碼,獲取驗證碼。 重要注意事項: - 設備必須連接電源和 WIFI。 5.重置密碼。 - 由於本產品及手機軟件程式使用界面會不斷 改良及更新,以提升用戶使用體驗。以上文中 列出的軟件使用界面內容及數據只供參考。最 新的使用界面需按當時下載的軟件版面為實, 不會另行通知。...
- Page 30 產品規格 型號: GWSF12 電壓: 100-240V~ 電機:DC15V 30W 定時關機:1-9 小時 噪音值:<53db 最大轉速:1100 最大風速:6M/S 產品尺寸:360 闊 X 1030 高 X360 深 毫米(最高)360 闊 X800 高 X360 深 毫米(最低) *相關產品的規格,可能會因配件批次或實際使用地區的電壓差異而有所不同。...
Need help?
Do you have a question about the GWSF12 and is the answer not in the manual?
Questions and answers