Table of Contents
Advertisement
Advertisement
Table of Contents

Related Manuals for Mediana i20

Summary of Contents for Mediana i20
- Page 1 Body Composition Analyzer USER MANUAL...
- Page 2 About this manual This manual explains how to install and use I20. Please refer to WARNING and CAUTION signs where users need to be extra careful while using I20. Before using the product, users should carefully read this manual including precautions.
- Page 3 Purchase date • The warranty is not valid if your issue falls into any of the following circumstances. - If non-MEDIANA staff or service provider performs unauthorized repair, installation, transport, or maintenance - When the product is damaged by other equipment...
-
Page 5: Table Of Contents
Body Composition Analyzer Contents 1. Description 1.1. Basic Component 1.2. Install the product 1.3. Connecting the A4 Printer 2. Using Product 2.1. Name and Characteristics of Parts 2.2. Safety Precautions 2.3. Power On/Off 2.4. Body Composition Measurement 2.5. Checking Result 3. - Page 6 • Be sure not to let this product in direct contact with other electronic devices in power. It may cause a spark hazard. (W0014) • Use the model adapter provided by MEDIANA. Use of other adapters may cause equipment malfunction. (W0025)
- Page 7 • Turn on the power of other inspection devices first, when connecting I20 to the inspection devices. If you want to turn off I20, power off the inspection devices first this time, then I20 later. Electrical shock of the equipment can be minimized.
-
Page 8: Description
1. Description Body composition analyzer I20 is a body composition analyzer which determines body composition parameters based on bioelectrical impedance analysis (BIA). This device calculates and estimates body composition parameters by using weight and segmental impedance of each frequency. Body composition analysis results may be of value to health care professionals in their management environments. -
Page 9: Install The Product
1. Description 1.2. Install the product 1.2. Install the product Check whether there is damage to the box. Please stop unpacking and contact local dealer or nearby service center immediately if signs of damage are spotted on the equipment or accessories. Also refer to the maintenance section. - Page 10 1. Description 1.2. Install the product D. Make sure the air bubble in the level indicator is centered by turning the height adjustment screws. Equipment should be leveled and installed on flat floor. If it is not leveled, it may cause a risk of stumbling injury to the examinee, product damage, or inaccurate measurement control.
-
Page 11: Connecting The A4 Printer
1. Description 1.3. Connecting the A4 Printer 1.3. Connecting the A4 Printer ① Power off the equipment. Connect the printer USB cable to USB private port to back of the product. ② Connect the printer private USB cable to port on back of the printer. ③... -
Page 12: Using Product
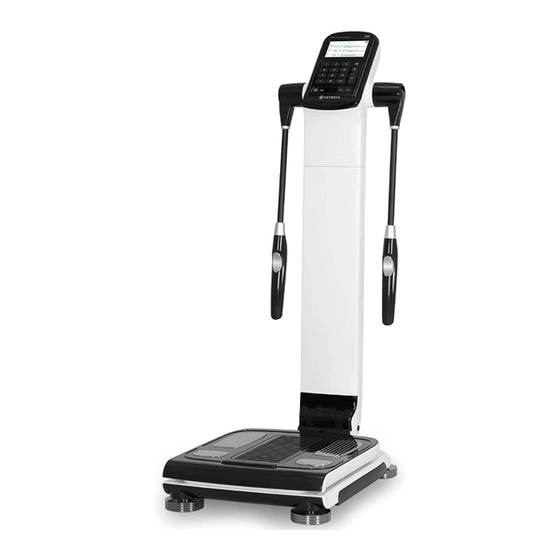
2. Using Product 2.1. Name and Characteristics of Parts 2. Using Product 2.1. Name and Characteristics of Parts A. Front Touch LCD Hardware button Rod electrode rotating unit Hand electrode rotation unit Hand electrode contact unit Weight measurement and Foot electrode Lower body joint unit (For packaging) Horizontal... - Page 13 2. Using Product 2.1. Name and Characteristics of Parts C. Hardware Button Gender Number Enter Point Delete Menu Light Power Blind Button Function • If you press it for more than 1 second when power is off, the power indicator turns green and the power is on.
- Page 14 2. Using Product 2.1. Name and Characteristics of Parts ○ Mechanical Feature • The size of this product is 360 (W) X 559 (L) X 992 (H) (mm). It allows for portable use and easy transport, with a simple-push-button-fold system and hand grip. ○...
-
Page 15: Safety Precautions
2. Using Product 2.2. Safety Precautions 2.2. Safety Precautions A. Display Item Symbols Description Symbols Description Manufacturer Manufacture Date Product configuration Product serial number number Connection type: Printer Connection type: USB private USB Serial Port B. Safety Sign Symbols Description Symbols Description Warning... - Page 16 2. Using Product 2.2. Safety Precautions C. Product Category Protection type against electric shock CLASS I Degree of protection against electric shock BF type Same degree of water protection as shell coverings Degree of protection against immersion that offer no liquid protection, IPX0. ※...
- Page 17 2. Using Product 2.2. Safety Precautions WARNING • Measurement is prohibited for individuals with an internally implanted Pacemaker. (W0016) • Measurement is prohibited for those whose use of electrodes may cause skin problems. (W0017) • Jumping or playing on the footplate is prohibited due to possible personal injury. (W0018) •...
-
Page 18: Power On/Off
2. Using Product 2.3. Power On/Off 2.3. Power On/Off Make sure that the product is working properly, before using it. The following explanation helps with how to operate the power button. A. Power On With the switch on the back of the product turned on, press power button for more than 1 second. -
Page 19: Body Composition Measurement
2. Using Product 2.4. Body Composition Measurement 2.4. Body Composition Measurement 1. When you step on the weighing platform while [the home screen] is turned on, it will automatically start to measure weight first. - If you take your socks off and stand on your feet, you can easily proceed with body composition measurement after measuring weight. - Page 20 2. Using Product 2.4. Body Composition Measurement 4. Input necessary user information for measurement and press Next - For non-member use, select Gender and enter Height and Age. - It shows up saved information for existing members. Personal information can be changed, if needed. [User information input screen] •...
- Page 21 2. Using Product 2.4. Body Composition Measurement 5. Take a proper measuring posture following voice and screen guidance. Arm should not touch armpit. Stretch arms as far as possible without bending. Grip the hand electrodes with bare hands. If thighs come in contact, wear a pair of shorts or swimsuits to prevent them touching each other.
-
Page 22: Checking Result
2. Using Product 2.5. Checking Result 2.5. Checking Result After measurement is completed, it displays the results of the main body composition on the LCD screen. Result Save button Result Print button Target weight Weight Weight graph Muscle mass Control Muscle mass Muscle mass graph Body Fat Control... -
Page 23: Setting
3. Setting 3.1. Manager Menu 3. Setting 3.1. Menu Helps you to manage I20 settings. A. Configuration Introduction MENU Press on the button input, or press on the home screen and press to enter the set- up menu. • See below for how to control screen display or time / date settings. -
Page 24: Database Result
3. Setting 3.2. Database result 3.2. Database result Stored measurement result data is listed in time order starting from the top. Selected DB Delete button Selected DB Print button Selected check button DB number display section Individual selection check button Detailed result show button A. - Page 25 3. Setting 3.2. Database result C. DB Control Press the [DB Control] button at the top to execute DB backup, restore and merge. • Backup: Whole database stored in device is copied to external storage media. • Restore: Whole database stored in device is deleted and the DB stored in external storage media is copied.
- Page 26 3. Setting 3.2. Database result ○ DB Restore / Merge ① Insert to the right USB port USB that has database to restore or merge as shown in the [Insert the external storage media] figure. ② If you click DB Restore DB Merge , a screen appears to confirm your selection.
-
Page 27: Measurement
3. Setting 3.3. Measurement and Evaluation 3.3. Measurement This menu is to set measurement mode of the equipment and the standard value that affects body composition evaluation. Select the sub menu to set at the top. A. Mode ○ Measurement mode selection Refer to the following description, and switch on / off for the test mode (expert / self-test) you want to use. -
Page 28: Print
3. Setting 3.3. Measurement and Evaluation 3.4. Print C. Standard ○ Standard value and range • You can change the BMI, body fat percent standard and standard range. ① Press button or select the input box to edit and fill it using [Numeric Key] and [Point Key] ②... -
Page 29: System Setting
3. Setting 3.5. System setting 3.5. System setting This menu is for managing the equipment system. Select [Advanced Menu] button to set up. A. Date • Time You can set the date and time displayed on the device and result and set the screen saver activation. •... - Page 30 3. Setting 3.5. System setting ○ Inserting external storage media ○ Back up system setting ① Insert to the right USB port USB to save system file as shown in the [Insert the external storage media] figure. ② If you click Backup , a screen appears to confirm selection.
- Page 31 3. Setting 3.5. System setting C. User logo setting Set the logo displayed at the top of result sheet. Enter the logo using [Button Input] or [Keypad], then press [Enter Button]. D. Country • Language Change the country / language setting of the device. Press Change and country or language can be changed on list.
-
Page 32: Service
If technical information is needed, contact local dealer or service center and order the service manual. Service manual contains useful information such as how to inspect or repair I20. When contacting service center, let them know the software version of the equipment. -
Page 33: Recycling And Disposal
4. Service 4.5. Transportation and Storage A. Firmware update Firmware update process is as follows. ① Insert the USB memory which the update file is stored to the USB slot located at the back of the device. Update file must be saved in the Root folder (F: \ Update) of USB memory. ②... -
Page 34: Transportation And Storage
4. Service 4.5. Transportation and Storage • Don’t use damaged equipment. Contact local dealer or our service center. (C0022) 4.5. Transportation and Storage ○ Shipping Precautions For safe transport, at least two people should move the equipment horizontally, parallel to the ground. ○... -
Page 35: Maintenance
4. Service 4.5. Transportation and Storage 4.6. Maintenance ○ Transportation and storage environment The shipping and storage environment of this product is as follows. Proper temperature -10~60°C Relative humidity 10~80% (Noncondensing) Titration pressure 50~101.3kPa 4.6. Maintenance Do not pour any liquid substances on the product. If it occurs, wipe and dry it up completely before use. If safe use of the equipment cannot be ensured, stop using it and contact service center for proper inspection. -
Page 36: Regular Safety Check
4. Service 4.7. Regular safety check 4.7. Regular safety check For safe use, please check following list on a daily basis. • Check for physical damage on surface of device, hand/foot electrodes, power cord and adapter. • Check the connection of power cable and the connection of DC jack of adapter. •... -
Page 37: Specifications
Input interface Keypad, Touch Screen Addition Function Data Backup and Restore to USB Supported printer Laser Printer that Mediana recommended External interface RS232C(9Pin Serial) 1ea, USB host(type A) 2ea, Mini-USB B(type B) 1ea Measurement Time About 25 sec. Age of Use... -
Page 38: Manufacturer's Emc Declaration
6. Manufacturer’s EMC Declaration 6. Manufacturer’s EMC Declaration The I20 is suitable for use in the specified electromagnetic environment. The customer and/or user of the I20 should assure that it is used in an electromagnetic environment as described below. CAUTION •... - Page 39 250/300 cycle At 0° At 0° Power 30 A/m 30 A/m It may be necessary to position the I20 further frequency from the sources of power frequency magnetic (50-60 Hz) fields or to install magnetic shielding. The power magnetic field...
- Page 40 Electromagnetic Environment Guidance Level test level The I20 is intended for use in the electromagnetic environment specified below. The customer or the user of the I20 should assure that it is used in such an environment. Portable and mobile RF communications equipment...
- Page 41 RF communications equipment and the monitor The I20 is intended for use in an electromagnetic environment in which radiated RF disturbances are controlled. The customer or the user of the I20 can help prevent electromagnetic interference by maintaining a minimum distance between portable and mobile RF communications equipment (transmitters) and the I20 as recommended below, according to the maximum output power of the communications equipment.
- Page 42 6. Manufacturer’s EMC Declaration ○ Immunity to proximity fields from RF wireless communications equipment (IEC60601-1-2) Immunity Test Maximum Band Distance frequency power Service Modulation test level (MHz) (MHz) (V/m) Pulse 360 – 390 TETRA 400 modulation 18 Hz FM c GMRS 460, ±...
- Page 44 Manufacturer Mediana Co., Ltd. 132, Donghwagongdan-ro, Munmak-eup, Wonju-si, Gangwon-do, Korea Tel: (82) 2 542 3375 (82) 33 742 5400...
Need help?
Do you have a question about the i20 and is the answer not in the manual?
Questions and answers