Table of Contents
Advertisement
Quick Links
Advertisement
Table of Contents

Related Manuals for Dahua NKB Series


Summary of Contents for Dahua NKB Series
- Page 1 Keyboard Quick Start Guide Version 1.1.1...
-
Page 2: Table Of Contents
Table of Contents Features and Specifications ................... 1 1.1 Features ........................1 1.2 Front Panel ......................1 1.3 Rear Panel ......................3 1.3.1 Network Keyboard Series ................3 1.3.2 Analog Keyboard Series ................3 1.3.3 Speed Dome Keyboard Series ..............4 1.4 Port Features ...................... - Page 3 3.3.5 Pan ......................15 3.3.6 Tour ......................15 3.3.7 Pattern ......................16 Keyboard Control DVR ....................18 4.1 Keyboard Setup ....................18 4.1.1 COM Connection ..................18 4.1.2 Network Connection Setup ..............18 4.2 Operation ......................18 4.2.1 Login ......................18 4.2.2 Logout ......................
- Page 4 8.4 RJ45 Network Port Connection ................. 29...
- Page 5 Welcome Thank you for purchasing our keyboard! This quick start guide is designed to be a reference tool for the operation of your system. Before the operation please read the following safeguards and warnings carefully! Please keep it well for future reference.
- Page 6 Regulatory Information FCC Information CAUTION Changes or modifications not expressly approved by the party responsible for compliance could void the user's authority to operate the equipment. FCC conditions: This device complies with part 15 of the FCC Rules. Operation is subject to the following two conditions: This device may not cause harmful interference.
- Page 7 Important Safeguarding and Warnings 1.Electrical safety All installation and operation here should conform to your local electrical safety codes. The product must be grounded to reduce the risk of electric shock. This unit is to be connected only to the devices whose power feeding meets the requirements for SELV (Safety Extra Low Voltage) and complies with Limited Power Source according to IEC60950-1.).
- Page 8 You need to be in compliance with the local privacy protection laws and regulations to protect the legitimate rights and interests of other people by implementing measures, including but not limited to: providing clear and visible identification to inform data subject the existence of surveillance area and providing related contact.
-
Page 9: Features And Specifications
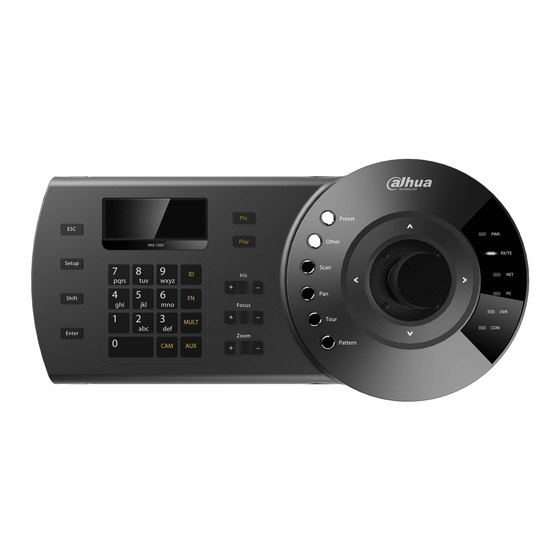
1 Features and Specifications 1.1 Features This series keyboard has the following features One keyboard can control multiple DVRs, or you can use multiple keyboards to control one DVR. Support PTZ camera (speed dome) operation. Support RS485 port and RS232 port. ... - Page 10 Note Icon Button Name Function 【Setup】:Set use mode switch 1+ 【Setup】:Main stream|sub stream mode switch. SHIFT Change input Switch between input methods method Go to the previous video channel. ENTER Confirm button On DVR main menu, confirm current operation ...
-
Page 11: Rear Panel
Note Icon Button Name Function to stop. PATTERN Pattern Set mode: Click【PATTERN】is to go to setup interface. Use mode: For example, 5+【PATTERN】 is to call pattern No.5 and then click the 【PATTERN】to stop. Aux menu and function operation. Joystick Indicator Power indicator... -
Page 12: Speed Dome Keyboard Series
Figure 1-3 Please refer to the following sheet for detailed information. Port Name Port Name Port Name USB port RS422 port RS485 port RS232 port Power socket 1.3.3 Speed Dome Keyboard Series Please refer to Figure 1-4 for speed dome keyboard port information. Figure 1-4 Please refer to the following sheet for detailed information. -
Page 13: Menu Operation
Menu Operation 2.1 Boot up and Shut down 2.1.1 Boot up Connect the keyboard to the proper power supplying source. The power indicator light is on. You can see the welcome interface (support customized setup) after the device properly booted up. Click 【ENTER】... - Page 14 Figure 2-2...
-
Page 15: Menu Operation
2.3 Menu Operation Use the joystick on keyboard to move up/down/left/right to select items. Use keyboard to input number or character to set parameters. Click 【ENTER】 to confirm current operation. Click【ESC】 to exit. 2.3.1 System The system manager includes time setup, network setup, address setup, aux setup, system update and logo update. - Page 16 2.3.1.3 Address The address value ranges from 0 to 255. The default setup is 0. When there is cascade connection, the 0 has the highest priority and the 255 has the lowest priority. See Figure 2-6. Figure 2-6 2.3.1.4 Aux It is to set screen backlight and auto logout function.
-
Page 17: Zone (Control Point)
Figure 2-8 Open REC Upgrade, input keyboard IP address and TCP port (Default setup is 37777). Note If you can not use the 37777 to upgrade, it means the application layer did not boot up properly. Please use port 3800 to upgrade. The upgrade process can become successful no matter the application layer properly booted up or not. -
Page 18: Account
ID: It is device ID number so that you can recognize device quickly. Name: Customized device name. Type: Device type. The options include: SD/NVD/DVR/DVM/MATRIX. Link: The options include: NET/RS232/RS485. Please select the type and set the corresponding parameters. -
Page 19: Config
Figure 2-12 2.3.3.2 Add Users Please input user name (max 8-digit) and then set corresponding password. The group options include user/guest. See Figure 2-13, Figure 2-13 Guest: The guest can only operate control point operation. User: The user has the PTZ control, system setup, backup, advanced setup and etc. Move the cursor to the corresponding item and then use the joystick to move the left/right to turn ... -
Page 20: Version
Figure 2-15 2.3.4.1 Import Insert the flash disk that contains the upgrade files to the keyboard and the go to the import interface. Click 【ENTER】 to import the configuration files. 2.3.4.2 Export Insert the flash disk to the keyboard and then go to the export interface. Click 【ENTER】 to export the configuration files. -
Page 21: Keyboard Control Speed Dome
3 Keyboard Control Speed Dome 3.1 Cable Connection Please connect keyboard A/B line to speed dome A/B line connection. 3.2 Keyboard Setup a) Please make sure keyboard A/B line and speed dome A/B line connection is right. b) Set speed dome address so that the speed dome address and the keyboard RS485 address are the same. -
Page 22: Iris/Zoom/Focus
On the speed dome, click 【ESC】 to go back to PTZ control interface. 3.3.2 Iris/Zoom/Focus 3.3.2.1 Iris On the keyboard, click 【IRIS】 button, use button 【+】and【-】or turn joystick up/down to control the iris. 3.3.2.2 Focus On the keyboard click 【FOCUS】 button, use button 【+】and【-】or turn joystick left/right to control the focus. -
Page 23: Pan
Figure 3-3 Please follow the steps listed below. a) Select Set and then click 【ENTER】, you can see an interface shown as in Figure 3-4. Figure 3-4 b) Use 3D joystick to select left limit and right limit. c) Click 【ENTER】 to complete setup. ... -
Page 24: Pattern
On Set mode, click 【TOUR】 button on the keyboard, the interface is shown as below. See Figure 3-6. Figure 3-6 3.3.6.1 Set tour a) Select Set item, the interface is shown as in Figure 2-10. Figure 3-7 b) Input a value at the tour No. c) Add/Delete preset to/from the tour. - Page 25 3.3.7.1 Set pattern a) Select tour number and then input a value. b) Select tour set button and then click 【ENTER】 button. c) Use joystick to set pattern and then click 【ENTER】 to end. The speed dome can memorize your whole operation. 3.3.7.2 Start pattern Select pattern No.
-
Page 26: Keyboard Control Dvr
4 Keyboard Control DVR 4.1 Keyboard Setup 4.1.1 COM Connection Note Please refer to chapter 8 to make COM cable. Before operation, please make sure cable connection is proper. In DVR menu, from Setting->System->RS232. The COM function is network keyboard and then set corresponding parameters. -
Page 27: Logout
c) Input ID, device name, IP address.RS232, RS485 you set on control point interface, Click 【ENTER】 to begin search. System auto connect to the DVR after successfully search operation. Tips Click 【ID】 on the keyboard and then input ID number. Click 【ENTER】 to quickly find the device. - Page 28 Function Function Function by frame...
-
Page 29: Network Keyboard To Control Decoder
5 Network Keyboard to Control Decoder 5.1 Splicing Screen Control Login the Web of the decoder, you can see the following interface. See Figure 5-1. Figure 5-1 Click the Splicing wall on the left pane; you can go to the following interface. See Figure 5-2. Click Fast splicing button, you can realize 1×1 setup conveniently. - Page 30 Figure 5-2 In Figure 5-2.click Info manager button, you can view and edit the corresponding screen control For network keyboard, click the 【Control ID】+【PLAY】 one by one, you can select the output screen quickly. See Figure 5-3. Figure 5-3...
-
Page 31: Output Video To The Tv Wall
5.2 Output Video to the TV wall Login the WEB of the decoder, from 【Setting】->【Remote device】, you can add the corresponding input source. Click the edit button ,you can edit the correspondong control SN. See Figure 5-4. For network keyboard, click the 【Control ID】+【CAM】, you can output the video to the TV wall. -
Page 32: Network Keyboard To Control Analog Matrix
6 Network Keyboard to Control Analog Matrix Please refer to chapter 8.1 to use RS232 COM to connect the network keyboard to the analog matrix. 6.1 Analog Matrix Operation Network keyboard can control the analog matrix to realize the following function. See Figure 6-1. Figure 6-1 Check can use the front panel to switch the video or not. -
Page 33: Network Keyboard To Control Video Matrix Platform
7 Network Keyboard to Control Video Matrix Platform 7.1 Splicing Screen Control Login the WEB of the video matrix platform (M60/M70), and then select splice control you can go to the following interface. See Figure 7-1. The network keyboard supports TV wall combination on the video matrix platform. You can add the video wall you want to control as the splicing screen and then add the plan for each TV wall. - Page 34 For network keyboard, click the 【Control ID】+【CAM】one by one, you can output the video on the wall to preview. Figure 7-2...
-
Page 35: Zone Settings Via The Keyboard
Figure 7-3 7.3 Zone Settings via the Keyboard Please refer to chapter 2.3.2 Zone (control point) for detailed information. The device type is DVM and step default value is 64. -
Page 36: Make Com Cable
8 Make COM Cable 8.1 Make RS232 COM Cable Please refer to the following figure to make RS323 cable. When use the network keyboard to control the analog matrix, RS232 Com adopts the straight 2-2, 3-3, 5-5. mode: Straight through connection mode is shown as in Figure 8-1. Figure 8-1 When use the keyboard to control other device, RS232 Com adopts the crossover connection 2-3, 3-2, 5-5. -
Page 37: 25-Pin Port And Switch Box Connection
Figure 8-3 8.3 25-pin Port and Switch Box Connection Connect switch 25-pin box RS232 port with DVR RS232 port. (25-pin outlet supports maximum twelve RS232 ports. Switch is just for sending not for receiving. So you can use two cables: GND and TXD) Please refer to the following figure if you are connecting 485 switch box to DVR See Figure 8-4. - Page 38 Figure 8-5 Please refer to the following figure if you are connecting via the hub. See Figure 8-6. Figure 8-6 Note: This quick start guide is for reference only. Slight difference may be found in the user interface. All the designs and software here are subject to change without prior written notice.
Need help?
Do you have a question about the NKB Series and is the answer not in the manual?
Questions and answers