Advertisement
Quick Links
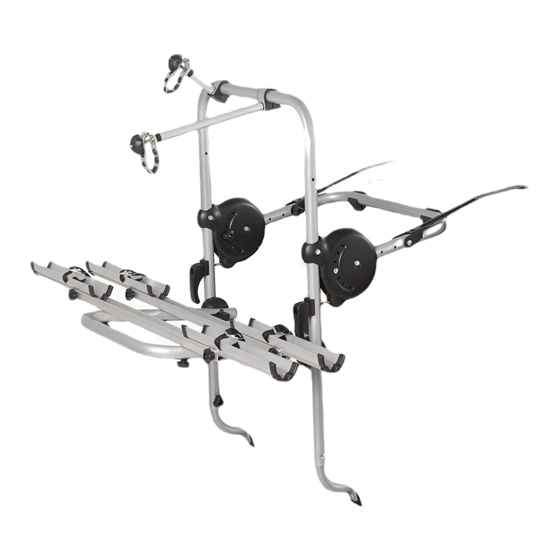
Kit Contents
S2
8
x
8
x
8
x
S3
2
x
1
x
2
x
4
x
4
3
2
1
FITTING KITS FOR THIS PRODUCT ARE
GB
SOLD SEPARATELY
application guide to determine the correct fitting kit.
MONTAGESETS VOOR DIT PRODUCT ZIJN
NL
LOS TE KOOP.
Zie de toepassingslijst welke
montageset U nodig heeft voor Uw auto.
MONTAGESÄTZE FÜR DIESES PRODUKT
DE
SIND SEPARAT ERHÄLTLICH
separaten Anwendungsleitfaden, um den passenden
Montagesatz zu wählen.
x10
x10
2
x
2
x
Refer to the separate
Siehe den
x10
ANPASSNINGSDETALJER FÖR DENNA
SW
PRODUKT SÄLJS SEPARAT
att hitta rätt anpassningsdetaljer
TÄMÄN TUOTTEEN AUTOKOHTAINEN KIINNITYS
FI
SARJA MYYDÄÄN ERIKSEEN
suositustaulukko oikean kiinnityssarjan valinnassa
LES KITS DE FIXATION POUR CE PRODUIT SONT
FR
VENDUS SÉPARÉMENT
d'affectation séparé pour déterminer le kit de
fixation correct
Main frame
Se separat guide för
Katso erillinen
Vous référer au guide
Advertisement

Related Manuals for Mont Blanc S2


Summary of Contents for Mont Blanc S2
- Page 1 Kit Contents Main frame FITTING KITS FOR THIS PRODUCT ARE ANPASSNINGSDETALJER FÖR DENNA SOLD SEPARATELY PRODUKT SÄLJS SEPARAT Refer to the separate Se separat guide för application guide to determine the correct fitting kit. att hitta rätt anpassningsdetaljer MONTAGESETS VOOR DIT PRODUCT ZIJN TÄMÄN TUOTTEEN AUTOKOHTAINEN KIINNITYS LOS TE KOOP.
- Page 2 Position the assembled carrier on a clean surface as Placera den hopmonterade cykelhållaren på en ren yta illustrated. Release the 2 adjuster levers and rotate the enligt bilden. Lossa de två låsningarna och vrid stödarmarna cycle support arms through 90 and lock in position.
- Page 3 S3: "Three cycle" carriers are packed with the cycle support S3: Cykelhållaren för 3 cyklar packas med frame separate. Position both parts of the frame on a clean/flat cykelhållarramen separat. Placera båda delarna till ramen på surface. Assemble the two ratchet adjusters as shown, and en ren och plan yta.
- Page 4 Release the two carrier clamping levers and turn the Lossa vridhandtagen för hållarens två spännanordningar handles anti-clockwise until the angle adjusters are fully och vrid moturs tills vinkeljusteringarna är helt öppna och opened, exposing approximately 45mm of the bolt. cirka 45 mm av skruvarna syns. .
- Page 5 Fit the thumb screw nuts to the inside face of the angle adjusters................... . De vleugelmoeren aan de binnenkant van de hoekinstellingen aanbrengen.
- Page 6 REFER TO SEPARATE LEAFLET FOR SUITABLE POSITION Refer to the enclosed application list to find the correct Se i den medföljande listan för att hitta rätt position, X, position for the extendable feet X, Y or Z. Insert the bolts Y eller Z, för de utdragbara fötterna.
- Page 7 A. Offer the carrier to the vehicle and hook the metal A. Placera hållaren på bilen och haka fast clamp straps over the tailgate of your vehicle. metallklämmorna i övre delen av bilens bagagelucka. B. Hook the feet under the bottom of your tailgate. B.
- Page 8 Ensure that both carrier clamping levers are in the Försäkra dig om att båda armarna för hållarens klämmor clamped position. Progressively tighten the levers on both är i rätt läge. Spänn armarna gradvis på båda sidorna av sides of the carrier, by turning them clockwise. When the hållaren genom att vrida dem medurs.
- Page 9 S2: Fixez la partie supérieur du vélo avec les bras de ...................
- Page 10 Feed the wheel straps through the wheel and into Mata fram remmarna genom cykelhjulet och in i the cambuckle. WARNING: ENSURE THAT THE STRAPS remlåset. VARNING: KONTROLLERA ATT REMMARNA FÖRS ARE INSERTED THROUGH THE CAMBUCKLES IN THE GENOM REMLÅSET ÅT RÄTT HÅLL. CORRECT DIRECTION.
- Page 11 FOR REMOVAL When removing the carrier from your vehicle release När du skall ta bort hållaren från din bil lossar du de båda both carrier clamping levers. Unhook the feet first from armarna för hållarens klämmor. Haka först loss fötterna från your tailgate (1st) and then metal fitting kit clamps nederdelen av bagageluckan (1) och sedan metallklämmorna (2nd).
- Page 12 FOR RE-FITTING Once you have set up the carrier for your first use all När du väl har justerat hållaren för första användningen adjustments can remain in position. When re-fitting release kan du låta alla vinklar och justeringar vara kvar. När du the two clamping levers (as step 2) offer the carrier to the skall återmontera hållaren lossar du de två...
-
Page 13: Special Recommendations
Special Recommendations • Retain these instructions for future • Avoid any vehicle bodywork of insufficient strength, trim reference, ensure that any other users of the cycle carrier and items such as aerofoils or spoilers. are familiar with their contents. • IMPORTANT! Carrier straps must always be re-tightened •... - Page 14 Besondere Empfehlungen • Behalten Sie diese Anweisungen für künftigen Gebrauch • Vermeiden Sie an Ihrer Wagenkarosserie jegliche und stellen Sie sicher, dass sämtliche Benutzer des Schwachteile wie Zier- oder Profilleisten bzw. Spoiler. Fahrradträgers mit ihrem Inhalt vertraut ist. • WICHTIG! Die Trägergurte müssen nach Anbringen der Fahrräder stets noch einmal angezogen werden.
- Page 15 Speciella rekommendationer • Undvik att belasta karossdelar, lister och detaljer som • Spara dessa instruktioner för framtida referens och vingar och spoilers onödigt mycket. försäkra att andra personer som använder hållaren är bekanta med dess funktioner. • VIKTIGT! Hållarens remmar skall alltid efterspännas när cyklarna har monterats på...
- Page 16 Szczególne zalecenia • Nale»y unika# na karoserii samochodu wszelkich miejsc • Baga»nik rowerowy mo»e zak¬óca# funkcjonowanie tylnej s¬abych takich jak listwy ozdobne lub listwy profilowane lub te» wycieraczki szyby samochodu. NIE MO„NA uruchamia# spojlery. wycieraczek szyby tylnej, gdy jest zamocowany baga_nik ! (PODPOWIED—) Nale»y usun™# bezpiecznik wycieraczki jako •...
- Page 17 Recommandations spéciales • Évitez tout élément de carrosserie qui n’est pas • L’essuie-glace arrière de votre véhicule risque d’être bloqué lorsque le porte-vélos est en place. NE PAS actionner l’essuie- suffisamment robuste, tel une section d’aile, un spoiler ou un bavolet.
- Page 18 Mont Blanc Industri UK Ltd. Eden Way, Pages Industrial Park, Leighton Buzzard, Beds, LU7 8TZ, Email: sales@montblancuk.co.uk www.montblancuk.co.uk PI398-00...
Need help?
Do you have a question about the S2 and is the answer not in the manual?
Questions and answers