Table of Contents
Advertisement
Quick Links
Active Aqua Chiller Setup and Troubleshooting
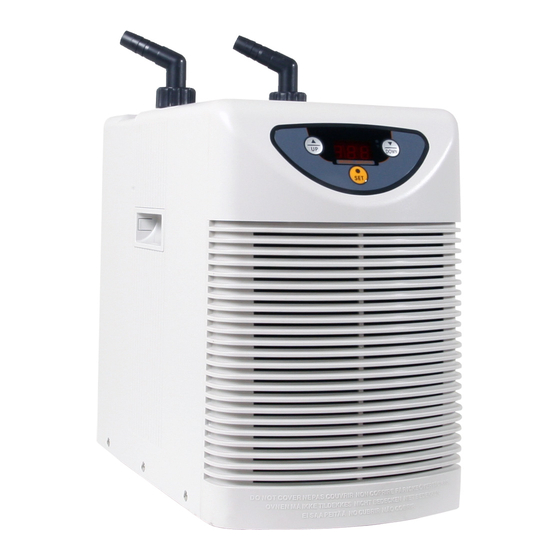
Active Aqua Chiller
Specifications:
Model:
Watts:
BTU:
Amps:
Volts:
Cord Length:
Compatibility:
Parts:
Chiller unit
Inflow/outflow fitting kit:
a. Inlet/outlet fittings
b. Worm drive hose clamps
c. Rubber replacement collars (extras)
d. Replacement fuse
Assembly Instructions:
1. Remove the chiller unit and all of the contained hardware from the box and packing
material.
2. Set the chiller unit upright in the desired area on a stable surface ensuring there is at
least 1' of clearance around the body (sides, top, and back) of the unit.
3. Install the inlet/outlet fittings onto the inflow and outflow threaded sites.
Guide Summary
AACH10 / AACH25 / AACH50 / AACH100
150W / 280W / 360W / 950W
960 / 2300 / 4100 / 10370
2.2 / 3 / 4.4 / 9.6
110‐120V
6'
Active Aqua submersible water pumps
x 1 ea.
x 1 ea.
x 2 ea.
x 2 ea.
x 2 ea.
x 1 ea.
Advertisement
Table of Contents

Related Manuals for Active Aqua AACH10


Summary of Contents for Active Aqua AACH10
- Page 1 Active Aqua Chiller Setup and Troubleshooting Guide Summary Active Aqua Chiller Specifications: AACH10 / AACH25 / AACH50 / AACH100 Model: Watts: 150W / 280W / 360W / 950W BTU: 960 / 2300 / 4100 / 10370 2.2 / 3 / 4.4 / 9.6 Amps: Volts: 110‐120V Cord Length: Active Aqua submersible water pumps Compatibility: Parts: Chiller unit x 1 ea. Inflow/outflow fitting kit: x 1 ea. a. Inlet/outlet fittings x 2 ea. ...
- Page 2 Note: If the inflow and outflow fittings are of different sizes, typically the larger one is used on the inflow and the smaller one on the outflow. 4. Attach the desired length of tubing onto each inflow and outflow fitting adapter with the worm drive hose clamps. The inflow should connect the chiller to the appropriate sized submersible water pump, such as an Active Aqua, in the proper sized reservoir (see attached performance chart). The outflow tube should hang freely in the reservoir to reintroduce the chilled water back into the holding tank. Operation: 1. Do NOT power on the chiller unit yet. Fully submerge the water pump to be used, plug it in, and ensure that water is moving freely between the holding reservoir and the chiller unit. 2. Plug the chiller into a grounded outlet and ensure the power switch located on the back of the unit is in the “ON” (I) position. Setting the Temperature: 1. Press and hold the SET button down for approximately 3 seconds to enter the water temperature programming mode. The previous water temperature setting will display. 2. Use the /\ or \/ buttons on the control panel to increase or decrease the desired water temperature. Press the SET button once more, or wait approximately 8 seconds to select the desired temperature. Temperature Display: • Press the SET button once to display the current set temperature value of the chiller unit; press it again to display the actual temperature value of the water. The blinking display indicates the set temperature. Temperature Error Adjustment: 1. When the reservoir water temperature differs from the set temperature value, an “II” indication should appear in the display.
- Page 3 2. Press and hold the /\ and \/ buttons at the same time for approximately 6 seconds to enter the error adjustment programming. The display will blink once this status is active. 3. By pressing either the /\ or \/ buttons, the error adjustment range can be modified +/‐1.5 degrees Celsius. DO NOT USE THIS FUNCTION IF IT IS NOT NECESSARY. Fuse Replacement: 1. Detach the power cord from the chiller. The fuse compartment is underneath the power cord socket located on the back of the unit. 2. Remove the notched fuse slide from the compartment by pulling it straight out. A small screwdriver or pointed tool may be needed to remove the slide. 3. Check the fuse and internal compartment for damage (e.g. blown fuse, melted terminals, etc.). 4. Replace the fuse if necessary and retry the operation. Compressor Operation: The refrigeration compressor will automatically turn off when the water reaches, or is below, the set temperature. When the compressor turns off, it will stay off for approximately 3 minutes or until the water is one degree above the set temperature. An indicator light in the top right portion of the display will appear when the compressor is active, disappear when the water temperature has been reached, and blink when the compressor is in the 3 minute protection mode. Error Code: Certain text will appear on the display panel in the event of an error. “P1” is an example that means there is a defect in the temperature sensor. If error codes are appearing on the display, return the unit to the original place of purchase for a warranty assessment. Cleaning and Maintenance: Flushing of the internal chiller components is recommended at least once every 1‐2 months to ...
- Page 4 Note: Do NOT use soap or detergents for cleaning the internal components of the chiller system. 1. Disconnect the chiller and submersible water pump from the power supply. 2. Clean off the pump with a high powered hose or sprayer to remove debris and dirt from the pre‐filter and housing. Clean the pre‐filter as well if one is used. 3. Reconnect the pump to the chiller inflow tubing and place it in a clean reservoir. 4. Fill the reservoir with clean water and a flushing agent formulated to remove salt deposits and excess nutrients from the plant system and grow medium (available at most indoor gardening and hydroponic retailers). Note: Using a flushing agent is completely optional as stated in step 4. 5. Plug in the pump and allow it to run for at least 1 hour so that the projected solution contacts all of the internal components used in the chiller during operation. Unplug the pump and empty the reservoir solution. 6. Repeat step 4 and 5 with plain water ONLY. 7. Remove the front grill from the unit so the air inlet filter is accessible. Clean both with a vacuum and/or brush. 8. Replace the air inlet filter and grill to the front. Special Notes and Instructions: • The cooling efficiency of this unit is relative to the surrounding environment i.e. install location, ambient air temperature, additional heat sources (grow lights, pumps, CO generators, air conditioners, dehumidifiers, etc.), and any other connecting parts that may impede the chiller’s operation. Insufficient air exchange of the room the chiller is occupying will reduce the operational efficiency if the ambient air temperature rises due to heat output from the chiller and/or other equipment. • Follow the GPH (gallon per hour) recommendations so that the appropriate size pump may be implemented. A pump that is either too weak or too powerful may impede the operation. Vertical distance between the pump and the chiller will affect the size of pump that is needed. For example, if the pump only needs to project water 2' to get the ...
- Page 5 • Do NOT cover the chiller unit with anything during operation. • Place the chiller in the upright position ONLY for operation and storage purposes. • Avoid allowing the external body of the chiller unit to come into direct contact with liquids. Failure to do so may result in damage to the unit or electric shock. • Keep the power cord free of obstructions, such as heavy or sharp objects sitting directly on it. • This chiller is for approved for indoor use ONLY. • Keep the unit away from flammable vapors, direct sunshine, high temperature exposure, and high humidity. • Do NOT submerse the chiller. Doing so will damage the unit and may inflict electric shock. The Hydrofarm Guarantee Active Aqua water chiller systems are guaranteed to the original owner for 1 year from the date of purchase. Misuse, abuse, or failure to follow instructions is not covered. If you have a problem, recheck your system and pump. If this does not remedy the situation, contact the original place of purchase for a warranty assessment. Unauthorized returns will not be accepted. Save your receipt/invoice–a copy is required for all warranty work.
Need help?
Do you have a question about the AACH10 and is the answer not in the manual?
Questions and answers