Table of Contents
Advertisement
Quick Links
Advertisement
Table of Contents

Related Manuals for Neatech Rehab Series


Summary of Contents for Neatech Rehab Series
- Page 1 2019-12 SERVICE MANUAL...
- Page 3 DECLARATION OF CONFORMITY The manufacturer Neatech.it Via A. de Curtis 4/A, 80040, Cercola (NA), Italy declares that the wheelchair XTREME (reference code: S065) other names: SPEEDSTAR XTREME satisfies the requirements laid down by the European Directive 93/42; according to the criteria for classification of Annex IX of this Directive, it is classified as:...
-
Page 4: Table Of Contents
Index PRODUCT INFORMATION ....................... 1 PREPARATION FOR FIRST USE ....................2 Checks to be made on delivery ..................2 Unpacking ........................2 Software description ....................... 3 2.1.1 Rnet system: OBP onboard programming..............4 2.1.2 Rnet system: PC programming ................. 5 ADJUSTMENTS ........................ - Page 5 Transport and storage ....................43 4.8.1 Batteries removal ....................44 MAINTENANCE ........................47 Maintenance and cleaning .................... 47 Controls to be performed on the product..............48 Tire puncture ......................... 49 5.3.1 User information ....................49 5.3.1 Service information ....................51 Wiring diagram ......................
- Page 6 Symbols in this manual WARNING This symbol means presence of danger for the user or damage for the product. Always follow instructions when this symbol is present. PINCH HAZARD This symbol means presence of pinch hazard. ELECTRICAL WARNING This symbol means presence of danger related to the presence of electrical energy.
- Page 7 TEMPERATURE The temperature of some surfaces may increase when the product is exposed to external heat sources as direct sunlight. TIPPING HAZARD Tipping hazard is strongly reduced because of the design of the product according to EN 12182. In any case, please pay special attention during the adjustments and use of the product to prevent any damage to the user or product itself.
- Page 8 ELECTROMAGNETIC RADIATION DANGER The behavior of the wheelchair while driving may be affected by electromagnetic fields created by transceivers such as: Citizens band (CB) radios, walkie-talkies, fire and police radios, cellular phones, lap-top computers, commercial radio and television broadcast antennas. PLEASE USE CAUTION in the presence of these devices.
- Page 9 Service manual is intended for technical personnel to maintain and repair wheelchairs. It is important to follow the instructions contained in this manual in order to professionally work with the product. The qualified personnel who works with wheelchairs must comply with all provisions of occupational safety and common sense in order to preserve his own safety.
- Page 10 MANUFACTURER For any need not expressly explained in this manual, please contact the manufacturer. Neatech.it SRL via A. de Curtis 4/A, 80040, Cercola (NA), Italy www.neatech.it –...
-
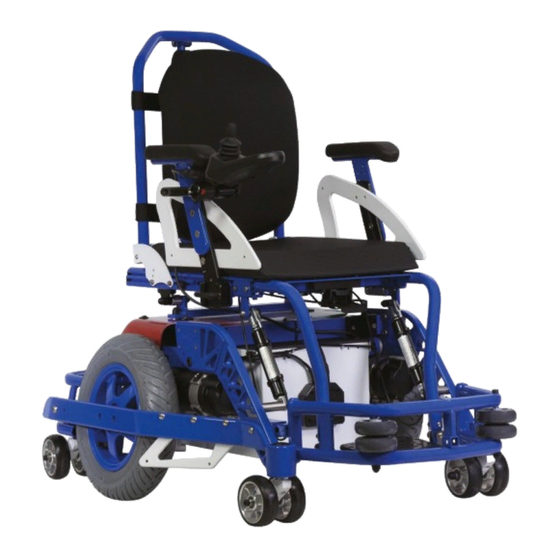
Page 11: Product Information
MAX 105 kg Maximum user weight MAX 150 kg Seat width MIN 360 mm – MAX 500 mm Batteries 2x 12 V 75 Ah / 2x 12 V 50 Ah Charger Power module Rnet 120 A Motors 2x 220 W www.neatech.it 1/71... -
Page 12: Preparation For First Use
The wheelchair is delivered already mounted and ready to use. Before starting to use the wheelchair please check if all described components are present. If not, please contact as soon as possible the vendor. PACKAGING DISPOSAL To properly recycle the packaging materials follow instructions provided by your local waste disposal service. www.neatech.it 2/71... -
Page 13: Software Description
Programming must be conducted only by qualified personnel with in- depth knowledge of the wheelchair and power module system. Any change to this part of the software may result in a hazardous situation for the user. www.neatech.it 3/71... -
Page 14: Rnet System: Obp Onboard Programming
Any change to this part of the software may result in a hazardous situation for the user. To manage this part of the software it is required a Rnet Dongle made by Penny & Giles and some special software. Please contact the manufacturer for more information. www.neatech.it 4/71... -
Page 15: Rnet System: Pc Programming
Software setup [SKIP THIS POINT IF YOU ALREADY INSTALLED THE LATEST VERSION OF RNET SOFTWARE OEM_GENERIC] To know the latest version of RNET software please contact the manufacturer. Please lunch setup application and follow showed indications. www.neatech.it 5/71... - Page 16 • Connect the Rnet Dongle to the PC and to the wheelchair. For more information, see Rnet manual. • Customize desired parameters. • When finished turn on the wheelchair and click on the UP arrow to write the parameters in the wheelchair. www.neatech.it 6/71...
-
Page 17: Adjustments
Armrests height B - Assistant Castor height B - Assistant Front protection B - Assistant Footplates height B - Assistant Footplates angle and depth B - Assistant Joystick position B - Assistant Stick depth B - Assistant Table 2 www.neatech.it 7/71... -
Page 18: Seat Tilt
3.2 Seat tilt MIN VALUE MAX VALUE SEAT ANGLE 0° 15° Figure 3 • Act on the lever (A) located under the seat to tilt the wheelchair. www.neatech.it 8/71... -
Page 19: Seat Depth
3.3 Seat depth MIN VALUE MAX VALUE 340 mm 460 mm Table 3 WARNING It is needed to set separately left and right seat depth. Always set them at the same manner. Average needed Difficulty level: time: Easy 5 min www.neatech.it 9/71... - Page 20 • Loosen the 2 screws shown in figure. • Set the backrest according to the desired seat depth. OPEN-END WRENCH • Tight again the 6 screws. 10 mm • Repeat operations for both left and right side of the wheelchair. • Mount again the backrest. www.neatech.it 10/71...
-
Page 21: Backrest Angle
Difficulty level: time: Easy <5 min Figure 5 • Pull away the pin shown in figure OPEN-END WRENCH • Set backrest at the desired angle 10 mm • Put back in place the pin in one of available holes. www.neatech.it 11/71... - Page 22 12/71...
-
Page 23: Footplates Height
3.5 Footplates height POSSIBLE VALUES 30.0 cm 31.5 cm 33.0 cm 34.5 cm 36.0 cm Average needed Difficulty level: time: Easy <5 min www.neatech.it 13/71... - Page 24 4 mm end wrench. • Repeat the operation for both left and right side of the wheelchair. • Set the position of the footplate according to OPEN-END WRENCH 10 mm desired height. • Screw again the screws. www.neatech.it 14/71...
- Page 25 • Unscrew the screw shown in figure with the allen ALLEN WRENCH wrench while holding the nut behind with the open- 5 mm end wrench. • Set the position of the footplate according to desired height. OPEN-END WRENCH • Screw again the screws. 13 mm www.neatech.it 15/71...
-
Page 26: Footplates Depth And Angle
It is not easy to provide a range for adjustment of footrests because there are too many configuration and possibilities. In any case it is always possible to choose between 3 different depth. Average needed Difficulty level: time: Easy <5 min www.neatech.it 16/71... - Page 27 Set the position of the footplate according to desired angle. • Tighten again the screws. Depth adjustment ALLEN WRENCH 4 mm • Unscrew the 2 screws shown in figure. • Set the position of the footplate according to desired depth. • Screw again the screws. www.neatech.it 17/71...
-
Page 28: Armrest Height
RIGHT AND LEFT SIDE It is possible to adjust separately left and right armrest. Average needed Difficulty level: time: Easy <5 min SIDEPAD, JOYSTICK AND ARMREST HEIGHT It is better to adjust first armrest height, then joystick and finally the sidepad. www.neatech.it 18/71... - Page 29 Figure 9 • Loosen the 2 screws shown in figure. ALLEN WRENCH • Set the armrest according to the desired height. 5 mm • Tight again the 2 screws. www.neatech.it 19/71...
-
Page 30: Armrest Depth
3.8 Armrest depth MIN VALUE MAX VALUE 12.5 cm 23.5 cm RIGHT AND LEFT SIDE It is possible to adjust separately left and right side. Average needed Difficulty level: time: Easy <5 min www.neatech.it 20/71... - Page 31 • Tilt the seat because it is needed to act under the seat. See section 3.2. OPEN-END WRENCH • Loosen the 4 screws shown in figure. 10 mm • Put the backrest at the desired position. • Tighten again the 2 screws. www.neatech.it 21/71...
-
Page 32: Armrest Depth
3.9 Armrest width MIN VALUE MAX VALUE 6.0 cm 10.0 cm RIGHT AND LEFT SIDE It is possible to adjust separately left and right side. Average needed Difficulty level: time: Easy <5 min www.neatech.it 22/71... - Page 33 • Tilt the seat because it is needed to act under the seat. See section 3.2 ALLEN WRENCH • Loosen the 4 screws shown in figure. 6 mm • Put the backrest at the desired position. • Tighten again the 2 screws. www.neatech.it 23/71...
-
Page 34: Castor Height
Easy <5 min Figure 12 • Remove the plastic cup using a lever. OPEN-END • Act on the two nuts shown in figure to adjust the WRENCH 19 mm height of the castor. OPEN-END WRENCH 19 mm www.neatech.it 24/71... -
Page 35: Legrest Angle
• Repeat operation for both left and right side of the wheelchair. ALLEN WRENCH • Set the protection at the desired position. 6 mm • Screw again the screw shown in figure. • Repeat operation for both left and right side of the wheelchair. www.neatech.it 25/71... -
Page 36: Joystick Position
Average needed Difficulty level: time: Easy <5 min Figure 14 • Unscrew the 2 screws shown in figure. ALLEN WRENCH • Adjust the depth of the joystick as desired. 5 mm • Screw again the screws. www.neatech.it 26/71... - Page 37 ADJUNCTIVE ADJUSTMENT Moreover it is possible to adjust the angle of the joystick simply acting on the two levers shown in figure. Figure 15 www.neatech.it 27/71...
-
Page 38: Default Position
Default position means that all adjustable parts of the wheelchair are set in the most stable and safe configuration ADJUSTABLE PARTS VALUE NOTES Seat angle 0° Backrest angle 90° Legrest angle 90° Or minimum Seat height 0 cm Table 4 www.neatech.it 28/71... -
Page 39: Use Of The Product
INFORMATION Do not install, maintain or operate the product without reading all warnings and this entire manual. Always keep this manual in connection with the product. INFORMATION The wheelchair is designed for use mostly in indoor environments. www.neatech.it 29/71... - Page 40 Do not stand on the frame of the wheelchair. Some pathologies may limit your ability to use your wheelchair safely. Be sure to consult with a doctor about your physical limitations. Please practice your drive ability under the supervision of an assistant. www.neatech.it 30/71...
- Page 41 The wheelchair is intended to be used during sport competition. So it is not explicitly designed to deal with side slopes. Please pay special attention when dealing with side slopes. Turning with the wheelchair When turning with the wheelchair, always use great caution. www.neatech.it 31/71...
- Page 42 Wheelchair is not intended to climb obstacles. In any case when facing a small obstacle is it possible to unlock the rear protection acting on the handles shown in figure in order to facilitate operations. After obstacle climbing it is very important to lock again the rear protection. Figure 16 Figure 17 www.neatech.it 32/71...
- Page 43 Do not lift the wheelchair with a user on board. Do not lift the wheelchair grabbing the legrests. If you really need to lift the wheelchair, it is suggested to grab it with the help of at least one other people. Grab the wheelchair using the parts shown in figure. Figure 18 www.neatech.it 33/71...
-
Page 44: Control System Of The Wheelchair
Speed increase/decrease and outdoor. Use the function PROFILE to change different types of profiles: they are sorted from the more indoor ones to the more outdoor ones. For each profile it is possible to change the speed. www.neatech.it 34/71... - Page 45 Use this function to see total and partial distance made with the wheelchair. It is also possible to reset partial distance. Backlight It is possible to adjust backlights of the screen. Background Use this function to choose the color of background of the display. www.neatech.it 35/71...
-
Page 46: Manual Brake Release Lever
Don’t operate the brake release without the presence of an assistant. WARNING The drive system should be re-engaged before an occupant is left unattended or attempts to operate the wheelchair. WARNING Always act on both left and right manual release levers. www.neatech.it 36/71... -
Page 47: Use As Seat In A Motor Vehicle
4.3 Use as seat in a motor vehicle WARNING It is not possible to use the wheelchair as a seat in a motor vehicle. www.neatech.it 37/71... -
Page 48: Main Switch
If the problem still continues, it means that there is some electric fault. If the switch operates, often this means that there is a major electrical fault. The cause of fault should be checked carefully. For more information, please contact the manufacturer. www.neatech.it 38/71... -
Page 49: Battery Charging
Seat width from 300 mm to 360 mm: 24 V - 35 Ah - about 197x131x180 (h) about Seat width from 380 mm to 460 mm: 24 V - 50 Ah - about 198x166x171 (h) mm - about 15 kg www.neatech.it 39/71... - Page 50 Check if charger requirements data matches with the network power (voltage, frequency) RELEASE DANGER Any impact to the batteries could cause a loss of fluids. Please pay special attention. BATTERIES DISPOSAL To properly recycle the batteries follow instructions provided by your local waste disposal service. www.neatech.it 40/71...
- Page 51 Under the back cover of the wheelchair there is a fan with the aim of cooling the main Power Module. It is possible to turn on and off the fan acting on the switch shown in Figure . Figure 58 www.neatech.it 41/71...
-
Page 52: Transport And Storage
4.7 Front protection It is possible to have different type of front protection. Figure 58 - Football front protection Figure 58 - Hockey front protection 1 www.neatech.it 42/71... -
Page 53: Transport And Storage
It is possible to store the wheelchair in a place with a temperature between -20 °C and +45 °C. • Turn off the wheelchair. • Turn off the main switch. See section 4.4. WARNING If you transport the wheelchair with motors disengaged, the wheelchair is free to move. This may result in a hazardous situation. www.neatech.it 43/71... -
Page 54: Batteries Removal
• Use a 17 mm open-end wrench to block the bolt OPEN-END WRENCH 17 mm (A)and a 22 mm open-end wrench to unscrew the nut (B). • Swipe away the bolt and pay attention to OPEN-END WRENCH 15 mm dismounted nuts. • Figure 24 www.neatech.it 44/71... - Page 55 • Use the highlighted bar in figure to pull toward the seat www.neatech.it 45/71...
- Page 56 • Remove the cover. While removing unplug the 6 mm connector of the switch of the fan. Figure 26 • Unscrew the screws shown in figure following the ALLEN WRENCH given order (1-2-3-4). 5 mm • Pull away the batteries. www.neatech.it 46/71...
- Page 57 It is not possible to provide a universal package, so the user should provide himself for it. The used package must be water and dust resistant and strong enough to protect the wheelchair from any hurts. When inserting the wheelchair into the package protect any protruding parts with some foam or similar. www.neatech.it 47/71...
-
Page 58: Maintenance
To clean the wheelchair do not use high-pressure water spray devices. For plastic and metal parts use a soft cloth dampened with mild detergent. For the upholstery, linings, seat and back covers use warm water and mild detergent. Do not use stain removers, solvents, acids, etc. www.neatech.it 48/71... -
Page 59: Controls To Be Performed On The Product
250 kPa. Check if the lever of the main Weekly B - Assistant switch works correctly Check tire usury Monthly B - Assistant Check brake release lever Monthly B - Assistant Check aging of batteries Monthly C - Service www.neatech.it 49/71... -
Page 60: Tire Puncture
Traction wheel Figure 27 ALLEN WRENCH 6 mm • Unscrew the screw (A) using a 5 mm allen wrench. • Unscrew the screw (B) using a 6 mm allen wrench. • Remove the bar. ALLEN WRENCH 5 mm www.neatech.it 50/71... - Page 61 • Remove the wheel Contact an authorized service center for the repair or the substitution of the damaged wheel. When the authorized service center gives you back the repaired wheel or a new one, mount it following instructions in reverse order. www.neatech.it 51/71...
-
Page 62: Service Information
Tube of traction wheel R045-0022 Tire of traction wheel Table 5 Type of operation Parts that can be bought at an authorized service center and substitute autonomously Parts that need to be substituted at an authorized service center. www.neatech.it 52/71... -
Page 63: Wiring Diagram
5.4 Wiring diagram 5.4.1 Rnet Figure 29 www.neatech.it 53/71... - Page 64 A - Power module Battery pack and main switch Motor 1 left (included in motor) Motor 2 right (included in motor) Charger connector www.neatech.it 54/71...
- Page 65 B - Battery pack and main switch Power module and fan www.neatech.it 55/71...
- Page 66 C - Fan and switch Power module Main switch www.neatech.it 56/71...
-
Page 67: Batteries Replacement
• Use a 17 mm open-end wrench to block the bolt OPEN-END WRENCH 17 mm (A)and a 22 mm open-end wrench to unscrew the nut (B). • Swipe away the bolt and pay attention to OPEN-END WRENCH 15 mm dismounted nuts. • Figure 31 www.neatech.it 57/71... - Page 68 • Use the highlighted bar in figure to pull toward the seat www.neatech.it 58/71...
- Page 69 • Unscrew the screws shown in figure following the given order (1-2-3-4). • Pull away the batteries. ALLEN WRENCH 5 mm • Mount new batteries following instructions in reverse order. When connecting cables please follow given order (1-2-3-4). www.neatech.it 59/71...
- Page 70 The weights of each battery is about 25 kg. Please pay special attention while handling. BATTERIES SPECIFICATION 12 V - C20 75 Ah - AGM or GEl type - Dimensions 260x170x205(h) Code Description Type of Notes operation R045-0110 Batteries www.neatech.it 60/71...
-
Page 71: Reuse
The product is suitable for reuse. Before dispensing it, the product must be cleaned, and subjected to maintenance. The operating instructions are included in this manual and must also be provided when the product is passed on. WARNING This operation must be performed only at an authorized service center. www.neatech.it 61/71... -
Page 72: Spare Parts
Lateral bar Ø320x58 mm R045-0220 Wheel protection R045-0040A Front castor with fork R045-0040B Rear castor with fork R045-0041 Single wheel of castor R045-0042 Bearings R045-0050 Cover R045-0060 Fan with mounting plate R045-0061 R045-0062 Switch R045-0170 Motors - couple www.neatech.it 62/71... - Page 73 R045-0330 Gas spring R045-0331 Gas spring support R045-0332 Lever for tilting R045-0372 Telescopic bar for backrest R045-0373 Backrest pin R045-0391 Armrest padding R045-0392 Armrest support R045-0393 Armrest fixing system R045-0394 Lever for armrest R045-0395A Armrest lower support standard www.neatech.it 63/71...
- Page 74 Seat cushion - seat 400 mm R045-0430D Seat cushion - seat 420 mm R045-0430E Seat cushion - seat 440 mm R045-0430F Seat cushion - seat 460 mm R045-0430G Seat cushion - seat 480 mm R045-0430H Seat cushion - seat 500 mm Table 7 www.neatech.it 64/71...
- Page 75 The use of spare parts or accessories not approved by the manufacturer may make the wheelchair unstable or uncontrollable. For each order, always contact an authorized service center. CONTACT INFORMATION For any other part not described in this manual please contact the manufacturer. www.neatech.it 65/71...
-
Page 76: Specifications
It is possible to use the wheelchair when the temperature is between -10 °C and +40 °C. It is possible to store the wheelchair in a place with a temperature between -20 °C and +45 °C. www.neatech.it 66/71... -
Page 77: Maximum User Weight
6.1 Maximum user weight Seat width 36 cm 75 kg 38 cm 100 kg 40 cm 100 kg 42 cm 150 kg 44 cm 150 kg 46 cm 150 kg 48 cm 150 kg 50 cm 150 kg Table 8 www.neatech.it 67/71... -
Page 78: Other Provided Information
6.2 Other provided information Manufacturer Neatech.it srl Address via A. de Curtis 4/A – 80040 – Cercola (NA) - Italy Model S065 – Xtreme Description Value Overall length with legrest MIN: 980 mm MAX: 1100 mm Overall width 730 mm Folded length N.A. - Page 79 Seat surface height at front edge 50.0 cm Backrest angle MIN: 80° MAX: 135° Backrest height 420 mm Footrest to seat distance MIN: 30.0 cm MAX: 36.0 cm Armrest to seat distance MIN: 30.5 cm MAX: 35.5 cm www.neatech.it 69/71...
-
Page 80: Dimensions
440 mm 460 mm 480 mm 500 mm MIN 340 mm MAX 460 mm 420 mm 500 mm Football front protection : 1100 mm Hockey 1 front protection : 980 mm Hockey 2 front protection : 1070 mm www.neatech.it 70/71... -
Page 81: Warranty Terms
The warranty expires in case of tampering, improper storage, unauthorized or incorrect maintenance. 7.1 Serial number For any report or assistance request, please communicate the serial number mentioned on the label in the position shown in figure. Figure 34 www.neatech.it 71/71... - Page 82 Note...
Need help?
Do you have a question about the Rehab Series and is the answer not in the manual?
Questions and answers