
Related Manuals for Pierenkemper MiniFG

Summary of Contents for Pierenkemper MiniFG
- Page 1 DE / EN / IT MiniFG GebrauchsanweisunG OperatinG instructiOns istruziOni per l‘usO...
-
Page 2: Table Of Contents
Pierenkemper Gebrauchsanweisung - MiniFG Inhaltsverzeichnis Allgemeine Informationen Hinweise zum Gebrauch des Gerätes Vorsichtsmaßnahmen Warnung! Gegenanzeigen Welche Nebenwirkungen können auftreten? Beschreibung der Bildzeichen Technische Beschreibung Technische Daten Betriebsarten Beschreibung des Gerätes Bedienung des MiniFG Das Gerät einschalten Wie stimuliere ich? Userprogramme Ein- und Ausschalten der Signaltöne... -
Page 3: Allgemeine Informationen
Luftfeuchtigkeit aussetzen (nur anwenden bei Temperaturen zwischen 10 °C - 40 °C und einer relativen Luftfeuchtigkeit unter 90 %). • Sorgfältige Aufsicht ist geboten, wenn das MiniFG an oder in der Nähe von Kindern angewendet wird. •... -
Page 4: Gegenanzeigen
Geräte beeinflussen. Beachten Sie auch die Hinweise zur „Inbe- triebnahme des Produktes“. Gegenanzeigen Wann darf ich das MiniFG nicht anwenden oder nur nach Rücksprache mit dem Arzt anwenden (Kontraindikationen)? • Anwender/-innen mit elektronischen Implantaten wie z.B. Herzschrittmacher oder Pumpen •... -
Page 5: Technische Beschreibung
Deutsch Umweltschutz. Geben Sie das Gerät am Ende der Lebensdauer nicht in den normalen Hausmüll. Bringen Sie es zum Recycling zu einer offiziellen Sammel- stelle. Auf diese Weise helfen Sie die Umwelt zu schonen. Gebrauchsanweisung befolgen Technische Beschreibung 2 Kanal Generator mit 6 integrierten Programmen und die Möglichkeit 36 eigene Pro- gramme anzulegen. -
Page 6: Beschreibung Des Gerätes
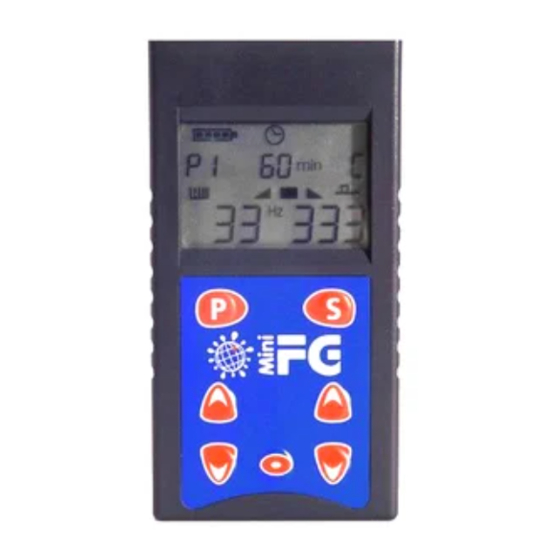
7 - Ausgangsbuchsen Bedienung des MiniFG Das Gerät einschalten Schalten Sie das Gerät über die Taste ein. Das MiniFG startet mit dem Programm 1 (P1). Wie stimuliere ich? Auswahl der Programme Durch Betätigen der Modifikationstasten wechseln Sie zum nächsten Standard- bzw. Userprogramm (Abbildung 1). Dabei werden zunächst die mit einem „P“... - Page 7 Deutsch Im Display wird zu jedem Programm die entsprechenden Betriebspa- rameter angezeigt: Sinus Rechteck Positiv – Negativ Positiv Kontinuierlich Programm (7-20-7-20-7 min) 6 Frequenzen à 10 min Starten der Stimulation Legen Sie zunächst die Elektroden an den gewünschten Körperstel- len an und verbinden Sie die Elektrodenkabel mit den Elektroden und dem Gerät.
- Page 8 Pierenkemper Gebrauchsanweisung - MiniFG Anzeigen der Stimulationsparameter In den Betriebsarten Programm „P“ und Frequenz „F“ wird die der- zeit ablaufende Programmsequenz im Wechsel mit der Programm- nummer in der Anzeige links oben dargestellt. In der Betriebsart Kontinuierlich „C“ erscheint dort nur die Programmnummer.
-
Page 9: Userprogramme
Deutsch Bei der Änderung der Stimulationsdauer in der Betriebsart Pro- gramme „P“ wird nur die Dauer der ersten Stimulationssequenz verändert. Bei der Änderung der Stimulationsdauer in der Betriebsart Frequenz „F“ wird die Gesamtdauer der Stimulation verändert. Es ist nur Abbildung 4 möglich die Zeit in 6 Minuten Schritten zu verändern. - Page 10 Pierenkemper Gebrauchsanweisung - MiniFG Standard– oder Userprogramme editieren Als Startwerte werden die Parameter des jeweiligen Programmes zugrunde gelegt. Drücken Sie die Taste , um zum nächsten Para- meter zu springen bzw. nach dem letzten Parameter die Werte zu übernehmen. Mit Hilfe der Modifikations-Tasten können die Werte editiert...
-
Page 11: Ein- Und Ausschalten Der Signaltöne
Deutsch Löschen aller Userprogramme Wenn Sie beim Einschalten des Gerätes die Tasten und links gedrückt halten, so werden alle Userprogramme gelöscht. Löschen eines einzelnen Userprogramms Zum Löschen eines Userprogramms wählen Sie bitte das entspre- chende Userprogramm im Editiermodus aus und betätigen Sie die Taste. Das Usersymbol „U“ blinkt. Durch das Betätigen der Taste wird das ausgewählte Userprogramm gelöscht. -
Page 12: Batteriewechsel
Betriebes über die Segmente innerhalb des Batteriesymbols deutlich gemacht. Sinkt die Spannung unter einen kritischen Wert, so schaltet sich das MiniFG selbständig aus bzw. lässt sich nicht mehr einschalten. Dann ist es notwendig, eine neue Batterie in das Gerät einzulegen. -
Page 13: Allgemein
Personen ausgeführt werden und das Gerät MiniFG in Übereinstimmung mit der Gebrauchsanweisung betrieben wird. Garantie Auf das Gerät MiniFG gewähren wir eine Garantie von 1 Jahr ab Datum der Übernahme, ausgenommen sind Kabel und Elektroden. Pflege und Reinigung Für das Gerät MiniFG sind keine besonderen Pflege- oder Reinigungsmittel nötig. -
Page 14: Kombination
Pierenkemper Gebrauchsanweisung - MiniFG Sollte trotzdem Feuchtigkeit eindringen, so muss das Gerät vor erneuter Anwendung einer technischen Kontrolle unterzogen werden. Kombination Das Gerät MiniFG darf mit allen im Lieferumfang aufgeführten Artikeln kombiniert werden. Lieferumfang MiniFG REF 447008 Koffer REF 450980-0050... - Page 15 Description of the Signs Technical Description Technical Data Types of Operation Description of the Device Operation of the MiniFG Switch on the Device How do I carry out the stimulation? User Programs Switching the Signal Tones On and Off Switching the Device Off...
-
Page 16: General Informations
40 °C and at a relative air humidity below 90 %). 10. Care must be taken when the MiniFG basic is used on or in the proximity of children. 11. Store the MiniFG device in its original packaging, to protect it from damage and contamination. -
Page 17: Precautionary Measures
Precautionary Measures Patients with an implanted electronic device (e.g. heart pacemaker) should not be treated with a stimulating current therapy with the MiniFG device without consulting a doctor beforehand. The MiniFG device must only be connected to one patient for stimulation. -
Page 18: Technical Description
Pierenkemper Operating Instructions - MiniFG Technical Description Dual-channel generator device with 6 integrated programs and the possibility of setting up 36 of your own programs. Technical Data Output Voltage 2 – 15 V (without working resistance) Frequency Range 1 – 999999 Hz (±100ppm) -
Page 19: Operation Of The Minifg
Operation of the MiniFG Switch on the Device Switch on the device by means of the key. The MiniFG will start with Program 1 (P1). How do I carry out the stimulation? Selection of the Program You change to the next standard or user program by operating the modification keys (Figure 1). - Page 20 Pierenkemper Operating Instructions - MiniFG Starting the Stimulation First, position the electrodes on the desired parts of the body and connect the electrode cables to the electrodes and the device. It will be possible to start the stimulation by means of the key...
- Page 21 English The stimulation of the current frequency can be displayed during the stimulation by means of the key . The remaining stimulation period in minutes will be shown in the centre of the display. Stopping the Stimulation The stimulation will stop automatically when the whole running period of the program has expired.
-
Page 22: User Programs
Pierenkemper Operating Instructions - MiniFG Attention! These changes to parameters will not be stored! They will be lost if the program is changed. The device must be started in editing mode to set up your own User program. To do this, see the ‚User Programs‘... -
Page 23: Switching The Signal Tones On And Off
English If the period of stimulation is changed in the ‘F’ type of operation, the whole period of stimulation will be changed. In this case, it will be possible to change the time in 6-minute steps. The whole period of the individual sequences must be divided by 6, to ascertain the length of the individual sequences. -
Page 24: Switching The Device Off
During operation, the voltage of the battery in the device will be clearly demonstrated by the segments within the battery symbol. If the voltage falls below a critical level, the MiniFG will switch off automatically or it will not allow itself to be switched on again. Then it will be necessary to replace the battery in the device. -
Page 25: General
MiniFG device is operated in accordance with the Instructions for Use. Guarantee We give a one year guarantee on the MiniFG device, with the exception of cables and electrodes, from the date that its delivery is taken. -
Page 26: Combination
If moisture penetrates the device in spite of this, the device must be subjected to a technical check before it is used again. Combination The MiniFG device may be combined with all the accessories listed in the Scope of Delivery Section. Scope of Delivery... - Page 27 Effetti Collaterali Misure precauzionali Attenzione! Descrizioni dei simboli Descrizione tecnica Caratteristiche tecniche Tipi di funzionamento Descrizione dell‘apparecchio Uso del MiniFG Accensione dello stimolatore Come stimolare? Programmi utente Attivazione e disattivazione dei segnali acustici Spegnimento dello stimolatore Programmi Generali Sostituzione della batteria...
-
Page 28: Informazioni Generali
(solo con temperature comprese tra 10 °C e 40 °C e un‘umidità relativa dell‘aria inferiore al 90%). • Bisogna fare attenzione quando la base MiniFG è utilizzato su o in prossimità di bam- bini. •... -
Page 29: Misure Precauzionali
Misure precauzionali I pazienti con un apparecchio elettronico impiantato (p. es. pace-maker) non dovrebbero essere sottoposti ad una terapia di elettrostimolazione con l‘apparecchio MiniFG, senza aver prima consultato un medico. L‘apparecchio MiniFG può essere collegato ad un solo paziente. -
Page 30: Descrizione Tecnica
7 minuti di stimolazione • Frequenze: 6 diverse frequenze per 10 minuti ciascuna Descrizione dell‘apparecchio Il MiniFG è stato concepito per la stimolazione dei nervi umana. Le impostazioni si effettuano mediante gli appositi pulsanti. Il display visualizza i diversi stati di funzionamento. -
Page 31: Uso Del Minifg
Vano batteria Boccole di uscita Uso del MiniFG Accensione dello stimolatore Accendere lo stimolatore azionando il tasto . MiniFG avvia il programma 1 (P1). Come stimolare? Selezione dei programmi Azionando i tasti di modifica si può passare al programma standard e/o programma utente successivo (Figura 1). I programmi standard contrassegnati con una „P“... - Page 32 Pierenkemper Istruzioni per l‘uso - MiniFG Avvio della stimolazione Appoggiare prima gli elettrodi sulla parte del corpo interessata e collegare il cavo degli elettrodi agli elettrodi e allo stimolatore. Dopo aver scelto il programma desiderato, azionando i tasti di modifica , è possibile avviare la stimolazione spingendo il tasto (Figura 2).
- Page 33 Italiano programma attualmente in corso non viene visualizzato sul display, bensì compare il tempo residuo della sequenza attualmente in corso. Azionando il tasto è possibile visualizzare l’attuale frequenza durante la fase di stimolazione. Al centro del display compare il tempo residuo di stimolazione espresso in minuti. Arresto della stimolazione Una volta decorsa l’intera durata del programma, la stimolazione si arresta in automatico.
-
Page 34: Programmi Utente
Pierenkemper Istruzioni per l‘uso - MiniFG Dopo aver modificato l’ultimo parametro è necessario premere nuovamente il tasto per salvare i parametri. Tale operazione viene confermata da un segnale acustico. Attenzione! Le modifiche apportate al programma non vengono salvate! In un cambio di programma le modifiche vanno di nuovo perse. - Page 35 Italiano di 1000, azionando entrambi i tasti di modifica disposti a sinistra, mentre la frequenza verrà variata ad intervalli di 1 spingendo entrambi i tasti di modifica che sono collocati a destra. Possibilità di modificare i seguenti parametri: • frequenze ( ): da 1 Hz a 999999 Hz (Figura 4) •...
-
Page 36: Attivazione E Disattivazione Dei Segnali Acustici
Pierenkemper Istruzioni per l‘uso - MiniFG Attivazione e disattivazione dei segnali acustici Avviare lo stimolatore nella Modalità di Modifica. Azionare anche il tasto mentre si attiva lo stimolatore. Nella parte in alto a destra del display, davanti all’indicatore della modalità di funzionamento, compare una „E“. -
Page 37: Generali
Sostituzione della batteria Durante il funzionamento, la tensione della batteria viene visualizzata dai segmenti del simbolo batteria. Se la tensione scende sotto un valore critico, il MiniFG si spegne automaticamente o non si riaccende. In questo caso occorre sostituire la batteria. -
Page 38: Nuove Impostazioni, Modifiche E Riparazioni
MiniFG è stato impiegato in conformità alle istruzioni per l‘uso. Garanzia Per l‘apparecchio MiniFG, prestiamo una garanzia di 1 anno dalla data di acquisto; esclusi dalla garanzia sono elettrodi e cavi. Cura e pulizia Per l‘apparecchio MiniFG non sono necessarie cure particolari. - Page 39 Italiano...
- Page 40 PIERENKEMPER Pierenkemper GmbH Am Geiersberg 6 · 35630 Ehringshausen · Deutschland GmbH Tel. +49 6443 8333-955 · Fax +49 6443 8333-950 info@pierenkemper.eu · www.pierenkemper.eu...
Need help?
Do you have a question about the MiniFG and is the answer not in the manual?
Questions and answers