Table of Contents
Advertisement
Advertisement
Table of Contents

Related Manuals for Dipol TFA 2.0 SL

Summary of Contents for Dipol TFA 2.0 SL
- Page 1 TFA 2.0 SL / 2.8 SL Thermal imaging front Attachment MANUAL...
-
Page 2: Table Of Contents
CONTENT Scope of delivery Important notes & warnings Application Design Technical Data Performance control Operation & Quick Settings Main Menu Accessories Possible errors / troubleshooting Storage and transport Quality Certificate Guarantee Manufacturer & Importer Certificate of conformity ATTENTION! Before putting the appliance into operation, carefully read the present operating instructions! SCOPE OF DELIVERY... -
Page 3: Important Notes & Warnings
IMPORTANT NOTES & WARNINGS Never look with the device in the sun or other intense heat sources, this can lead to damage of the sensor! Protect the device from strong side impacts. Only use optical cleaning cloths when cleaning glass surfaces. -
Page 4: Design
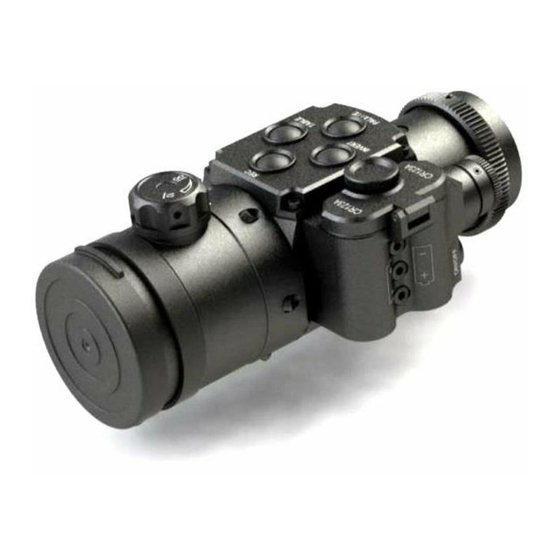
Please note that the use of the device on a riflescope is restricted in many European countries without a special permit. Follow state laws and applicable legislation! DESIGN 1. ON/OFF button 2. Onjective rubber cover 3. Focusing knob 4. MENU controller 5. -
Page 6: Technical Data
TECHNICAL DATA 2.0 SL / 2.8 SL Sensor, pixel/pitch 384x288, 17µm Micro display, pixel OLED 1024x768 Focal length/ aperture ratio F40, 1,0 / F55, 1,0 Exit pupil, mm Magnification Field of view 9,3° х 7,0° / 7,5° x 5,6° Detection range (for objects 0.5x1.8m), m up to 2000 / 2800 Spectral range, micrometre... -
Page 7: Performance Control
PERFORMANCE CONTROL Insert the batteries according to the polarity shown on the battery compartment (5) and remove the lens cover (2). Switch on the device by pressing the ON / OFF button (1). The control indicator (6) now lights up red. The complete switching on process should not take longer than 3-5 seconds. -
Page 8: Operation & Quick Settings
EN DE To be able to use the thermal imaging monocular with other optical devices you may need a suitable adapter. First, loosen the locking screw on the locking ring (15) on the ocular side of the device with the enclosed key. Now screw the adapter (16) on, place it into desired position and fixe it with the locking ring (16). - Page 9 Use with day optics To be able to use your TFA device with other (day) optics, the suitable adapter is required with inside diameter corresponding to the outside diameter of the day optics’ objective. As described above, firsts the display sharpness has to be adjusted with daytime optics.
- Page 10 Micro display stand-by mode: To switch off the display temporarily (to save power) shortly press ON/OFF button (4). To activate it, press the ON/OFF button again. Quick settings: display & thermal sensor With the MENU controller (4) you can adjust the brightness of the display (Display Brightness / BR), the sensor sensitivity (Thermomatrix Sensitivity / SN), digital image enhancement (Image...
- Page 11 To set the optimal sensor sensitivity (values from 40 to 80), turn the MENU controller (4) in the selected sensor sensitivity mode (SN). To set the optimal level of contrast/digital image enhancement (values from 0 to 7), turn the MENU controller (4) in the selected (DE) mode.
-
Page 12: Main Menu
MAIN MENU To call up the main menu, keep the MENU multifunction button (4) pressed until the main menu appears in the field of view. To move up and down in the menu, turn the MENU controller (4) in each direction. - Page 13 User Profile The four sensor and image quality settings described above can be saved along with the selected Colour palette and Colour polarity as individual unser profiles. The TFA device already has three pre- installed profiles: Fix 1 Woods, Fix 2 City, Fix 3 Mountains.
- Page 14 In this way, you can quickly select a different colour palette than defined in the basic setting (Colour Palette). Thermal image gain Here you can determine the performance of the thermal imaging sensor. This setting process is also described in detail in the operation &...
- Page 15 Increases the contrast and image quality, especially with insignificant temperature differences for observed objects or backgrounds. USB transfer mode Enables the copying and deletion of video files from the built-in memory card. If you select this menu item and the words "Connection is being established ..."...
- Page 16 REC (blinking) - Recording module active REC 00:00:00 - ready to record REC 00:01:20 - recording REC Saving - internal storaging running. Note, that the betterie consumption is greater in the video recording mode as well as during the quick start. To reduce power consumption, you can press and hold the “REC”...
- Page 17 For better contrast when observing the objects ans surroundings with very similar thermal patterns, the thermal imaging sensor can be adapted to the average ambient temperature in this mode. Automatic pixel correction After an automatic correction of defective pixels, press and hold the MENU controller (4) to save changes or briefly press the MENU controller (4) to cancel the changes.
- Page 18 pressing the MENU controller (4). After the cursor is positioned as precisely as possible over the defective pixel, briefly press the ON / OFF button (1). The pixel then changes colour. Repeat the process with other defective pixels if necessary. To save the changes, press and hold the MENU controller (4).
- Page 19 Automatic switch-off Allows the device to turn off automatically after a period of inactivity (in minutes). Position profile This MENU mode allows quick switch between Image position and Table position setting pairs (each setting pair = correction/sight in profile). There are 5 profiles avaliable.
- Page 20 Date In this section you can set the date to be displayed during video recording or video transmission. The setting is made by pressing and turning the MENU controller (4). Please note that the date and time settings are not lost after the power elements are switched off or removed.
- Page 21 Language Allows you to select the language for the user interface. Russian, English, German, Spanish are available. Software version Displays the version of the installed device software. Carry out a reset Here the current device settings can be reset to the factory settings. Please note that the quick settings of the image and sensor, as well as the settings in the user profiles remain unchanged!
- Page 22 and fix it solidly in this position e.g. in a vice. • Mount the TFA device on the objective of your day optics using a high-quality clamp adapter (e.g. SmartClip). • Switch on the TFA device, open the objective cover and look through the whole system again.
-
Page 23: Accessories
• In the same way as described above, move the complete quick settings matrix that appears so, that its centre lies exactly above the object/reticle. • Confirm and exit the main menu. For repeatability control, the Quick settings table can be called up briefly every time you re-attach your TFA device, the adapter opened and device moved slightly so, that the four-field matrix lies... -
Page 24: Possible Errors / Troubleshooting
micro USB connector (11) with a voltage of 5 V. POSSIBLE ERRORS & TROUBLESHOOTING Your monocular is a complex optomechanical device. A repair or maintenance may only be carried out under the conditions of the manufacturer. If the display does not appear or flash after switching on and the image is missing or flashing, the batteries may be dead or the contacts in the battery... -
Page 25: Storage And Transport
Make sure that the maximum operating time of the device is achieved by using batteries of known manufacturers with a temperature of + 20 ° C. Using batteries of unknown manufacturers and during the wintertime, the operating time of the device may be reduced, and it does not indicate a technical defect. -
Page 26: Quality Certificate
QUALITY CERTIFICATE Thermal imaging monocular TFA2.0/2.8 SL Serial № ………………..............Sensor № ....……............... Release date ………………..............Quality control department ......………………………………………... WARRANTY • The manufacturer guarantees that the quality of the thermal monocular meets the technical requirements, if the rules and conditions for storage, transport and operation are observed. -
Page 27: Manufacturer & Importer
MANUFACTURER & SALES: Manufacturer: SPF „DIPOL“ Ltd. 210033, Vitebsk, Lazo Str., 115А, Republic Belarus Tel. +375 212 53 00 63 www.dipol.biz E-Mail: contact@dipol.by Sales & Service Center: Optinova Solutions UG Lahnblick 1, 35606 Solms Deutschland Tel.: +49 6441 8702312 www.optinova-solutions.de E-Mail: info.optinova@mailbox.org...
Need help?
Do you have a question about the TFA 2.0 SL and is the answer not in the manual?
Questions and answers