Table of Contents
Advertisement
Quick Links
Advertisement
Table of Contents

Related Manuals for XSPC H1 Cube+

Summary of Contents for XSPC H1 Cube+
- Page 1 ® XSpc H1 Cube+...
-
Page 2: Table Of Contents
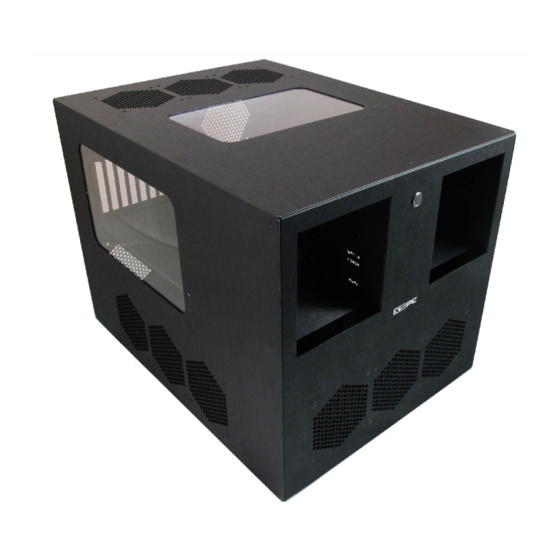
Attaching the back panel Page 10 Attaching the front panel Page 11 Fitting the L beams Page 12 Fitting the motherboard tray Page 13 Fitting the side panels Page 14 Radiator placements Page 15 Troubleshooting Page 16 Page 1 XSpc... - Page 3 Introduction The XSPC H1 case is a PC case specifically designed for high end PC watercooling. It has support for up to three triple 120mm radiators, two dual 120mm radiators, and leaves plenty of space for tubing routing. The case is supplied in flat pack form, so you will need a little time and patience to get it setup correctly.
-
Page 4: Component List
Component List [A] Base Panel x1 [B] Back Panel x1 [C] Front Panel x1 [D] Top Panel x1 [E] Right Panel x1 [F] Left Panel x1 Page 3 XSpc... - Page 5 [G] MB Cover Panel x1 [H] PCI Panel x1 [J] HDD Rack x1 [I] Motherboard Tray x1 [K] 5.25“ Bay Cage x2 [L] L Beam x2 Page 4 XSpc...
-
Page 6: Accessories
Accessories SSD Tray x1 Castors x4 PCI Slot Covers x10 Neoprene Pad x1 Power Switch x1 Support Post x1 Page 5 XSpc... - Page 7 6-32 Thumb Screw x28 6-32 Countersink Screw x123 Motherboard Standoff x21 6-32 Hex Screw x52 Optional Accessories / Spares Optional accessories and spares can be purchased from www.xspc.biz or from an approved XSPC reseller www.xspc.biz/resellers Page 6 XSpc...
-
Page 8: Preparing The Base Panel
Place the HDD cage over the Use four 6-32 thumb screws to screw holes shown above. attach the HDD cage to the panel. Page 7 XSpc... -
Page 9: Preparing The Back Panel
Part 2: Preparing the Back Panel Put panel [B] on a flat surface Place panel [G] over panel [B] facing upward. and line up the four holes. Attach panel [G] using four 6-32 thumb screws. Page 8 XSpc... -
Page 10: Preparing The Front Panel
Flip the panel over and thread the On the reverse side place an o- power cables through the hole on ring and nut over the switch then the front. tighten the nut. Page 9 XSpc... - Page 11 Flip the panel over and thread the On the reverse side place an o- power cables through the hole on ring and nut over the switch then the front. tighten the nut. Page 9 XSpc...
-
Page 12: Attaching The Back Panel
Make sure the HDD cage is near the back. On the underside of the case use Repeat this for the two screw two 6-32 countersunk screws in holes on the other side. the locations above. Page 10 XSpc... -
Page 13: Attaching The Front Panel
[C] and slot the the two holes highlighted above. corners together. Repeat this for the two screw On the underside of the case use holes on the other side. two 6-32 countersunk screws in the locations above. Page 11 XSpc... -
Page 14: Fitting The L Beams
L beam. panels. Use two countersunk screws to Repeat this for the other side, attach the L beam to the front and using the second L beam. back panels. Page 12 XSpc... - Page 15 HDD cage. Line up the eleven holes on the Place the support post between back and use 6-32 thumb screws the case and motherboard and to attach the motherboard tray. use 6-32 screws to secure it. Page 13 XSpc...
- Page 16 This will allow countersunk screws. you to shift the panel into line. Repeat this for the right panel [E] Repeat this for the left panel [F] Page 14 XSpc...
-
Page 17: Radiator Placements
Radiator placements The H1 supports up to three triple and two dual 120mm radiators. XSPC radiators can be mounted on the front, back, top or side panels using the provided 6-32 screws. You can alternatively use a triple 140mm radiator by using an optional XSPC 140mm bracket set. -
Page 18: Troubleshooting
Q – I am missing a part or I have lost a part A – Please contact XSPC support for assistance www.xspc.biz/support XSPC Contact Details Website - www.xspc.biz Support - www.xspc.biz/support Copyright © XSPC (UK) Limited 2011 Page 16 XSpc XSPC is a registered trademark of XSPC (UK) Limited... - Page 19 ® XSpc...
Need help?
Do you have a question about the H1 Cube+ and is the answer not in the manual?
Questions and answers