
Subscribe to Our Youtube Channel
Related Manuals for VBM POCKET

Summary of Contents for VBM POCKET
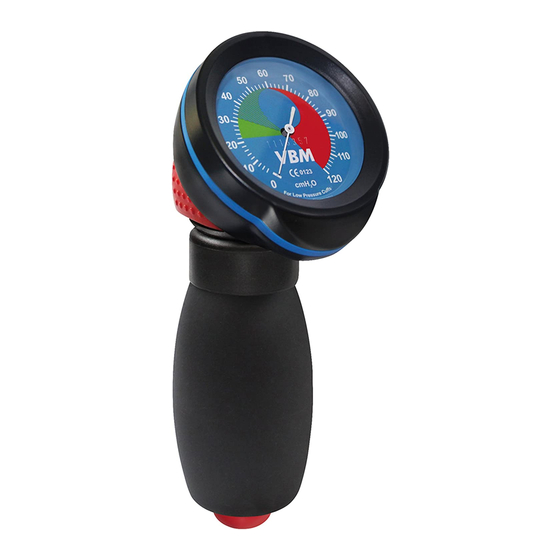
- Page 1 VBM Medizintechnik POCKET MONITOR Cuff Pressure Gauge for inflation, deflation and pressure control of tracheal tubes G3064 - 07/09.2015...
- Page 3 Bruksanvisning ................. Sida 28-31 Symbol ................... Page 33-36 Medizintechnik GmbH Einsteinstrasse 1 | 72172 Sulz a.N. | Germany | Tel.: +49 74 54 / 95 96 0 Fax: +49 74 54 / 95 96 33 | e-mail: info@vbm-medical.de | www.vbm-medical.de...
- Page 4 Luer nozzle Tube connector Inflation line Luer nozzle of vacuum valve...
- Page 6 Deutsch VERwENDuNGSzwECK Das Cuffdruckmessgerät dient zur Be- und Entlüftung und Druckkontrolle bei Tra- chealtuben mit großvolumigem Niederdruckcuff. Das Vakuumventil dient der Ent- leerung des Niederdruckcuffs mittels Handpumpenball. SIChERhEITShINwEISE • Gebrauchsanweisung vor der Anwendung des Produktes sorgfältig lesen und beachten. • Das Produkt darf nur von medizinisch ausgebildetem Personal verwendet wer- den.
- Page 7 wenn ein Verbindungsschlauch eingesetzt wird, ist das System aus Cuff- druckmessgerät und Verbindungsschlauch wie folgt zusätzlich zu 1 zu prü- fen: 2a) Verbindungsschlauch mit Lueranschluss des Cuffdruckmessgerätes verbinden (Bild 2). 2b) Das Ende des Verbindungsschlauchs mit dem Finger abdichten (Bild 3). 2c) Mit dem Handpumpenball auf 40 cmH O belüften;...
-
Page 8: Messtechnische Kontrolle
sen bzw. bei einem Druckabfall nachgepumpt werden. EXTuBATION Vor der Extubation ist das Vakuumventil mit der Belüftungszuleitung des Tubus zu verbinden und der Handpumpenball solange zu betätigen, bis er nicht mehr in seine Ausgangsform zurückkehrt. Die vollständige Entleerung ist zu prüfen, indem die Belüftungszuleitung mit dem Lueranschluss des Cuffdruckmessgerätes ver- bunden wird. -
Page 9: Lager- Und Transportbedingungen
tes mit einem kalibrierten Druckmessgerät (Messungenauigkeit von maximal ±0,6 cmH O) verbunden werden. Anschließend das Cuffdruckmessgerät mit dem Handpumpenball auf 30, 60 und 90 cmH O belüften und die Werte notieren. Die Werte müssen innerhalb der ange- gebenen Toleranz liegen. Sollte dies nicht der Fall sein, muss das Gerät zurück zum Hersteller zur Reparatur. -
Page 10: Intended Use
English INTENDED uSE The Cuff Pressure Gauge is used for inflation, deflation and pressure control of tracheal tubes with high volume low pressure cuffs. SAFETy INFORMATION • Read and follow the instructions for use carefully before using the product. • The product must only be used by trained medical personnel. •... -
Page 11: Wipe Disinfection
must be replaced. Check again with the new connecting tubing (repeat steps 2a-2c). During connection and disconnection of the connecting tube, do not bend the luer fitting of the device, to prevent damage. Furthermore, make sure that the connecting tubing is held on the connector (not at the tubing). If the vacuum valve is used, do the following test prior to use: 3a) Inflate the low pressure cuff of a tracheal tube with the Cuff Pressure Gauge to 40 cmH... -
Page 12: Maintenance
trol can be carried out by the manufacturer. In this case the Cuff Pressure Gauge has to be sent to the manufacturer. If there is an indication that the Cuff Pressure Gauge cannot keep the accuracy of measurement within the 24 months, or the metrological characteristics of the Cuff Pressure Gauge have been affected, a metrological control has to be carried out immediately. -
Page 13: Bezpečnostní Upozornění
Česky POužITí Kontrolní manometr je určen pro nafouknutí a kontrolu tlaku vzduchu v nízkotla- kých manžetách endotracheálních a tracheostomických kanyl. Vakuum ventil slouží k odsátí vzduchu z těchto manžet před extubací. bEzPEČNOsTNí uPOzORNěNí • Před použitím výrobku si přečtěte návod k použití a pečlivě jej dodržujte. •... -
Page 14: Čištění A Dezinfekce
Pokud používáte vakuum ventil, proveďte před použitím následující test: 3a) Nafoukněte nízkotlakou manžetu tracheální kanyly či LT manometrem na 40 cmH O (obrázek 4). 3b) Připevněte červený Luer konus vakuum ventilu (obrázky 5, 6). 3c) Stiskněte několikrát balonek, manžeta se musí vyprazdňovat. 3d) Stlačujte balonek manometru tak dlouho až... - Page 15 0 musí být kontrolována každých 24 hodin. Pokud nemá uživatel měřící zařízení k dispozici přímo, metrologickou kontrolu může provést přímo výrobce. V tomto případě zašlete manometr výrobci VBM Medi- zintechnik. V případě nepřesnosti měření zjištěných v průběhu dvou let je nutné provést met- rologické...
-
Page 16: Uso Previsto
Español uSO PREVISTO El manómetro de presión es utilizado para el inflado, desinflado y el control de la presión de los tubos endotraqueales con balón de alto volumen y baja presión. La válvula de vacío sirve para desinflar los balones de baja presión mediante la pera de inflado. - Page 17 Cuando haya un tubo de conexión, el sistema se debe comprobar junto con el manómetro de presión y el tubo de conexión como se indica a continua- ción además de como se explica en el punto 1: 2a) Conectar el tubo de conexión con el conector Luer del manómetro de presión (fig.
- Page 18 EXTuBACIÓN Antes de la extubación, conectar la línea de inflado del tubo a la válvula de vacío. Manipular la pera de inflado varias veces hasta que no vuelva al estado origi- nal. Comprobar el vacío completo del balón conectando la línea de inflado a la conexión Luer del manómetro de presión.
-
Page 19: Condiciones De Almacenamiento Y Transporte
y 90 cmH O y anotar los valores. Los valores deben estar dentro de los límites de tolerancia indicados. Si los valores no se encuentran fuera de este margen, el equipo debe ser enviado al fabricante para su reparación. Si los valores se encuentran dentro de la tolerancia, el equipo puede seguir en funcionamiento. -
Page 20: Usage Prévu
Français uSAGE PRéVu Le contrôleur de pression des ballonnets sert au gonflage, dégonflage et au contrôle de la pression des sondes trachéales à ballonnets basse pression et grand volume. La valve de vidange sert à la vidange du ballonnet basse pression à... - Page 21 En utilisant un tube de connexion, vérifier le système complet du contrôleur de pression des ballonnets avec tube de connexion en plus de 1) comme suit : 2a) Connecter le tube de connexion au raccord Luer de le contrôleur de pression des ballonnets (fig.
-
Page 22: Contrôle Métrologique
En vérifiant la pression du ballonnet régulièrement, elle peut être observée et si nécessaire réajustée (dégonfler à la pression souhaitée avec le bouton rouge ou regonfler avec la poire de pompage). EXTuBATION Avant l‘extubation, connecter la valve de vidange au tube de gonflage de la sonde trachéale et manipuler la poire de pompage jusqu’à... -
Page 23: Entretien
des ballonnets à un appareil de mesure de pression calibré (avec imprécision de mesure max. ±0,6 cmH Puis gonfler le contrôleur de pression des ballonnets avec la poire de pompage à 30, 60 et 90 cmH O et noter les valeurs. Les valeurs doivent se situer dans les tolérances indiquées. -
Page 24: Avvertenze Di Sicurezza
Italiano DESTINAzIONE D’uSO Il manometro viene utilizzato per il gonfiaggio, lo sgonfiaggio ed il controllo pres- sorio delle cuffie ad alto volume/bassa pressione dei tubi tracheali. La valvola di vuoto permette lo sgonfiaggio di cuffie a bassa pressione mediante pompetta. AVVERTENzE DI SICuREzzA •... - Page 25 Se viene utilizzato un tubo di collegamento, il sistema costituito da manome- tro e tubo di collegamento deve essere controllato come segue in aggiunta al punto 1: 2a) Collegare il tubo di collegamento all’ugello Luer del manometro (figura 2). 2b) Sigillare l’estremità del tubo di collegamento con il dito (figura 3). 2c) Gonfiare con la pompetta manuale a 40 cmH O;...
- Page 26 la pompetta di gonfiaggio. ESTuBAzIONE Prima dell’estubazione collegare il palloncino spia del tubo alla valvola del vuoto e premere la pompetta di gonfiaggio finché non ritorna nella sua posizione originale. Al fine di verificare lo sgonfiaggio completo, collegare il palloncino spia all’ugello Luer del manometro.
-
Page 27: Condizioni Di Conservazione E Trasporto
riparazione. Se i valori sono nei limiti della tolleranza, il dispositivo può continuare ad essere utilizzato. Nota per la conversione da cmH O a SI-Unit Pascal: 1 cmH O = 0,98067 hPa ASSISTENzA Prima di restituire i dispositivi medici per reclamo/riparazione essi devono essere puliti e disinfettati per evitare qualsiasi rischio per il personale del fabbricante. -
Page 28: Avsedd Användning
Svenska AVSEDD ANVäNDNING Kufftrycksmätaren är avsedd till fyllning och tömning samt tryckkontroll vid trake- altuber med lågtryckskuffar med stor volym. Vakuumventilen tömmer lågtryckskuf- fen med hjälp av en handblåsa. SäKERhETSANVISNINGAR • Läs bruksanvisningen noggrant innan produkten används, och följ bruksan- visningen. - Page 29 2b) Täta kopplingsslangens ände med ett finger (bild 3). 2c) Pumpa upp med handblåsan till 40 cm H O. Värdet måste hålla sig konstant i 2 - 3 sekunder. Om trycket faller, är slangen otät och måste bytas ut. Testa den nya slangen på...
- Page 30 spektrum användas: baktericid, levurocid, tuberkulocid och virucid. Kontrollera efter ytdesinficeringen om det finns synlig smuts. Upprepa ytdesinficeringen om det behövs. Efter ytdesinficeringen ska produkterna kontrolleras enligt avsnittet "Funktionskontroll". OBSERVERA • Produkten får under inga villkor nedsänkas i vätskor. • Produkten får inte rekonditioneras/steriliseras maskinellt eller manuellt. •...
- Page 31 uNDERhåll Den medicinska produkten får endast underhållas av personer som har kunskaper, förutsättningar och nödvändig utrustning för korrekt utförande av denna uppgift. Efter underhåll av den medicinska produkten krävs kontroll av de konstruktions- mässiga och funktionella egenskaper som är av betydelse för säkerhet och funk- tion om de kan ha påverkats av underhållsåtgärderna.
- Page 33 General Symbol Description Product-related symbol on the label DE - Hersteller IT - Fabbricante EN - Manufacturer NL - Fabrikant CS - Výrobce PT - Fabricante DA - Producent RU - Производитель ES - Fabricante SV - Tillverkare FR - Fabricant TR - Üretici DE - Herstellungsdatum IT - Data di fabbricazione...
- Page 34 DE - Achtung IT - Attenzione EN - Caution NL - Attentie CS - Pozor PT - Atenção DA - OBS RU - Внимание! ES - Atención SV - Observera FR - Attention TR - Dikkat DE - Vorsicht: Der Verkauf oder IT - Attenzione: le leggi federali die Verschreibung dieses limitano la vendita del...
- Page 35 DE - Bei beschädigter Verpackung IT - Non utilizzare se la confe- nicht verwenden. zione è danneggiata. EN - Do not use if package is dam- NL - Niet gebruiken als verpakking aged. beschadigd is. CS - Nepoužívejte, je-li obal PT - Não utilizar caso a embala- poškozený.
- Page 36 DE - Von Sonnenlicht und Wärme IT - Proteggere dalla luce solare fernhalten. e da fonti di calore. EN - Keep away from sunlight and NL - Tegen zonlicht en warmte heat. beschermen. CS - Chraňte před slunečním PT - Manter afastado da luz solar světlem a teplem.
Need help?
Do you have a question about the POCKET and is the answer not in the manual?
Questions and answers