Table of Contents
Advertisement
Quick Links
Advertisement
Table of Contents

Related Manuals for Dish Network 52.0


Summary of Contents for Dish Network 52.0
- Page 1 Remote Set Up Guide Standard_Remote_QSG.indd 1 9/2/2015 4:16:11 PM...
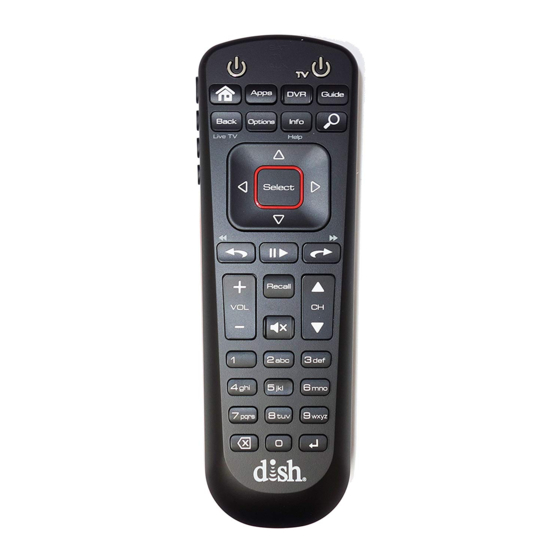
- Page 2 1. Using the Remote Buttons To ensure you are in SAT mode, press the SAT button located on the side of the remote (see page 2) to display programming and to use the features described in this section. Note: Some features may not be available depending on your receiver model.
- Page 3 Power Skip Back/Back • Turns the receiver • Press to skip back on/off 10 seconds in a program SAT/TV/AUX • Press and hold to • Mode indicator lights reverse the program up when in that Pause/Play mode • Pauses or plays Home a live or recorded •...
-
Page 4: Inserting The Batteries
2. Inserting the Batteries Push the tab toward the top of the remote to release the battery door latch and lift the battery door from the remote. Insert 2 AA batteries, putting the negative ends first. Match the plus (+) ends with the plus markings on the battery case. - Page 5 3. Pairing the Remote to a Hopper or Joey Receiver Turn your receiver and TV Press SYSTEM INFO on the Hopper: SYS INFO front panel of the receiver. Joey: SYSTEM INFO Press the SAT button on your remote. When the remote is paired, it gives a series of ascending tones.
- Page 6 4. Restoring Your Remote Settings After your remote is paired, restore your remote settings to update the remote with settings that were previously backed-up. Use your remote to complete this step. Press the HOME button. Press the UP Arrow to access the tabs, then using the LEFT Arrow highlight Menu and press SELECT.
- Page 7 Highlight Restore Settings and press SELECT. Highlight Restore to Remote Control and press SELECT. Note: Do not move your remote or receiver during this process. Highlight Finished and press SELECT when the remote settings have been restored. Standard_Remote_QSG.indd 6 9/2/2015 4:16:18 PM...
- Page 8 5. Accessing Your Remote Settings If you would like the VOLUME and MUTE buttons on your DISH remote to work with your TV or other devices, go to the Remote Control Settings menu to program your DISH remote. Use your remote to complete this step. Press the HOME button.
- Page 9 Highlight Devices, Customizations, or Advanced Features and press SELECT to program that specific setting. For additional information, highlight the ? button and press SELECT. Standard_Remote_QSG.indd 8 9/2/2015 4:16:19 PM...
- Page 10 6. Backing-up Your Remote and Receiver Settings After changing your remote settings, it is recommended that you back-up these settings. These steps back up both the receiver and remote settings. Use your remote to complete this step. Press the HOME button. Press the UP Arrow to access the tabs, then using the LEFT Arrow...
- Page 11 Highlight Back Up Settings and press SELECT. Highlight Continue and press SELECT. Note: Do not move your remote or receiver during this process. Highlight Finished and press SELECT when the backup is completed. Standard_Remote_QSG.indd 10 9/2/2015 4:16:19 PM...
-
Page 12: Limited Warranty
Proof of Purchase to be out of warranty. This warranty extends only to the original user (“you,” “your”) of the DISH remote control and is limited to the purchase price of the remote control. DISH Network L.L.C. and its affiliated companies (“we,” “our,” “us”) warrant this remote control against defects in materials or workmanship as follows. -
Page 13: Accessory Warranty
Accessory Warranty An accessory is any DISH-branded equipment, displaying the DISH logo, excluding the receiver, Smart Card, cables and hookups, and non- mechanical components. A one-year warranty becomes effective upon the activation of the DISH system or date of purchase, if bought separately. A proof of purchase is required to verify the purchase date. -
Page 14: Regulatory Information
Regulatory Information This device complies with Part 15 of FCC Rules. Operation is subject to the following two conditions: 1. This device may not cause harmful interference, 2. This device must accept any interference received, including interference that may cause undesired operation. This equipment has been tested and found to comply with the limits for a Class B digital device, pursuant to Part 15 of the FCC Rules. -
Page 15: Safety Instructions
Safety Instructions You must keep safety in mind while using this device. Keep these and any other instructions for future reference. Observe Warnings: Carefully follow all warnings on the device and in the operating instructions. Heat: Do NOT place the device near heat sources such as radiators, stoves, heat registers, or other appliances that produce heat. - Page 16 For all your customer needs, go to mydish.com/chat or call the Customer Service Center at 1-800-333-DISH (3474) Standard_Remote_QSG.indd 15 9/2/2015 4:16:19 PM...
Need help?
Do you have a question about the 52.0 and is the answer not in the manual?
Questions and answers