Table of Contents
Advertisement
Quick Links
Advertisement
Table of Contents

Related Manuals for GSC GS-66


Summary of Contents for GSC GS-66
- Page 1 End Mill Grinder Operation Manual Model : GS-66...
- Page 2 RECYCLING Do not dispose of electrical appliances as unsorted municipal waste, use separate collection facilities. Contact your local government for information regarding the collection systems available. If electrical appliances are disposed of in landfills or dumps, hazardous substances can leak into the groundwater and get into the food chain, damaging your health and well-being.
-
Page 3: Table Of Contents
Index Safety Instructions .................. 2 Machine Devices Introduction..............6 III. Dust Collection Adapter Assembly Steps ..........7 Machine Installation Instruction ............. 8 Choose of Grinding Wheel & Accessories & Collet ......8 VI. Chuck Set Assembly Steps ..............9 VII. The use of the Positioning Shelf............. 10 VIII. -
Page 4: Safety Instructions
I. Safety Instructions All personnel working with the machine must be properly trained in its operation, and must follow strictly on the operating instructions and procedures given in this and all associated manuals. The machine may only be operated by persons who are authorized and trained. The user of the machine must not remove, modify or obscure in any way the content or the readability of any safety label placed on or inside the machine. - Page 5 ● Do not expose power tools to rain or wet conditions. Water entering a power tool will increase the risk of electric shock. ● Avoid body contact with earthed or grounded surfaces, such as pipes, radiators, ranges and refrigerators. There is an increased risk of electric shock if your body is earthed or grounded.
- Page 6 ● Never stand on tool. Serious injury could occur if the tool is tipped or if the cutting tool is unintentionally contacted. ● Never leave tool running unattended. Turn power off. Don't leave tool until it comes to a complete stop. Power tool use and care Do not force the power tool.
- Page 7 ● Please use the air spray gun and duster to clean all sharpened dusts from the machine after finishing the grinding job. ● Direction of feed. Feed work into a blade or cutter against the direction of rotation of the blade or cutter only. Service Have your power tool serviced by a qualified repair person using only identical ●...
-
Page 8: Machine Devices Introduction
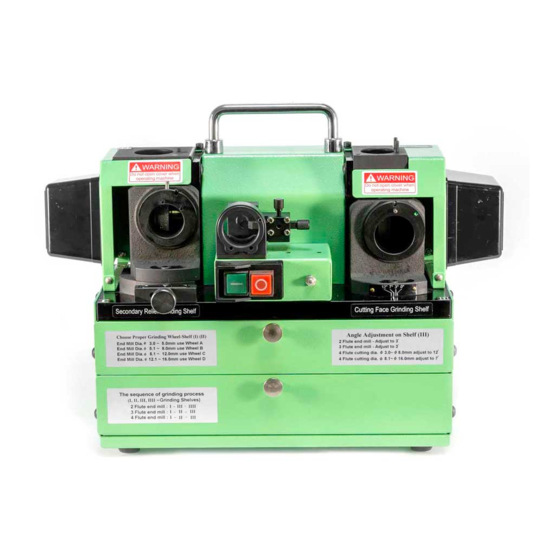
II. Machine Devices Introduction Handle Adjustment Scale Grinding Shelf (II) Grinding Shelf (IIII) Warning Sign Warning Sign Adjustable Pin Grinding Shelf (III) Grinding Shelf (I) Positioning Shelf Angle Indicator Positioning Shelf Switch Cutting Face Adjustment Device Grinding Wheel Bushing & Chuck Set &... -
Page 9: Dust Collection Adapter Assembly Steps
III. Dust Collection Adapter Assembly Steps Thread the hex nut onto the suitable position of the threaded rod, align the end of the threaded rod containing the hex nut to the tapped hole of grinding wheel cover, and turn the threaded rod clockwise to thread the rod into the grinding wheel cover and tighten lightly. -
Page 10: Machine Installation Instruction
IV. Machine Installation Instruction Environmental Condition ● Place the machine on a “flat” and “stable” working table. ● Operate the machine in dry environment and away from liquid. ● Make sure power plug and power cord are installed in proper location. Power Supply Make sure the local power supply is matching with the voltage specification from the product label. -
Page 11: Chuck Set Assembly Steps
VI. Chuck Set Assembly Steps Make sure there are no dust or scraps inside the Collet clamping nut, collet and collet holder. Put the collet into collet holder by 45° angle. (Fig. 6-1) Screw in a little bit by clamping nut (Fig. 6-2 step ①), Collet Holder then insert end mill shank into the clamping nut (Fig. -
Page 12: The Use Of The Positioning Shelf
VII. The use of the Positioning Shelf Preset the scale of the positioning shelf. ① ● Right Positioning Shelf : Φ3.0 mm - Φ12.0 mm (Fig. 7-1) ② ① Turn it by clockwise to the end. ② Turn it by counterclockwise at “0”. ●... -
Page 13: The Use Of The Cutting Face Adjustment Device
(continued from previous page) Slot No.1 Slot No.1 Increase the scale Decrease the scale Fig. 7-4 Make sure the positioning result is correct before starting the grinding procedure. ※ VIII. The use of the Cutting Face Adjustment Device This device is to adjust the width of the cutting face. (Fig. 8-1) Cutting Face width Please turn it to “-”... -
Page 14: Flute End Mill Grinding Preparations
IX. 2 Flute End Mill Grinding Preparations Adjustable Pin Secondary Relief Grinding Shelf (I) (Fig. 9-1) ① Move the adjustable pin on the Shelf (I) from the bottom to top. Shelf (I) ② Adjust the cutting face adjustment device to “0”, after finishing the whole sharpening procedure, then adjust this device according to your needs. -
Page 15: Flute End Mill Grinding Process
X. 2 Flute End Mill Grinding Process Grinding procedure: I, III, IIII Turn the power switch on and wait about 10 seconds until the motor rotation is stable. Do not hold end mill shank while grinding, it may affect the grinding accuracy. ※... -
Page 16: Flute End Mill Grinding Preparations
XI. 3 Flute End Mill Grinding Preparations Adjustable Pin Secondary Relief Grinding Shelf (I) (Fig. 11-1) ① Move the adjustable pin on the Shelf (I) from the bottom to top. Shelf (I) ② Adjust the cutting face adjustment device to “0”, after finishing the whole sharpening procedure, then adjust this device according to your needs. -
Page 17: Flute End Mill Grinding Process
XII. 3 Flute End Mill Grinding Process Grinding procedure: I, II, III Turn the power switch on and wait about 10 seconds until the motor rotation is stable. Do not hold end mill shank while grinding, it may affect the grinding accuracy. ※... -
Page 18: Flute End Mill Grinding Preparations
XIII. 4 Flute End Mill Grinding Preparations Adjustable Pin Secondary Relief Grinding Shelf (I) (Fig. 13-1) ① Move the adjustable pin on the Shelf (I) from the top to bottom. Shelf (I) ② Adjust the cutting face adjustment device to “0”, after finishing the whole sharpening procedure, then adjust this device according to your needs. -
Page 19: Flute End Mill Grinding Process
XIV. 4 Flute End Mill Grinding Process Grinding procedure: I, II, III Turn the power switch on and wait about 10 seconds until the motor rotation is stable. Do not hold end mill shank while grinding, it may affect the grinding accuracy. ※... -
Page 20: Machine Maintenance And Clean
XV. Machine Maintenance and Clean Replacement of Grinding Wheel Do not exchange our grinding wheel with other grinding wheel ※ from other supplier! ① Unplug the power cord and make sure the power is off. ② Confirm the screw direction on the grinding wheel cover before Fig. -
Page 21: Troubleshooting
XVI. Troubleshooting End mill is positioned but incorrect result. ● Check end mill’s cutting edge is clean without scraps / iron ash. ● Check the scale of the positioning shelf. Must turn the scale to the end by clockwise first. ※... - Page 22 166L02-2 2019.11...
Need help?
Do you have a question about the GS-66 and is the answer not in the manual?
Questions and answers