
Related Manuals for Cub EXPLORER

Summary of Contents for Cub EXPLORER
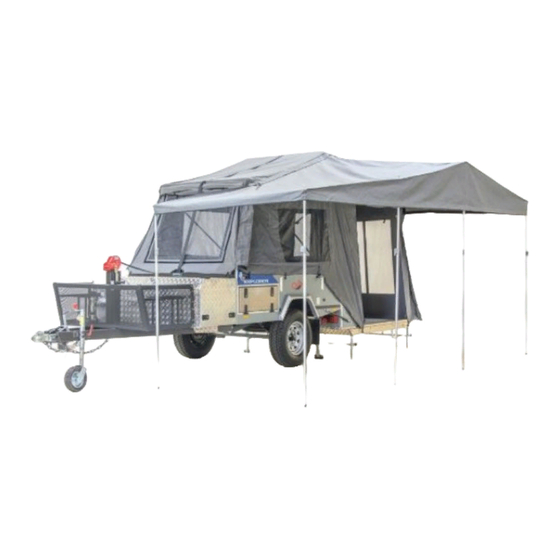
- Page 1 YOUR HIRE CAMPER CUB EXPLORER Explorer Camper Trailer Hire 1 Kookaburra Crescent Hawthorndene SA 5051 Phone: Email: Website: Page 1 of 25...
- Page 2 TABLE OF CONTENTS Opening the Camper……………..pg 3 – 6 Closing the Camper………………pg 7 - 9 Awning Set Up Instructions…………pg 10 – 13 Problem Solving……………………..pg 14 – 15 Canvas & Zipper Care….…….pg 16 Changing a Tyre……………….pg 17 Gas Stove Operation……….pg 18 -23 Battery &...
- Page 3 Opening the Camper After unhitching from the tow vehicle and positioning the camper trailer, set the Explorer parallel • with ground (this can be done simply by marking the front of the trailer roof against yourself and then levelling the rear of the trailer roof using the jockey wheel, to the same height on your body).
- Page 4 (4) adjustable legs on the hard floor. The roof of the trailer has now become the hard floor of the opened Cub. Adjust the 4 legs on the hard floor using the blocks provided if surface is not level Lift the canvas over the trailer body at the side where the trailer body angles downwards at •...
- Page 5 Walk around the Cub and affix all press studs/shock cords on the canvas tent to the corresponding • press stud/knob on the Cub body, leaving the shock cords on the door way until after full set-up has been completed. Step inside the camper and zip the door closed.
- Page 6 Insert the two support poles into the rear bow corners of the camper Release the locking screw on the slide bracket (Numbered 3) just inside the zip door (this is the • fitting that secures the rear diagonal bar to the centre upright bar). Release the snap lock adjuster (Number 2) on the doorway side of the rear tent bow to temporarily take the tension off, and then raise the diagonal bar upwards until it reaches a horizontal position above the doorway.
- Page 7 Remove the two white rear tent bow support poles and stow on to the bed for use when nextsetting • up the Cub. Release the two snap lock adjusters(#1 and #2) of the rear tent bow. Allow the rear bow to collapse •...
- Page 8 • tightening screws and raise the legs into the body of the camper, re-tightening securely. As the Cub is fitted with a self-braking winch, the winch strap should be reasonably “tight” so that • the winch handle is not left to swing freely in transit.
- Page 9 Awning Set Up Instructions SUPPLIED EQUIPMENT 5 x Upright Spigot Poles with wing nut 5 x Cup Spreader Poles 3 x Velcro Spreader Poles 10 x Large Pegs 10 x Ropes Awning Set-Up 1. Check that all required poles, pegs, ropes and a mallet are on hand. Page 9 of 25...
- Page 10 2. Taking an Upright Spigot Pole, remove the wing nut from the spigot, place the spigot through the middle eyelet of the awning and place the wing nut back onto the spigot ensuring that the rope is looped over it. Peg the rope down about ½ a metre out from the upright pole leaving some slack on the rope.
- Page 11 5. Raise the Centre Upright Spigot Pole and tension the rope. 6. Attach the next Velcro Spreader to the Velcro Patch located above the main tent door on the right hand side then insert Upright Spigot Pole into coinciding eyelet, doing up with wingnut and attaching the rope.
- Page 12 Always remember though, the awning (roof section), can remain affixed to the trailer tent, and never require removal. The CUB camper can still be closed fully with the awning still attached. Leaving the awning attached will eliminate the hardest part of the awning set up and is recommended for ease of camper use.
- Page 13 Problem Solving Page 13 of 25...
- Page 14 If yes to either of these questions, a full tent setting is recommended as follows: Please call Explorer Camper Trailer Hire on 08 8278 5771 before attempting Reset.
- Page 15 No. 10 as this will pull more canvas from the front of the trailer to the rear. The above steps are to return the canvas to original factory settings. If you continue to have difficulty opening and closing the doorway zipper, please call Explorer Camper Trailer Hire on 08 8278 5771 CANVAS CARE INSTRUCTIONS...
- Page 16 1. Keep the fabric clean by brushing regularly, both inside and outside with a soft brush and by hosing occasionally with clean cold water aiming at the lower edge of fabric working upwards. 2. Do not use a High-Pressure Cleaner on the canvas. 3.
- Page 17 Using the spare wheel winder provided, feed the handle through the Ring that’s welded on the chassis of the camper and wind down the spare. Disconnect the chain and move out from under the camper ready to change the wheel. Chock the wheel opposite to the one you are changing and using the wheel brace provided loosen the wheel nuts (but do not undo) of the wheel to be changed.
- Page 18 Page 18 of 25...
- Page 19 Page 19 of 25...
- Page 20 Page 20 of 25...
- Page 21 Page 21 of 25...
- Page 22 Page 22 of 25...
- Page 23 Page 23 of 25...
- Page 24 Camper. When plugged in and placed in the sun the display of the DC/Solar Charger located under the bed will change and display as follows: If unsure, please call Explorer Camper Trailer Hire on 08 8278 5771 CLEANING COSTS: We take pride in ensuring that you have a clean and functional camper for your hire, we’d appreciate it...
- Page 25 Did you know that if you hire from us and wish to purchase, the hire price (up to one week) comes off your purchase price? What a way to try before you buy! This camper is also for sale………speak to us upon your return. FOLLOW US ON……. Just search Explorer Campertrailer Hire! Page 25 of 25...
Need help?
Do you have a question about the EXPLORER and is the answer not in the manual?
Questions and answers