
Related Manuals for Power-Blox PBX-200 Pb

Summary of Contents for Power-Blox PBX-200 Pb
- Page 1 Swarm-enabled Solar Battery System Installation and operating instructions PBX-200 Pb PBX-200 Li PBX-200 Li/LE 06-2020...
-
Page 2: Table Of Contents
Protective equipment ..........................17 5.3.3 Potential hazards of AGM lead-acid batteries (PBX-200 Pb) ..............17 5.3.4 First aid measures for AGM lead acid batteries (PBX-200 Pb) ..............18 5.3.5 Measures in case of accidental release of lead acid ................18 5.3.6 Potential hazards of LiFePO4 batteries (PBX-200 Li) ................ - Page 3 The PBX-200 is overheated (whole display flashes orange) ..............41 RETURN / DISPOSAL ..........................42 10.1 ............................ 42 EMOVING THE BATTERY 10.2 ................................ 45 ISPOSAL DISCLAIMER ..............................46 LEGAL INFORMATION ..........................47 EU DECLARATION OF CONFORMITY ......................48 Installation and Operating Instructions PBX-200 Pb ; Li ; Li/LE Page 3...
-
Page 4: Introduction And General
With Power-Blox you can use solar energy in a simple, flexible and scalable way. No matter whether you use a Power-Blox as a single device, combined as a tower or even as a Power Wall of up to nine or more devices. -
Page 5: Contact Details
Do not dispose of the product with household waste, but after valid disposal regulations for electronic waste. 1.4 General Safety Instructions This manual is an integral part PBX 200 product and is provided digitally on the Power-Blox AG website. - Page 6 Persons who do not have sufficient experience and knowledge Unless they have been instructed in the use of the device by a person responsible for their safety. People with a pacemaker. Never operate the PBX-200 with safety-relevant devices. Installation and Operating Instructions PBX-200 Pb ; Li ; Li/LE Page 6...
-
Page 7: Scope Of Delivery, Transport And Storage
2 Scope of delivery, transport and storage 2.1 Available versions The product is available in several configurations: 1. With network and network-independent charging capability (PBX-200 Li, PBX-200 Pb) 2. Only with mains-independent charging capability (PBX-200 Li/LE) For details of the differences, see chapter 4. -
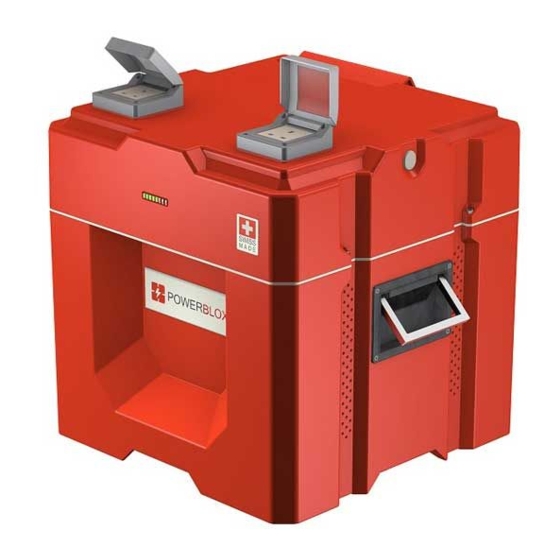
Page 8: Overview Of The Pbx-200
2.1 A (5). The additional 12 V car socket (4) to the left of the main switch supplies up to 3 A. In total, consumer devices with a total output of 36 W can be connected to (4) and (5). Installation and Operating Instructions PBX-200 Pb ; Li ; Li/LE Page 8... - Page 9 The clamp connections are an alternative way of connecting the PBX-200 to a solar module (16) or an external 230 V power source (18). Several solar modules can be connected to the PBX-200 in parallel. The Installation and Operating Instructions PBX-200 Pb ; Li ; Li/LE Page 9...
- Page 10 16 Terminal block Transfer connection 17 Micro-USB connection (for service work) 18 Terminal block for mains / generator input 19 Terminal block Solar connection 20 Strain relief web 21 Carrying handle Installation and Operating Instructions PBX-200 Pb ; Li ; Li/LE Page 10...
-
Page 11: Properties And Technical Data
0.1 ... 1 Quantity For each additional PBX-200 connected, the maximum continuous power decreases by 175 VA. For each additional connected PBX-200, the maximum continuous current decreases by 0.75 A. Installation and Operating Instructions PBX-200 Pb ; Li ; Li/LE Page 11... - Page 12 220-240 V Continuous power 200 VA Power for 3 sec. 400 VA Output frequency range 47 Hz... 64 Hz Distortion factor <4% Power factor (Cos ϕ) 0.1 ... 1 Installation and Operating Instructions PBX-200 Pb ; Li ; Li/LE Page 12...
- Page 13 At continuous operating temperatures above 45°C the batteries age significantly faster. General data PBX-200 Pb PBX-200 Li PBX-200 Li/LE Weight 51.4 kg 20.6 kg 20.0 kg Dimensions (W / H / D) 400mm / 443mm / 400mm Installation and Operating Instructions PBX-200 Pb ; Li ; Li/LE Page 13...
-
Page 14: Pbx-200 Pictorial Schematic
4.1 PBX-200 pictorial schematic Figure 5: PBX-200 schematic diagram Installation and Operating Instructions PBX-200 Pb ; Li ; Li/LE Page 14... -
Page 15: Safety And Accident Prevention
Important note Local and national laws and guidelines as well as applicable standards must be observed. Installation and Operating Instructions PBX-200 Pb ; Li ; Li/LE Page 15... -
Page 16: Information About The Batteries
Improper use can lead to overheating, smoke, fire and serious injury. In addition, the handling instructions and / or the safety data sheet of the battery manufacturer must be observed. Installation and Operating Instructions PBX-200 Pb ; Li ; Li/LE Page 16... -
Page 17: Protective Equipment
Always wear suitable protective equipment when working with lead-acid batteries. Observe the handling instructions and the information on the battery manufacturer's safety data sheet. Installation and Operating Instructions PBX-200 Pb ; Li ; Li/LE Page 17... -
Page 18: First Aid Measures For Agm Lead Acid Batteries (Pbx-200 Pb)
5.3.4 First aid measures for AGM lead acid batteries (PBX-200 Pb) Sulphuric acid: Has a corrosive and tissue-destroying effect. After skin contact Rinse with water for at least 15 minutes, remove wetted clothing and wash. After inhalation of acid mist Breathe fresh air. -
Page 19: Measures In Case Of Accidental Release Of Lifepo4 Batteries Electrolyte
3. If possible, switch off the power supply and fight the fire. 5.4.2 Fire fighting measures for AGM lead-acid batteries (PBX-200 Pb) Suitable extinguishing media: For electrical fires in general, water and foam are suitable extinguishing agents. For incipient fires, extinguishing with CO2 is the most effective solution. -
Page 20: Installation And Commissioning
Connect only one conductor to each terminal. Lay the cable so that: — connections cannot become loose accidentally. — persons cannot step on or trip over it. — fire protection equipment is not affected. Installation and Operating Instructions PBX-200 Pb ; Li ; Li/LE Page 20... -
Page 21: Site Conditions
The installation location of the PBX-200 must be out of the reach of animals / pets. The installation location of the PBX-200 must be out of the reach of children. Installation and Operating Instructions PBX-200 Pb ; Li ; Li/LE Page 21... -
Page 22: Connecting The Solar Module To The Pbx-200
6.5.) The PBX-200 must be easily accessible and the LED display must be clearly visible. The PBX-200 Pb weighs about 51.4 kg (Li version 20.6 kg). Therefore, the device must be moved by at least two persons. Personal protective equipment (protective clothing, safety shoes, gloves) must always be worn when moving PBX-200. -
Page 23: Plug Mounting Of The Solar Connection
In addition, the plug can also be purchased separately from specialist dealers. The plug is a Neutrik NAC3FX-W. Alternatively, the solar cable can also be connected to the terminals (19) of the Power-Blox. In this case the solar plug described above is not required. -
Page 24: Coupling Of Pbx-200
The memory of the combined system is increased. The daily energy yield from the sun is increased. The entire system can be charged by connecting a single Power-Blox to a mains / generator connection The individual power elements can simply be added together in such a coupling: 1 PBX-200 = 200 W power, 1.2 kWh storage tank (Pb version 1'392 kWh), 200 W solar... - Page 25 Figure 11: Two paired PBX-200s as "Power Tower Danger No towers higher than three units may be formed. Each PBX-200 Pb weighs 51.4 kg (Li version 20.6 kg) and a high tower could fall and injure people. Higher towers are unstable and may easily tip over if they are not properly secured or if they are placed on unstable or sloping ground.
-
Page 26: Minimum Distances
When placing multiple PBX-200 or Power towers next to each other, make sure there is a minimum distance of at least 10 cm between the units and at least 20 cm from an adjacent wall. Installation and Operating Instructions PBX-200 Pb ; Li ; Li/LE Page 26... -
Page 27: Interconnecting Several Towers To Form A "Power Wall
Connection of a generator with a self-made cable. Connection to the public power supply system with a self-made cable. Connection to a fuse box, e.g. to supply a building installation. Installation and Operating Instructions PBX-200 Pb ; Li ; Li/LE Page 27... - Page 28 The flap can also be completely removed for better handling. To do this, press the left locking tab slightly to the side with your finger and unthread the flap. Installation and Operating Instructions PBX-200 Pb ; Li ; Li/LE Page 28...
-
Page 29: Connecting The Terminal Cables
The terminals can then be closed: When closing, make sure that the terminals are completely closed and that the clamp does not protrude: Installation and Operating Instructions PBX-200 Pb ; Li ; Li/LE Page 29... -
Page 30: Interconnection Types
Prior to installation, it must be ensured that the relevant applicable laws and national regulations have been complied with and that all safety criteria have been observed. Installation and Operating Instructions PBX-200 Pb ; Li ; Li/LE Page 30... -
Page 31: Solar-Powered Pbx-200
After a few seconds, the PBX-200 will synchronise itself to the house internal network and start charging. Consumer Socket on the public mains Figure 18: Solar and network operated PBX-200 with consumer device Installation and Operating Instructions PBX-200 Pb ; Li ; Li/LE Page 31... -
Page 32: Backup System
The PBX-200 has no UPS (uninterruptible power supply) characteristics! In the event of a power failure, there may be a brief interruption in the power supply to the consumer devices until the Power-Blox has synchronized with the swarm network. -
Page 33: Install Pbx-200
An exception is charging via the network / generator. Here it is sufficient to connect a single PBX-200 to the network to cross-charge the remaining PBX-200s. Installation and Operating Instructions PBX-200 Pb ; Li ; Li/LE Page 33... -
Page 34: Installation Of Power Systems Larger Than Nine Pbx-200
1. Install several PowerWalls according to the previous chapter. 2. Within the building distribution board, the individual Power Walls are each protected by a 10 A (type B) circuit breaker. Installation and Operating Instructions PBX-200 Pb ; Li ; Li/LE Page 34... -
Page 35: Operation
Figure 21: LED display charge level It is preferable to always operate the Power-Blox in the green range. If you notice that the display regularly reaches the orange or red area, this indicates that the Power-Blox system is too small. If possible, add more PBX-200s to the system until the system is only operated in the green range. -
Page 36: Display Of The Battery Status
During repair work to rectify an overload situation, it is therefore essential to ensure that all PBX-200s in the system are switched off and that no unintentional automatic restart occurs! Installation and Operating Instructions PBX-200 Pb ; Li ; Li/LE Page 36... -
Page 37: Important Aspects Of Handling Batteries
When operating lead-acid batteries, avoid deep discharges. The Power-Blox system prevents deep discharges by switching off before a critically low level is reached. Operating the PBX-200 Pb in the green range (charge level 50%-100%) saves the battery. The lifetime of lead-acid batteries is also affected by the ambient temperature. -
Page 38: Maintenance
PBX-200 data sheet. Installation and Operating Instructions PBX-200 Pb ; Li ; Li/LE Page 38... -
Page 39: Repair And Troubleshooting
9 Repair and troubleshooting In case of malfunction, please contact your local dealer. Repair work may only be carried out by a service technician authorized by Power-Blox AG. 9.1 Troubleshooting If the system is not working properly, you can proceed as described here. -
Page 40: The Pbx-200 Has A Voltage At The Sockets, But Not Full 230 V
Check whether the fuse of the battery is defective. How the fuse can be exposed can be read in chapter 10.1 under points 1-3. If the fuse is intact, the PBX-200 should be checked by a certified Power-Blox service technician. -
Page 41: The Pbx-200 Is Overheated (Whole Display Flashes Orange)
Switch on the PBX-200 via the main switch and connect the solar module to the PBX-200. If these actions do not solve the problem, the PBX-200 should be checked by a certified Power- Blox service technician. Installation and Operating Instructions PBX-200 Pb ; Li ; Li/LE Page 41... -
Page 42: Return / Disposal
1. Unscrew the four screws securing the cover with an S2 PH2 screwdriver. See illustration22. Figure 22: Remove the cover of the PBX-200 2. Uncoil the transfer cable on the back of the PBX-200. Installation and Operating Instructions PBX-200 Pb ; Li ; Li/LE Page 42... - Page 43 4. Remove the fuse by hand as shown in the figure24. Figure 24: Remove the fuse 5. Loosen the two screws on the battery terminals and remove the battery cable. (See figure 25) Installation and Operating Instructions PBX-200 Pb ; Li ; Li/LE Page 43...
- Page 44 Figure 26: Remove the temperature sensor 7. Now the two screws of the safety cable can be loosened and the safety cable removed. (SeeFigure Installation and Operating Instructions PBX-200 Pb ; Li ; Li/LE Page 44...
-
Page 45: Disposal
Do not dispose of the device in household waste! Dispose of the device or used batteries at the collection point designated in your country or send the device to Power-Blox AG customer service at the end of its service life with the note "For disposal". -
Page 46: Disclaimer
Power-Blox. The manufacturer reserves the right to make changes to the product, the technical data or the installation and operating instructions without prior notice. Installation and Operating Instructions PBX-200 Pb ; Li ; Li/LE Page 46... -
Page 47: Legal Information
Please keep this documentation in a safe place so that it is available to all persons who carry out activities in connection with PBX-200. All information contained in this manual is the property of Power-Blox AG. Copying or reproduction, in whole or in part, is only permitted with the prior written consent of Power- Blox AG. -
Page 48: Eu Declaration Of Conformity
13 EU Declaration of Conformity Installation and Operating Instructions PBX-200 Pb ; Li ; Li/LE Page 48... - Page 49 Dealers: Street, no: Postcode, place: Land: Phone: E-mail: website: Notes guy: .......... serial number .......... MAC address: .......... Installation and Operating Instructions PBX-200 Pb ; Li ; Li/LE Page 49...
Need help?
Do you have a question about the PBX-200 Pb and is the answer not in the manual?
Questions and answers